
 AUDIO FILTER DIY's AUDIO FILTER DIY's
IMPROVE TONE QUALITY - Change The Low Pass Filter Cutoff From 3.6kHz To 20kHz HEIGHTEN AUDIO CLARITY AND REDUCE NOISE - Replace Two Op‑Amp IC's For Superior Audio RAISE VOLUME OUTPUT - Increase Output Gain For The Left And Right Audio Outs MISC. DIY's / DOCUMENTS / PATCHES
SYSEX PATCH READER - Free Web Browser Utility To Read FB‑01 MIDI Bulk Data Dump *.SYX Files (Mac / Windows / LINUX) FREE PATCHES - 3,000+ Free FB‑01 Patches VOICE BANK #2 - Useful Info re: Loading Voice Bank #2 EDISYN / FREE PATCH EDITOR - A Free FB‑01 Patch Editor Available For Mac OS X, Windows And Linux BATTERY REPLACEMENT - Internal Battery Removal And Replacement POWER SWITCH & AUDIO JACKS - Replacement Part Numbers And Specs DOCUMENTS - FB‑01 Secrets, SysEx Control, 1986 Intro, Gatefold Sales Brochure. Ghosts In The Machine Part 1 & Part 2 FACTORY RESET - Procedure To Automatically Reload The Factory Patches TROUBLESHOOTING - A Couple Of Things To Try If You Are Having Issues HAIRLINE SOLDER FRACTURES - Random Reboots, Power Issues, Overheating And Other Intermittent Problems CHEAP-O MIDI INTERFACES - SysEx Errors, Dump Errors, System Lock-Ups And Other MIDI Communication Issues |
||
| AUDIO FILTER DIY's | ||
| IMPROVE TONE QUALITY
FROM 3.6kHz TO 20kHz Listen To "Before/After" Audio |

|
|

(4) 3.3nF Polyester Film Capacitors, 50V* 647-QYX1H332KTP - mouser.com or A-414 - taydaelectronics.com Note: I chose Nichicon P/N: QYX1H332KTP because it is a high quality capacitor and has the same 3.5mm lead spacing as the original. Any brand 3.3nF polyester film capacitor will work as long as it has a DC voltage rating 50V or greater. Because this is for an audio circuit, I highly recommend using a quality brand name like Panasonic, TDK, WIMA, Nichicon, or Kemet (a.k.a Arcotronics) 
I suggest using Single Column DIP Sockets for these four capacitors. Changing the capacitor values will be very simple and allows you to find the right one for your musical tastes. Single Column DIP Sockets: 855-D01-9972042 - mouser.com -or- taydaelectronics.com - P/N: A‑1605 NOTE: Polyester and polypropylene capacitors are extremely susceptible to heat. I always use Single Column DIP Sockets when using these style capacitors so I don't have to worry about that. If you decide to solder these capacitors directly to the PCB, it's good practice to use a heat sink * Update: One year after posting this mod, I've received eMails from DIY visitors who have decided to substitute 6.8nF or 10.0nF caps instead because they say the 3.3nF caps produce a sound which is "too hot" for their use. Of course, everyone has different tastes. I mainly use my FB‑01 for Industrial, Sound FX and Unusual Noises so for me... the hotter the better! 
6.8nF = 647-QYX1H682KTP - mouser.com or A-421 - taydaelectronics.com 10nF = 647-QYX1H103KTP - mouser.com or A-1763 - taydaelectronics.com |
||
| HEIGHTEN AUDIO CLARITY
AND REDUCE NOISE Listen To "Before/After" Audio |
Background: Just about every online review of the FB‑01 mentions issues about noise. Some FB‑01 owners like the noise for recording tracks with that "industrial" flavor while others do not. Yamaha sourced JRC4556D op‑amps for the FB‑01 which are low priced and have a Slew Rate* of 3V/µs. Imagine if these were replaced with some hi‑fidelity, high‑performance op‑amps with a higher Slew Rate to eliminate noise! I chose to use mid‑priced OPA2134PA op‑amps at $6/each which are higher quality but not too pricey. The OPA2134PA has a slew rate of 20V/µs. This is nearly 7x greater than the factory installed JRC4556D op‑amps. Another op‑amp with a Slew Rate of 20V/µs is the LM4562. The LM4562 may also work but, I can't verify this since I have not tested that part number
*IC's with limited Slew Rates can cause noise and distortion at high output frequencies and amplitudes. This is why IC's with a higher Slew Rate are more desirable and more expensive |
|

(2) OPA2134PA Op-Amps (2) 8-Pin Tooled IC Sockets 595‑OPA2134PA ‑ mouser.com or A‑856 ‑ taydaelectronics.com 575-199308 - mouser.com or A-857 - taydaelectronics.com |
||
| RAISE VOLUME OUTPUT
Listen To "Before/After" Audio |
Background: FB‑01 owners have always complained about low gain from the audio outs. A factory stock FB‑01 has an output gain level of 3. This mod replaces two 4.7K Ω resistors with two 10K Ω resistors to raise the output gain level to 5 with no clipping after effects | |

(2) 10K Ω 1/4W Metal Film Resistors, 1% Tolerance 660-MFS1/4DCT52A1002 - mouser.com or A-2203 - taydaelectronics.com
* Update: After this mod has been online for a couple of years, some purists have commented that this additional volume mod adds a level of extra distortion to the total volume output. That it does! I don't use my FB‑01 for Piano and Violin sounds. I use it for Industrial and Sound Effects so I like it LOUD! I suggest using Single Column DIP Sockets for these two resistors. If you don't care for the additional volume output, changing the resistors back to their original values of 4.7K Ω will be very simple. And... also simple to change the resistors to anything in‑between. Single Column DIP Sockets are available from taydaelectronics.com - P/N: A‑1605 |
||
| The YouTube channel of Jiří V. has an excellent comparison on the oscilloscope of the "Before" and "After" showing the upgraded performance value
|
||
|
Click on images to enlarge → |
Component Location Detail

|
Schematic With Notations

|
|
All of the modifications shown above were compiled from various discussions I have found on the Internet. I have performed all of these mods on two FB‑01's I own. They are completely revitalized and sound better than ever. Of course, the results are subjective and I've had comments from other FB‑01 owners who say they prefer the original sound. Detailed discussions about all modifications shown above are here, here and here
Safety Precautions Modifications made to any factory stock equipment will always pose an element of risk. Sometimes mistakes are made which are irreversible. Improper soldering and handling of electricity can cause serious injury and damage the FB‑01. Use caution when handling static sensitive devices and the PCB. Make sure you are properly grounded, working on a static‑free workbench or table and wearing eye protection during any soldering tasks. The author is not responsible for any damage or injury resulting from this DIY info. Use this DIY information at your own risk. And, I can't stress enough, the importance of wearing eye protection while soldering. That stuff flies everywhere sometimes! |
||
| FREE PATCHES, EDITORS, DOCUMENTATION, DIY's & MORE | ||
| PATCHES | ||
|
|
||

|
||

So was I until I found a workaround. I've put together a couple of solutions on how to get the job done |
||
| EDISYN (FB-01 PATCH EDITOR) | ||
|
FREE !!!
EDISYN from developer Sean Luke is a synthesizer editor that gives you control over the FB‑01 (and more than 80 other synths!) via custom made MIDI editing synthesizer templates. It also has unlimited levels of undo, CC and NRPN mapping, real‑time updates, test notes and chords and some MPE support. Sean has also built‑in a range of creative tools to help with patch generation. These include randomization, patch merging and blending of random patches, pushing patches closer towards other patches (very interesting), morphing interpolation between four patches and more 
|
||
| INTERNAL BATTERY | ||
| P/N: CR2032 | 
 Battery Replacement DIY Battery Replacement DIY
|
|
| SPECIFICATIONS | ||
| WIDTH | DEPTH | HEIGHT |
| 8 7/16" (218 mm) | 10 13/16" (274 mm) | 1 7/8" (48 mm) |
| WEIGHT | POWER CONSUMPTION | POLYPHONY |
| 4 lb. 6 oz. (2.1 kg) | 9 Watts | Up To 8 Notes |
| SOUND | TONES | MEMORY |
| FM Tone Generator
4 Operators / 8 Algorithms |
7 Voice Banks x 48 Voices Each Bank
A Total Of 336 Tones |
240 Tones (ROM) / 96 Tones (RAM)
4 ROM Configurations / 16 RAM Configurations |
| REPLACEMENT POWER SWITCH* Power Rating: 6A @ 250V AC Type: Solder Lug - DPST (ON/OFF) Panel Opening: 13mm x 19mm |
||

|

|

|
| CWSB21AA2F
mouser.com |
A-5091
taydaelectronics.com |
A-5092
taydaelectronics.com |
| * The original FB‑01 rocker switch has a solitary dot as its actuator marking on the face. After evaluating all three switches, I prefer the higher quality switch from Mouser. I've posted two alternative switches from Tayda because of the low cost and the high visibility of the red switch A‑5092. These have the same power rating as the Mouser switch and will work equally well. As of August 2024, the price for the Mouser switch was $4.64 (USD) and the price for the Tayda switches was 29¢ and 26¢ | ||
| REPLACEMENT AUDIO OUT JACK (LEFT AND RIGHT)
Size: 6.35mm (1/4") Type: Solder Pin (3-Pin Mono w/Switch) Silkscreen Locations: JK1 and JK2 |
||

|
 
|
|
| UPC: 711331498014
ASIN: B00X77SADC Model: US-SA-AJD-121564 |
Note: The PCB footprint has Pin #2 and Pin #4 slightly off‑center (blue dots)
Tayda SKU: A-5238 will not work |
|
| DOCUMENTS | ||
| There was a great article in the January 1989 edition of Electronic Musician Magazine titled "Secrets Of The Yamaha FB‑01". This article covers a lot of "hands‑on" applications using SysEx to unleash the FB‑01. This article is a must read if you have any interest in controlling parameter changes using SysEx codes
|
||
| A brief review of the "Brand New" FB‑01 in the November 1986 edition of Electronic Musician Magazine
|
||
| Yamaha User's Group Magazine Aftertouch from July 1986 featuring an article titled "Introducing Yamaha's Multi‑Timbral, Multi‑MIDI‑Channel FM Tone Module"
|
||
| Yamaha User's Group Magazine Aftertouch from September 1988 featuring an article titled "Percussion Secrets Of The FB‑01"
|
||
| Yamaha's 6‑page gatefold sales brochure from 1986
|
||
| FB-01 Owner's Manual (v04/1988)
|
||
| FB-01 Service Manual (v09/1986)
|
||
| I have added this document to the webpage since it covers a wide range of Yamaha series synths (DX, TX, RX, QX, FB). Two articles from the May 1989 and July 1989 editions of Electronic Musician Magazine titled "Ghost In The Machine". These articles discuss test routines inside synths and samplers which might help save you a trip to the repair shop. Some of the other brands featured are Roland, Oberheim, Kawai, Ensoniq & Korg
|
||
| SYSEX FILE VERIFICATION UTILITY | ||


Operating System: Any Computer With A Web Browser |
||
| TROUBLESHOOTING | ||

(click for larger image)
If you have signal bleed‑through when assigning different sounds to the left and right outputs, the problem is most likely the transistors TR1, TR2 and/or TR3. These transistors are part of the audio switching circuit and apparently, "leaky transistors in muting circuits" are a thing. Replacing these three transistors will most likely solve the problem Yamaha OEM Part #'s
    TR1 = NJM7805A   (+5V) TO-92 package
    TR2 = NJM78M05A  (+5V) TO-92 package
    TR3 = MJM79M05A  (-5V) TO-92 package

The FB‑01 comes with an internal memory battery which maintains the settings of custom Voices and Configuration Memories when there is no power supplied to the unit. This battery, however, can be switched OFF when necessary to extend the life of the battery. Set the [OFF/ON] MEMORY POWER SWITCH located in the rear of the unit to ON to protect custom Voices and configuration memories. Do your Voices continue to disappear even though this switch is turned ON? If so, the internal memory battery should be replaced using the instructions at this link NOTE: When the unit is NOT being used to store custom Voices and Configuration Memories, turn the [OFF/ON] MEMORY POWER SWITCH to OFF A Lot Of Pooled Information Is At The "Yamaha FB-01 Owners" Facebook Page This "Yamaha FB-01 Owners" group is a great resource for asking FB-01 questions with 300+ members and growing larger every day |
||
| MY TAKE ON THE FB-01 | ||

Several FB‑01 owners go one step beyond and scarf up a second FB‑01 module for only $99 and spend extra time slightly detuning similar Patches and Voices. When the two modules are broken into their own Left and Right channels on the mixing board and played on the same MIDI channel, listening to the stereo separation is a real joy. Even if you have only one FB‑01 in your studio, it still has some advanced features to make it sing. Check out this blurb from the original 1986 Yamaha Gatefold Brochure
|
||
 I Think These Two Topics Are Important Enough To Place On All Of My Synth INFO Webpages I Think These Two Topics Are Important Enough To Place On All Of My Synth INFO Webpages |
||
1) I buy a lot of broken synths on eBay and I'm able to fix about 90% of everything I find. It's usually a simple fix. If you have a synth with no power or intermittent problems after it warms up, it's probably due to the fact that back in the 1980's Roland and other synth makers used sub‑par solder and/or not enough solder to hold components in place. After 30+ years, the solder begins to break down and hairline fractures appear. This occurs at a higher rate for components which generate a lot of heat like Bridge Rectifiers, Power Transistors, large Electrolytic Capacitors, power input jacks and audio jacks which get a lot of use. The best approach is to use a magnifying glass and carefully inspect the backside of the circuit board. If you spot any suspect areas, re‑flow a hefty amount of NEW solder
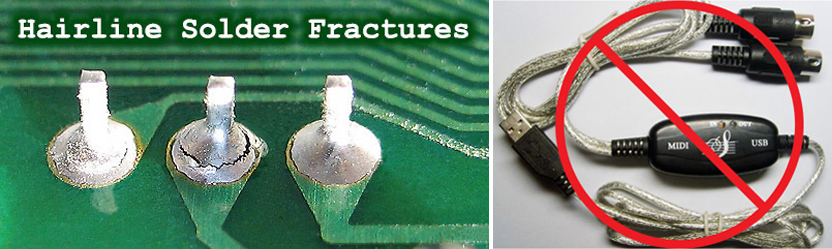
2) I receive a lot of eMails and field many questions at synth related forums and also on Facebook. The most common question I get about problems with a synth has to do with errors when trying to load Patches and Tones. About 99.9% of the time, the problem always turns out to be a crappy MIDI interface. If you have a cheapo MIDI interface which looks similar to the one shown on the right... throw this piece of shit in the trash! Do It Now. Seriously! This thing is total junk and you get what you pay for. Inexpensive MIDI interfaces like this are unable to properly regulate the buffering of MIDI data. They will work fine with simple messages such as CC, Note On, Note Off, etc... however, when you try to send SysEx messages which are much longer, the SysEx data cuts off after only sending a few bytes. Investing in a higher quality MIDI interface will solve Load/Save errors and other communication problems. Also, if you experience errors when transferring Patch and Tone data from a computer to a synthesizer, DON'T use a USB hub. Plug your MIDI interface directly from the computer to the synthesizer. Why? Some external USB hubs fail when multiple USB devices are attached because there is not enough power to share. Small power sags will suddenly cause one or ALL of the attached USB devices connected to the hub to fail, often accompanied with a "disconnect" signal These MIDI interfaces have been tested and will work with large SysEx Dumps: ✓ Focusrite Scarlett 2i4 2nd Gen ✓ M-Audio Profire 2626 ✓ ESI Midimate eX ✓ ESI Midimate II ✓ Focusrite Scarlett 4i4 2nd Gen ✓ Miditech MIDIface II Thru ✓ Yamaha UX 16 USB/MIDI ✓ MOTU 823 mk3 ✓ Focusrite Scarlett 6i6 3rd Gen ✓ Tie Studio MIDI 1i1o ✓ Miditech MIDIface 4x4 ✓ RME FireFace UC 2X2 ✓ iConnectivity mio 1x1 ✓ iConnectivity mioXC 1x1 These MIDI interfaces are shit and do not work with large SysEx Dumps (some might w/special driver): ✗ AVID/M-Audio Fast Track Pro ✗ M-Audio MIDISport UNO ✗ M-Audio MIDISport 1x1 ✗ M-Audio Uno ✗ M-Audio MIDISport 2X2 ✗ Lekato MIDI USB ✗ Hosa USM-422 MIDI ✗ Fore MIDI Interface ✗ DigitalLife MIDI-C01 ✗ Hosongnic, Urweonu, HiFangeow, etc... |
||
|
Other Synthesizer And Sampler Homepages I Maintain 
|
||

If you find some of this DIY info useful, please consider donating a small amount. All donations are used for future DIY sampler development and free info. Thanks!

|

|
All images, text, JavaScript and HTML Code ©1995- by llamamusic.com
The Information On This Page Is Current As Of
WEBSITE DISCLAIMER
Last updated October 31, 2014
1) You may not copy, reproduce, republish, disassemble, decompile, reverse engineer, post, make available to the public, or otherwise use the content of this website (including all software applications, scripts, webpages, design elements, and graphics) for commercial gain in any way
2) By using the llamamusic.com website and its services you agree to be bound by these terms, which shall take effect immediately on your first use of this website. You may not use llamamusic.com services if you do not accept the terms. If you do not agree to be bound by all of the following terms please do not access and use llamamusic.com. llamamusic.com reserves rights to block violators of these terms from using its services or restrict their access in any form at any time
3) You agree that lawful owners of llamamusic.com own all legal right, title, copyrights, design rights, and other intellectual property rights (registered and unregistered) in this website and all content (including all software applications) located on the site
4) llamamusic.com website content and services are provided "AS IS" and on an "AS AVAILABLE" basis. To the extent permitted by law, llamamusic.com excludes all representations and warranties (whether express or implied by law), including the implied warranties of satisfactory quality, fitness for a particular purpose, non‑infringement, compatibility, security, and accuracy. llamamusic.com does not guarantee the accuracy, completeness, or performance of the website or any of the content and services. While we try to ensure that all functionality provided is correct, no responsibility is accepted by or on behalf of llamamusic.com for any errors or inaccurate content on the website
5) llamamusic.com shall not be liable for any of the following losses or damage (whether such damage or losses were foreseen, foreseeable, known, or otherwise): (a) loss of data; (b) loss of revenue or anticipated profits; (c) loss of business; (d) loss of opportunity; (e) loss of goodwill or injury to reputation; (f) losses suffered by third parties; or (g) any indirect, consequential, special or exemplary damages arising from the use of llamamusic.com and its services regardless of the form of action
6) You agree to use this website only for lawful purposes, and in a way that does not infringe the rights of, restrict or inhibit anyone else’s use of llamamusic.com
7) The information provided by llamamusic.com ("we," "us," or "our") on llamamusic.com (the "Site") is for general informational purposes only. All information on the Site is provided in good faith, however we make no representation or warranty of any kind, express or implied, regarding the accuracy, adequacy, validity, reliability, availability, or completeness of any information on the Site. UNDER NO CIRCUMSTANCE SHALL WE HAVE ANY LIABILITY TO YOU FOR ANY LOSS OR DAMAGE OF ANY KIND INCURRED AS A RESULT OF THE USE OF THE SITE OR RELIANCE ON ANY INFORMATION PROVIDED ON THE SITE. YOUR USE OF THE SITE AND YOUR RELIANCE ON ANY INFORMATION ON THE SITE IS SOLELY AT YOUR OWN RISK
EXTERNAL LINKS DISCLAIMER
The Site may contain (or you may be sent through the Site) links to other websites or content belonging to or originating from third parties or links to websites and features in banners or other advertising. Such external links are not investigated, monitored, or checked for accuracy, adequacy, validity, reliability, availability, or completeness by us. WE DO NOT WARRANT, ENDORSE, GUARANTEE, OR ASSUME RESPONSIBILITY FOR THE ACCURACY OR RELIABILITY OF ANY INFORMATION OFFERED BY THIRD‑PARTY WEBSITES LINKED THROUGH THE SITE OR ANY WEBSITE OR FEATURE LINKED IN ANY BANNER OR OTHER ADVERTISING. WE WILL NOT BE A PARTY TO OR IN ANY WAY BE RESPONSIBLE FOR MONITORING ANY TRANSACTION BETWEEN YOU AND THIRD‑PARTY PROVIDERS OF PRODUCTS OR SERVICES
AFFILIATES DISCLAIMER
The Site may contain links to affiliate websites. Our affiliates include the following:
• supersynthprojects.com • vecoven.com • super-jx.com
