Configuring An S‑550, W‑30 Or S-760 Sampler To Boot From A SCSI Device
For the The S‑550 and W‑30, Roland's definition of "booting" from the hard drive is very misleading. The S‑550 will only boot from a hard drive, SCSI2SD or ZuluSCSI if there is a properly configured 3.5" disk in the Floppy Disk Drive (FDD) or if a disk image file with a valid O/S is loaded into a GOTEK USB Floppy Drive Emulator (USB/FDE). From what I have discovered by trial and error, the W‑30 does the complete opposite of the S‑550 and will only boot from a hard drive, SCSI2SD or ZuluSCSI if there is no floppy disk inserted! Loading the W‑30 O/S from a SCSI device now takes only 20 seconds as compared to the slower FDD or USB/FDE which takes almost 2 minutes. For the S‑760, Loading the O/S from a SCSI device now takes only 1 second! The boot configurations outlined below will work with an external SCSI hard drive, ZIP drive (S‑760 only), SCSI2SD or ZuluSCSI
*** SPECIAL NOTES ***
- In order to use instructions shown on this page, the S‑550 and S‑760 are required to have a mouse and monitor connected
- The W‑30 will need to have the Fujitsu MB89352AP SCSI IC chip installed (also known as the Roland KW‑30 Upgrade Kit) and the S‑550 will need to have the HD5‑IF SCSI card installed
- All commands and configurations used in this setup guide were made using these three Startup Utility Boot Disks. Using different version boot disks other than these three will display inconsistent menu commands and in some cases will limit the use of multiple SCSI hard drives and other SCSI devices
 S-550 / CD‑5 CD‑ROM Utility Disk v1.00 S-550 / CD‑5 CD‑ROM Utility Disk v1.00
W-30 / Hard Drive And CD‑ROM Utility Disk v1.07
S-760 / System Utility Disk v2.24
|

Using a Roland factory default S‑550 floppy boot disk (HD5‑IF Hard Disk Utility v1.03 ‑ CD‑5 CD‑ROM Utility Disk v1.02, CD‑5 CD‑ROM Utility Disk v1.00, etc...) as is will not enable the hard drive, SCSI2SD or ZuluSCSI to boot. As usual, another typical Roland default which works the opposite way of logical thinking! As is, a Roland factory default floppy boot disk will only enable hard drive access via loads, saves, HD setup utilities, HD format, etc... You will need to change the configuration settings and save it to the floppy boot disk before the O/S will boot from a hard drive, SCSI2SD or ZuluSCSI
When you press the power button on the S‑550, it does it's usual hardware system initialization and then goes out to the FDD or USB/FDE to read the disk in the FDD. If it finds a floppy boot disk, it will do one of two things;
- If the floppy boot disk is a Roland factory default disk, the S‑550 will not boot from the hard drive, SCSI2SD or ZuluSCSI
- or -
- If the floppy boot disk configuration has been changed and saved using new S/Load I⇽Area and/or S/Load II⇽Area settings and the hard drive system was configured and saved, then the S‑550 will boot from the hard drive, SCSI2SD or ZuluSCSI
You must do the following to setup an S‑550 if you want it to always boot the from the hard drive, SCSI2SD or ZuluSCSI. You will only need to perform this setup once;
- Boot the S‑550 using a default floppy boot disk (HD5‑IF Hard Disk Utility v1.03 ‑ CD‑5 CD‑ROM Utility Disk v1.02, CD‑5 CD‑ROM Utility Disk v1.00, etc...) Note: I always use the CD‑5 CD‑ROM Utility Disk v1.00 disk because it's the only one which allows my setup to use a ZIP drive and more than one hard drive at a time. For unknown reasons, the HD5‑IF Hard Disk Utility v1.03 and CD‑5 CD‑ROM Utility Disk v1.02 disks won't enable my setup to use multiple SCSI devices
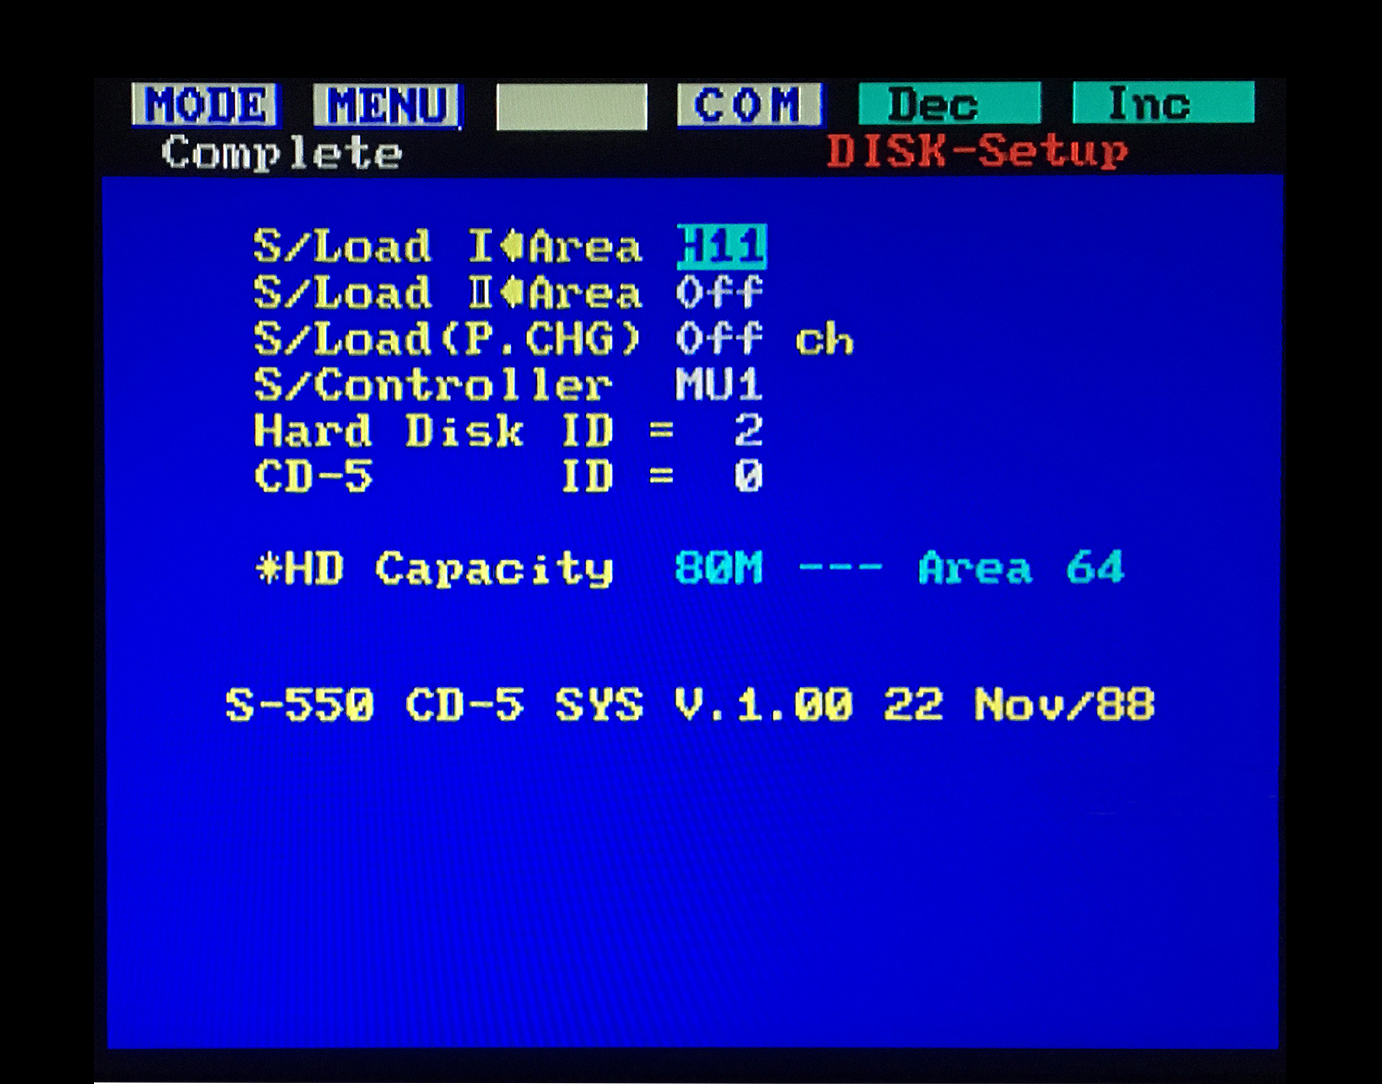
- Choose DISK > MENU > SETUP > S/Load I⇽Area and set it to any Patch from Area I or Area II on the hard drive, SCSI2SD or ZuluSCSI
For example: RSB‑5501 / Club E.Piano Splits w‑Bass which will make the top line look something like;
S/Load I⇽Area H11 Club E.Piano
- *** Note *** This next step will overwrite the floppy disk (or the current USB/FDE flash buffer)
Choose DISK > MENU > SETUP > COM > FD Save SYS
- Next, choose DISK > MENU > SETUP > COM > HD Save SYS
- Remove the floppy disk and power off the S‑550
*** If you are using a USB/FDE, don't forget to write the new disk image file back onto the USB stick! ***
- Wait 30 seconds and power on the S‑550
- Insert the newly created floppy boot disk or USB stick and the S‑550 will display the normal startup screen but with one exception:
A new line now appears at the bottom of the startup list ➤ S‑550 HD Loading 35.. 34.. 33.... 3.. 2.. 1..
 In this example, the screen above shows two hard drives connected to an S‑550
One hard drive is at SCSI Device ID#1, the other is at SCSI Device ID#4
The O/S will boot from the last hard drive in the SCSI chain, Device ID#4
This new line at the bottom of the screen shows that the S‑550 is now booting from the hard drive and not from the FDD or USB/FDE anymore. After counting down to zero, the RSB‑5501 / Club E.Piano Splits w‑Bass disk (or whichever sound disk you chose) will automatically load from the hard drive, SCSI2SD or ZuluSCSI into the Set I Area location. This can be changed easily by choosing a different S/Load I⇽Area on the hard drive, SCSI2SD or ZuluSCSI. There are 64 to choose from. You may also have a different sound disk load into the Set II Area location so that both Set Area I and Set Area II are loaded and ready to rock. Other default settings may also be configured including a choice between using the front panel buttons, a mouse or the RC‑100 and also MIDI Program Change Messages. When using the new floppy boot disk you just created, the S‑550 system on the hard drive, SCSI2SD or ZuluSCSI will always boot first. If you have more than one hard drive connected, the last hard drive in the SCSI chain (the hard drive with the largest device ID#) will be used as the boot disk. Keep this in mind if you change SCSI ID settings or remove a hard drive
If you are focused on the fastest boot speed possible, ensure that S/Load I⇽Area and S/Load II⇽Area are both turned Off and do not load anything. Note that if S/Load I⇽Area and S/Load II⇽Area are both turned Off, the "S‑550 HD Loading 35.. 34.. 33...." countdown message will not display as shown in the image above. Since no Patches and no Tones are configured to load at startup with these two Areas turned off, the O/S has already loaded at this point and there is nothing to countdown
Page 12 of the HD5‑IF Owner's Manual describes the S/Load I⇽Area and S/Load II⇽Area settings in more detail
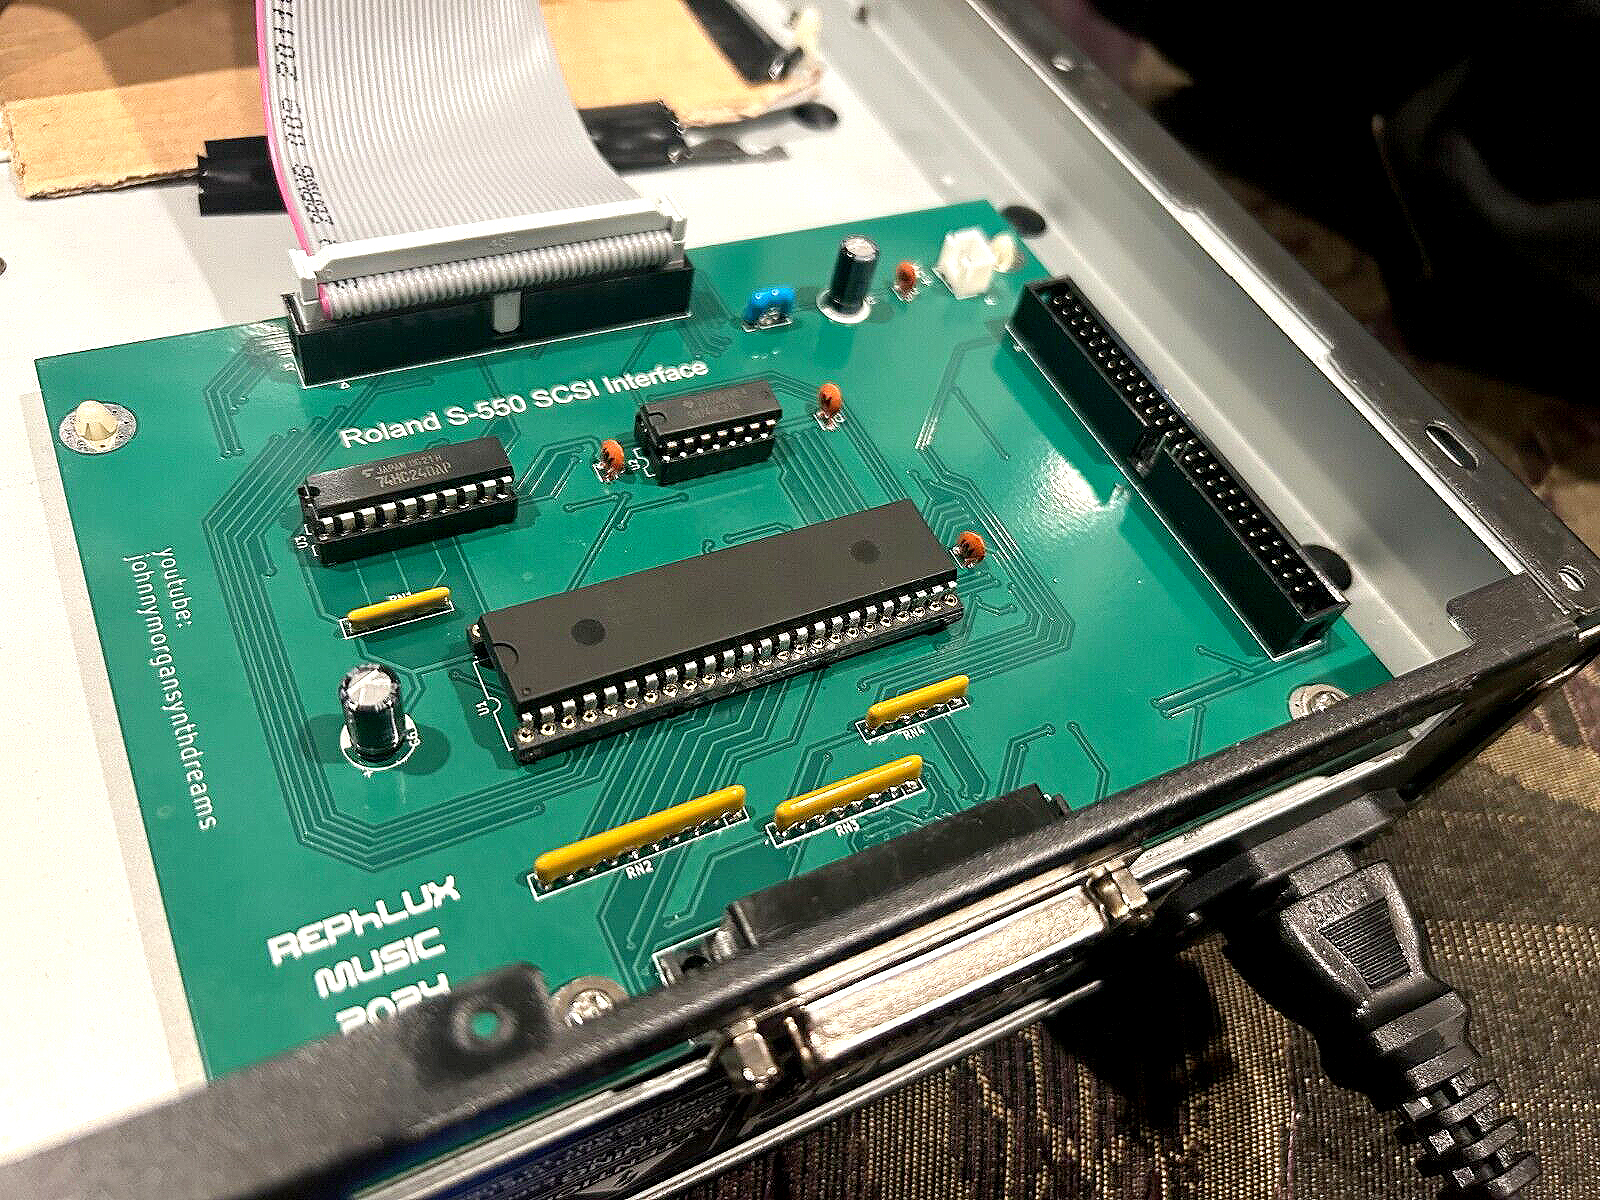
- The original HD5‑IF SCSI board is very hard to source because as I estimate, Roland only manufactured enough of these boards for 10% of the S-550's out there. If you are looking for one... you are in luck because Johnny Morgan has created a new HD5‑IF board! It has been reversed engineered from the original Roland schematics. I've been using this new SCSI board and have been getting fantastic results. The form‑factor is exactly the same as the original and it fits perfectly in my S‑550. I have tested it with SCSI2SD, ZuluSCSI, Quantum UltraSCSI hard drives and ZIP Drives. It works great! You can find ordering info and more from these links
Ordering Info
Johnny Morgan Synth Dreams - YouTube Channel
|

Setting up the W‑30 to boot from a hard drive, SCSI2SD or ZuluSCSI is the same regardless if you are using a factory stock W‑30 w/FDD or one fitted with a new GOTEK USB/FDE. Unfortunately, the W‑30 is unable to boot from a ZIP drive (more details are in the "Things To Note" section at the end of this page). I have verified that all three hardware configurations (3.5" Floppy / Generic GOTEK / GOTEK with FlashFloppy or HxC Firmware) will boot the W‑30 from a hard drive, SCSI2SD or ZuluSCSI. You will need to follow these initial steps first, then choose your device from the A ‑ B ‑ C ‑ D list below
- Boot the W‑30 from the floppy drive or GOTEK using the hard drive And CD‑ROM Utility Disk v1.07 boot disk
- Press the SOUND button
- Press the 8 button then press the ENTER button (8: SCSI Check ⇾ ENTER)
- Use the VALUE dial to select Hard Disk ID = n (where n = largest hard drive SCSI ID# connected in SCSI chain)
- Press the F5 Button (5: HD Utility)
- Press the 7 button then press the ENTER button (7: HD Convert ⇾ ENTER)
- Menu responds with "Are you sure?" (Note: There isn't a YES or NO button to press!)
- Press the F5 button (EXECUTE) ...In "Roland‑speak, this is the YES button... Duuuuuuh!!!

- The system will take a loooooong 8 minutes to convert the hard drive so be patient
- At this point, the busy light on the hard drive (or SCSI2HD) will be active as it counts down from 99% to 0%
- Next, use the VALUE dial to select Destination ID = n (80M) [S] (where n = the largest hard drive SCSI ID#)
- Press the F1 button (to [W] where "to W" indicates a W‑30 System HD and "S" indicates an S‑550 System HD)
- Press the 2 button then press the ENTER button (2: HD Save SYS ⇾ ENTER)
At this point, the busy light on the hard drive (or SCSI2HD device) should be active as it counts down from 70 to 0. After it's finished saving the new system to the hard drive (or MicroSD card in the SCSI2HD device), choose one of the methods below based on what kind of hardware is installed in your W‑30:
- A - Generic USB/FDE (GOTEK SFRM72‑FU‑DL with unmodified firmware) * Tested And Verified *
- Problem: What happens at boot time is, the W‑30 first goes out to the USB/FDE to load the O/S. If it finds the W‑30 disk image hard drive And CD‑ROM Utility Disk v1.07, or any other valid W‑30 System Disk, it will boot the O/S from the USB/FDE which takes forever to load
- Solution: Force the W‑30 to go look for a boot O/S some place other than the USB/FDE. If the disk image loaded in the USB/FDE is not a valid W‑30 O/S, the W‑30 will go look somewhere else for a valid O/S to boot from. If it finds a hard drive, SCSI2SD or ZuluSCSI with a valid O/S on it, the W‑30 will boot from there. To force the W‑30 to go searching somewhere else for the O/S, what I do is keep the S‑50 System/Sound Disk RSB‑502 #6 (MIDI STACK #1) disk image loaded in the GOTEK flash memory and it is always ready to load (or in this case, it is always ready NOT to load and be rejected). When the W‑30 finds the S‑50 System/Sound Disk in the USB/FDE when it's powered on, it rejects it and goes searching for a hard drive. If I load another disk into the GOTEK during a session, I just remember to pre‑load the S‑50 System/Sound Disk RSB‑502 #6 image file right before I turn off the W‑30 at the end of the day. That way it's all set to go the next time I turn on the sampler and will boot from the hard drive
Note: I just picked the S‑50 System/Sound Disk RSB‑502 #6 disk at random. Any random System/Sound disk should work provided it's not a W‑30 disk and is properly formatted @720KB
-
- B - USB/FDE With FlashFloppy Firmware (GOTEK with modified firmware) * Tested And Verified *
USB/FDE With HxC Firmware (GOTEK with modified firmware) * Tested And Verified *
- Problem: Same as above. If the W‑30 finds the disk image hard drive And CD‑ROM Utility Disk v1.07 in the FlashFloppy or HxC USB/FDE, it will boot the O/S from the USB/FDE and not from the hard drive and will take forever to load
- Solution: Power on the W‑30 without a USB stick in the FlashFloppy or HxC modified USB/FDE. The W‑30 can't find a valid O/S disk image file to load so it goes searching for a hard drive to boot from. The modified firmware inside a FlashFloppy or HxC GOTEK is somehow different from a generic GOTEK in relation to the way it boots up the W‑30. The generic GOTEK just hangs the W‑30 if there is no disk image loaded in the GOTEK flash memory. And remember that the W‑30 will boot its O/S from the last hard drive in the SCSI chain (or the last virtual hard drive on the SCSI2SD or ZuluSCSI). Ensure that when you initially setup the last hard drive in the SCSI chain that you follow the directions above for saving the system onto that particular hard drive, i.e. (Menu Item 2: HD Save SYS ⇾ ENTER)
- C - 3.5" FDD (Factory default sampler) * Tested And Verified *
- Problem: What happens at boot time is, the W‑30 first goes out to the 3.5" FDD to load the O/S. If it finds the W‑30 disk image hard drive And CD‑ROM Utility Disk v1.07, (or any other valid W‑30 System Disk), it will boot the O/S from the 3.5" FDD which takes forever to load
- Solution: Power on the W‑30 without a 3.5" floppy disk in the FDD. The W‑30 can't find a valid O/S disk image file to load so it goes searching for an external hard drive, SCSI2SD or ZuluSCSI device to boot from
- D - No FDD / No USB/FDE (34‑Pin Ribbon cable left hanging) * Tested And Verified As Not Working *
- Problem: What happens at boot time is, the W‑30 first goes out to the 3.5" FDD to load the O/S. If it can't find any hardware device connected to the 34‑pin ribbon cable, the sampler goes into "Hardware Failure Mode" and will not continue past the "Roland W‑30 / Please Insert System Disk" screen. This message will remain until the sampler is powered‑off. Side Note: In the event a 3.5" FDD is plugged into the 34‑pin ribbon cable upside‑down, the W‑30 will not power‑up at all. This result is quite different from the S‑550 which will blow a fuse on the main power supply board
- Solution: There is no solution. This test was included for the inquisitive types who are wondering if there is a way to boot the sampler from a hard drive in the event the 3.5" FDD is removed or is broken. The answer is "No". Some type of a hardware device must always be connected to the 34‑pin ribbon cable. It would be interesting to see if a jumper somewhere on this cable could simulate a hardware device connection and force the boot sequence to always search for an external hard drive
 In this example above, 1 CD‑ROM & 4 hard drives are connected to the W‑30
C = CD-ROM At SCSI Target #0
H = hard drives At SCSI Targets #1, #2, #3 & #4
* = SCSI Targets #5 & #6 (Unused)

When booting the S-760 from a FDD or GOTEK, loading the O/S portion takes 36 seconds. After configuring it to boot from a hard drive, Zip Drive, SCSI2SD or ZuluSCSI Drive, it takes less than 1 second to load the O/S portion. You will need to change the boot configuration using the LCD panel. Setup is very easy
* This process assumes that the hard drive, ZIP drive, SCSI2SD or ZuluSCSI virtual hard drive has already been formatted for use with the S‑760
Step 1 of 2
- Click on Disk, select Load, click on the drive selector area and select the SCSI device you want the O/S to boot from (See Figure 1)
- In this example, the hard drive / Zip Drive / SCSI2SD / ZuluSCSI Drive selected is HD5
- Click on Disk (Figure 2)
- Choose Save System (Figure 3)
- Click on SaveSys located at the bottom center of screen (Figure 4)
- In the upper left section it will briefly respond with '!!Now Saving System' followed by '!!Complete' (Figures 5 & 6)
- Power off the S-760 and proceed to Step 2
Step 2 of 2
When powering on the S‑760, a system check is performed and all the settings stored in EEPROM are loaded. The next thing to do is change the boot order currently stored in EEPROM
- Remove the floppy disk from the FDD ‑or‑ remove the USB stick from the GOTEK
- Power On while holding the MODE button and keep holding it down for 15 seconds. This places the S‑760 in Setup Mode
- The MODE button should now be flashing its red LED

- At the > >Setup Menu< <, use the △ ▽ cursor arrows on the front panel and place the selector arrow next to ▶2. Boot Drive (Figure 7)
- Rotate the VALUE/MENU encoder knob and select the hard drive you want the O/S to boot from
- In this example, the hard drive / Zip Drive / SCSI2SD Drive / ZuluSCSI Drive selected is SCSI:5
- Press the EXIT button
- The LCD will briefly display the message 'EEPROM Renewing.......' and the new boot sequence is saved
- The sampler will reboot. From now on the O/S will load from the selected hard drive, Zip Drive, SCSI2SD Drive or ZuluSCSI Drive (i.e. HD5)
- If the hard drive, Zip Drive, SCSI2SD or ZuluSCSI Drive is unplugged from the S‑760, the startup process defaults and the O/S will load from the FDD or GOTEK

(Figure 1)
|

(Figure 2)
|

(Figure 3)
|
|

(Figure 4)
|

(Figure 5)
|

(Figure 6)
|
|

(Figure 7)
|
|
 Things To Note Things To Note
- For the S‑550 and W‑30, if more than one hard drive is connected in the SCSI chain, the O/S contained on the last hard drive will be used to boot the sampler. The cable order doesn't matter. It's the hard drive with the highest SCSI ID# that matters
- Unlike the S‑550 and S‑760 boot process, the W‑30 does not display a countdown while loading from the hard drive, SCSI2SD or ZuluSCSI
- Never set an S‑550 or W‑30 external CD‑ROM or hard drive to SCSI ID#7. This will cause the sampler to lock‑up during the boot process. The internal SELF SCSI ID# for the S‑550 and W‑30 samplers is set at the factory to SCSI ID#7. This can never be changed because it is hard‑coded into the operating system and hardware
- For the S‑550 and W‑30, if the last device in the SCSI chain is a ZIP drive, then you won't be able to boot from any hard drive! For example, if a ZIP drive were set to SCSI ID#6, it would be the last device in the SCSI chain. At boot time, the sampler will go out to search for the last SCSI ID# which is #6. Since the S‑550 and W‑30 samplers can't boot from a ZIP drive, it will not boot from any hard drive. Setting the ZIP drive to SCSI ID#5, setting the ZIP drive termination switch to "OFF", setting a hard drive to SCSI ID#6 and terminating the hard drive will solve this problem
- The S‑550 and W‑30 are unable to boot from a ZIP drive no matter how you try to configure the SCSI chain. Information hard‑coded on the Main Board Boot ROM IC will only recognize hard drives and Floppy Drives as a valid boot device because of a SCSI hardware timing issue. The Neil's Webbly World Website has some great resource materials re: W‑30 SCSI and boot‑up info including the SCSI hardware timing "bug" which prevents ZIP drives from booting the O/S
- Some S‑550 and W‑30 owners have noted that not every external SCSI device or hard drive make and model will boot the O/S. Quantum hard drives seem to be the most reliable brand which are able to boot the S‑550 and W‑30. External SCSI devices and hard drives and I have personally tested and verified for booting both S‑550 and W‑30 samplers are
- Quantum ProDrive LPS 80S (formatted @80MB)
- Quantum ProDrive ELS 170S (formatted @80MB)
- SCSI2SD Model: IM150402001 - v5.0α using four 80MB virtual hard drives on a 4GB (and larger) MicroSD card
- ZuluSCSI Model: RP2040 Rev.2022d using seven 80MB virtual hard drives on a 4GB (and larger) MicroSD card
- Unlike the S‑550 and W‑30, the S‑760 is able to boot the O/S from a ZIP drive. The setup procedure is the same as shown above for an external hard drive, SCSI2SD or ZuluSCSI device. However, the SCSI target ID# on a Zip drive can only be #5 or #6 because of its hardware limitations (i.e. the SCSI ID# Selector Switch on the back)
- When using a SCSI2SD, RaSCSI, PiSCSI or ZuluSCSI device with the S‑760, partitions setup as CDROM's are unable to boot the system. CDROM virtual partitions will work just like the real thing... they are unable to have any system information written to them because they emulate a write protected CDROM
- Sometimes the sampler will not boot and locks‑up with the SCSI2SD showing only a solid LED. This usually occurs because
a microSD card was not plugged into the SCSI2SD device before powering on the sampler - or - The microSD card plugged into the SCSI2SD contains an invalid partition scheme. In most cases you can recover from this error without having to power off the sampler by following these steps in order
- Eject the microSD card from the SCSI2SD
- Unplug the +5V DC power supply from the SCSI2SD (DO NOT UNPLUG THE DB-25 SCSI CABLE!)
- Wait 20 seconds then plug the +5V DC power supply back into the SCSI2SD
- Re-insert a properly formatted microSD card into the SCSI2SD
- If needed, there are four S-760 hard drive v2.24 Boot Disk Image Files formatted for use with a ZuluSCSI device, available at this download link. These files are 650MB each and contain the S‑760 O/S. Simply copy one or more of these four files (HD1.img, HD2.img, HD3.img, HD4.img) onto an SD card which has already been properly formated for use with a ZuluSCSI device. Use the directions shown above to choose which SCSI device you want to boot to the S‑760. All four 650MB files are blank with the execption of HD1.img which contains two Sound Disk files (RSB L701‑1 / ROCK MLT SET [DISK #1 OF 2] and RSB L701‑2 / ROCK MLT SET [DISK #2 OF 2]). Although there are only four files here, you can use up to seven if needed. Simply copy/paste existing files and rename them to HD5.img, HD6.img and HD7.img
S-760 Boot Disk Image Files For ZuluSCSI
|
All images, text, JavaScript and HTML Code ©1995- by llamamusic.com
The Information On This Page Is Current As Of
|