SCSI PROJECTS FOR ROLAND S-550, W-30 AND S-760 SAMPLERS
SCSI2HD And MicroSD Card Multi-Partitioning Info Is Available At this link
Quick Links To SCSI Information
 SCSI2SD ‑ Virtual SCSI Access for the S-550, W-30 and S-760
W‑30 SCSI ‑ The KW‑30 SCSI IC Chip Upgrade. Simple, Cheap & Powerful
ZULUSCSI ‑ Virtual SCSI Access for the S-550, W-30 and S-760
S‑550 SCSI ‑ The Rare HD5-IF SCSI Board... Or Is It REALLY That Rare Now??? SCSI CD‑ROM ‑ Aaah Yes...... The Elusive External SCSI CD‑ROM
SCSI ZIP DRIVE ‑ Extra Sample Storage In A Major Way
SCSI HARD DRIVE ‑ Even More Extra Sample Storage
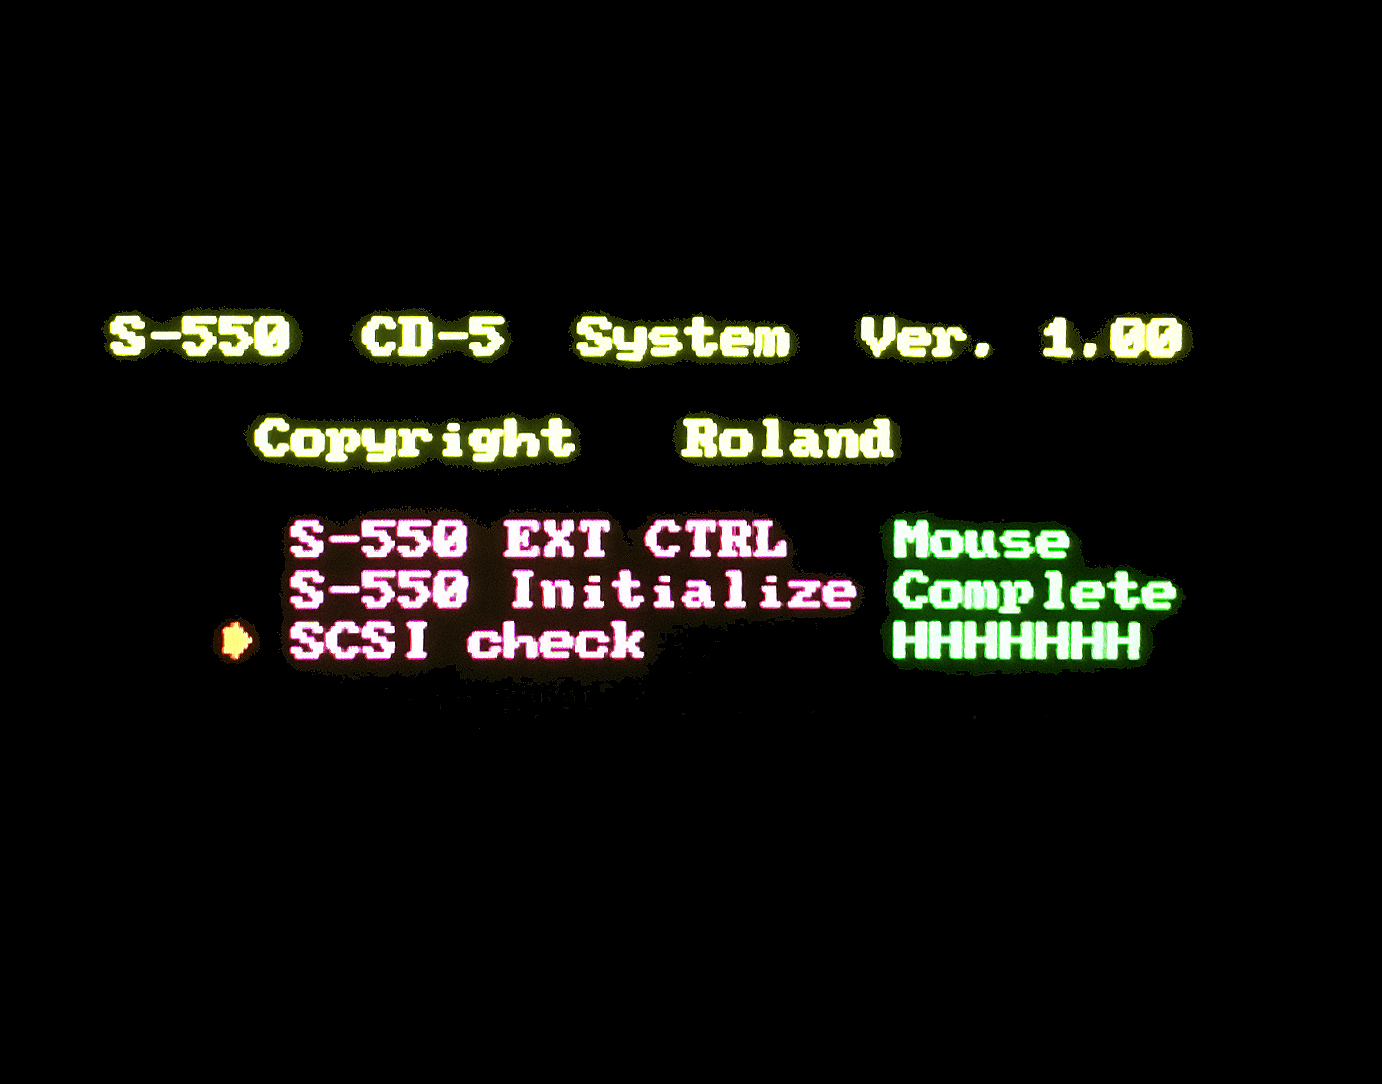
CD-5 SCSI CD‑ROM ‑ Roland's Mysterious And Very Annoying Proprietary SCSI CD‑ROM
ULTRASCSI HARD DRIVE ‑ UltraSCSI? 1980's Sampler? Yes... It is possible!
ROLAND CD‑ROM COMPATIBILITY MATRIX ‑ Only A Few Choices For This Dinosaur Gear
BOOT THE SAMPLER FROM A HARD DRIVE OR SCSI2SD DEVICE ‑ Configuration For The S‑550 And W‑30
BURNING *.MDX, *.ISO, *.BIN & *.CUE SAMPLE LIBRARY FILES TO CD‑ROM ‑ Burning Down The House SCSI2SD ‑ Virtual SCSI Access for the S-550, W-30 and S-760
W‑30 SCSI ‑ The KW‑30 SCSI IC Chip Upgrade. Simple, Cheap & Powerful
ZULUSCSI ‑ Virtual SCSI Access for the S-550, W-30 and S-760
S‑550 SCSI ‑ The Rare HD5-IF SCSI Board... Or Is It REALLY That Rare Now??? SCSI CD‑ROM ‑ Aaah Yes...... The Elusive External SCSI CD‑ROM
SCSI ZIP DRIVE ‑ Extra Sample Storage In A Major Way
SCSI HARD DRIVE ‑ Even More Extra Sample Storage
CD-5 SCSI CD‑ROM ‑ Roland's Mysterious And Very Annoying Proprietary SCSI CD‑ROM
ULTRASCSI HARD DRIVE ‑ UltraSCSI? 1980's Sampler? Yes... It is possible!
ROLAND CD‑ROM COMPATIBILITY MATRIX ‑ Only A Few Choices For This Dinosaur Gear
BOOT THE SAMPLER FROM A HARD DRIVE OR SCSI2SD DEVICE ‑ Configuration For The S‑550 And W‑30
BURNING *.MDX, *.ISO, *.BIN & *.CUE SAMPLE LIBRARY FILES TO CD‑ROM ‑ Burning Down The House
|

ZuluSCSI RP2040
ZuluSCSI
ZULUSCSI FOR THE S-760 AND SP-700
If you want to add SCSI to your S‑760 or SP‑700, the new ZuluSCSI is the best and least expensive option these days. It's simple to use and 100x easier to setup than the old SCSI2SD, raSCSI, piSCSI and BlueSCSI cards. I was amazed at how fast I was up and running. I copied some *.iso and *.img files onto an SD card and was immediately loading and saving samples
The DIY crowd will be happy to know there is a ZuluSCSI board for only $69 which includes 99.9% of the components pre‑soldered in place (ZuluSCSI RP2040). Just add the optional DB25F connector yourself to save big $$$ from Rabbit Hole Computing. If you buy this kit you will need the extra DB25F connector for the S‑760, SP‑700 (and S‑550, W‑30, DJ‑70MKII) so be sure to add it to your cart before checking out. If you are not much of of a DIY person then you're still covered. Anyone with basic soldering skills can easily solder the DB25F connector in place. The SCSI bus on the S‑760 and SP‑700 supplies it's own +5V DC power so there is no need to use an external power supply with the ZuluSCSI RP2040. It is important to note that the ZuluSCSI Compact RP2040 Homebrew Kit, ZuluSCSI Compact RP2040 and ZuluSCSI Laptop models do not have the option to add a DB25F connector. Also, the ZuluSCSI Mini RP2040 does have a DB25F connector installed but... this model requires external +5V DC power for use with the S‑760, SP‑700 (and S‑550, W‑30). This is why I always recommend the ZuluSCSI RP2040 over the other models. It's the most versatile board and I'm able to use it back and forth between my S‑760, SP‑700, S‑550 and W‑30 samplers

SP-700 TERM POWER Switch
If you have any doubts about which board to get for your S‑760, SP‑700 or any other sampler, tech support at Rabbit Hole Computing answers their eMails promptly. Setup instructions and a User Manual can be found at zuluscsi.com
Important: Circuitry inside the S‑760 and SP‑700 samplers have +5V DC present on the SCSI bus line. ZuluSCSI does not require an external power supply when connected to these two samplers when using the ZuluSCSI RP2040 model. Unfortunately, the SCSI bus line on S‑750 and S‑770 samplers does not supply it's own +5V DC power so ZuluSCSI will require an external power supply. If you plan to use a ZuluSCSI board with the SP‑700 sampler, you will need to ensure that the switch labeled TERM POWER (located on the Main Board inside the SP‑700) is set to the ON position (see image to the right). This supplies a line on the SCSI bus with +5VDC which in turn will provide the required power on Pin #25. This switch is easily accessible without having to remove the entire case and is located directly beneath the SIMM memory access lid

With the S‑760 and SP‑700, if you plan to load AKAI S1000 and S1100 CD‑ROM's often using the "Convert Load" feature, I highly recommend using a ZuluSCSI, SCSI2SD or a CD mechanism with speeds faster than 1x or 2x. Why? Older 1x and 2x speed CD‑ROM's take forever and a day to load AKAI CD's. "Convert Loading" an AKAI sample will take up to 8x longer than loading a native Roland sample file. With ZuluSCSI, SCSI2SD, RaSCSI, PiSCSI or other virtual CD‑ROM devices, the hardware drivers built into these will compensate and deliver the maximum load speed. However... it's still quite slow because of the 1990's O/S architecture of the sampler. I compiled some benchmark tests in this PDF
ZULUSCSI FOR THE S-550, W-30 AND DJ-70MKII

Seven S-550 Blank 80MB Hard Drives
(same file works with the W-30 & DJ‑70MKII)
(same file works with the W-30 & DJ‑70MKII)
Please read the info above for the S‑760 and SP‑700 because almost everything applies (i.e. I recommend purchasing the ZuluSCSI RP2040 model and adding the extra DB25F connector). For S‑550, W‑30 and DJ‑70MKII samplers, ZuluSCSI works fine with 80MB hard drives but does not work with CD‑ROM *.iso files (at least I certainly can't make it work. Still trying). The caveat about working with 80MB hard drives is I see no way to create an 80MB hard drive from scratch on the S‑550, W‑30 or DJ‑70MKII. The easiest way is to download this file which contains seven pre‑formatted 80MB blank hard drives (pre‑formatted using the CD‑5 CD‑ROM Utility Disk v1.00). Use one or use many. Your choice. Another workaround is to find an existing 80MB S‑550, W‑30 or DJ‑70MKII *.img file, rename it to HD1.img or HD2.img, etc... and pop it on an SD card. After that, the S‑550, W‑30 or DJ‑70MKII will recognize it and you can use it as‑is with the existing tones contained within ‑or‑ format it and use it as new storage space. For testing, I used the downloads near the bottom of the SAMPLES page named "80MB_Disk-(n).zip"
Another easy way to create blank 80MB files is a built‑in function of the ZuluSCSI firmware. I've not tested this feature yet but others have reported success. From the ZuluSCSI firmware webpage:
- "ZuluSCSI firmware can also create image files itself. To do this, create a text file with filename:
Create 80M HD1.txt
The special filename must start with 'Create' and be followed by file size and the name of resulting image file. The file will be created next time the SD card is inserted. The status LED will flash rapidly while image file generation is in progress."
Important: The SCSI bus line on S‑550, W‑30 and DJ‑70MKII samplers does not supply it's own +5V DC power. ZuluSCSI will require an external power supply for these three samplers. Also, the S‑550 requires the HD5‑IF SCSI BOARD and the W‑30 requires the KW‑30 SCSI UPGRADE KIT

I mounted my ZuluSCSI RP2040 board inside a 1599XX Metal Stompbox and added a 3-Pin Male Connector,
a 3-Pin Female Connector, three 3.96 Crimp Terminals and a Female Barrel Power Connector for +5V DC operation
This way I'm able to swap and use it externally with an S-550, W-30, S-760 or SP-700 sampler
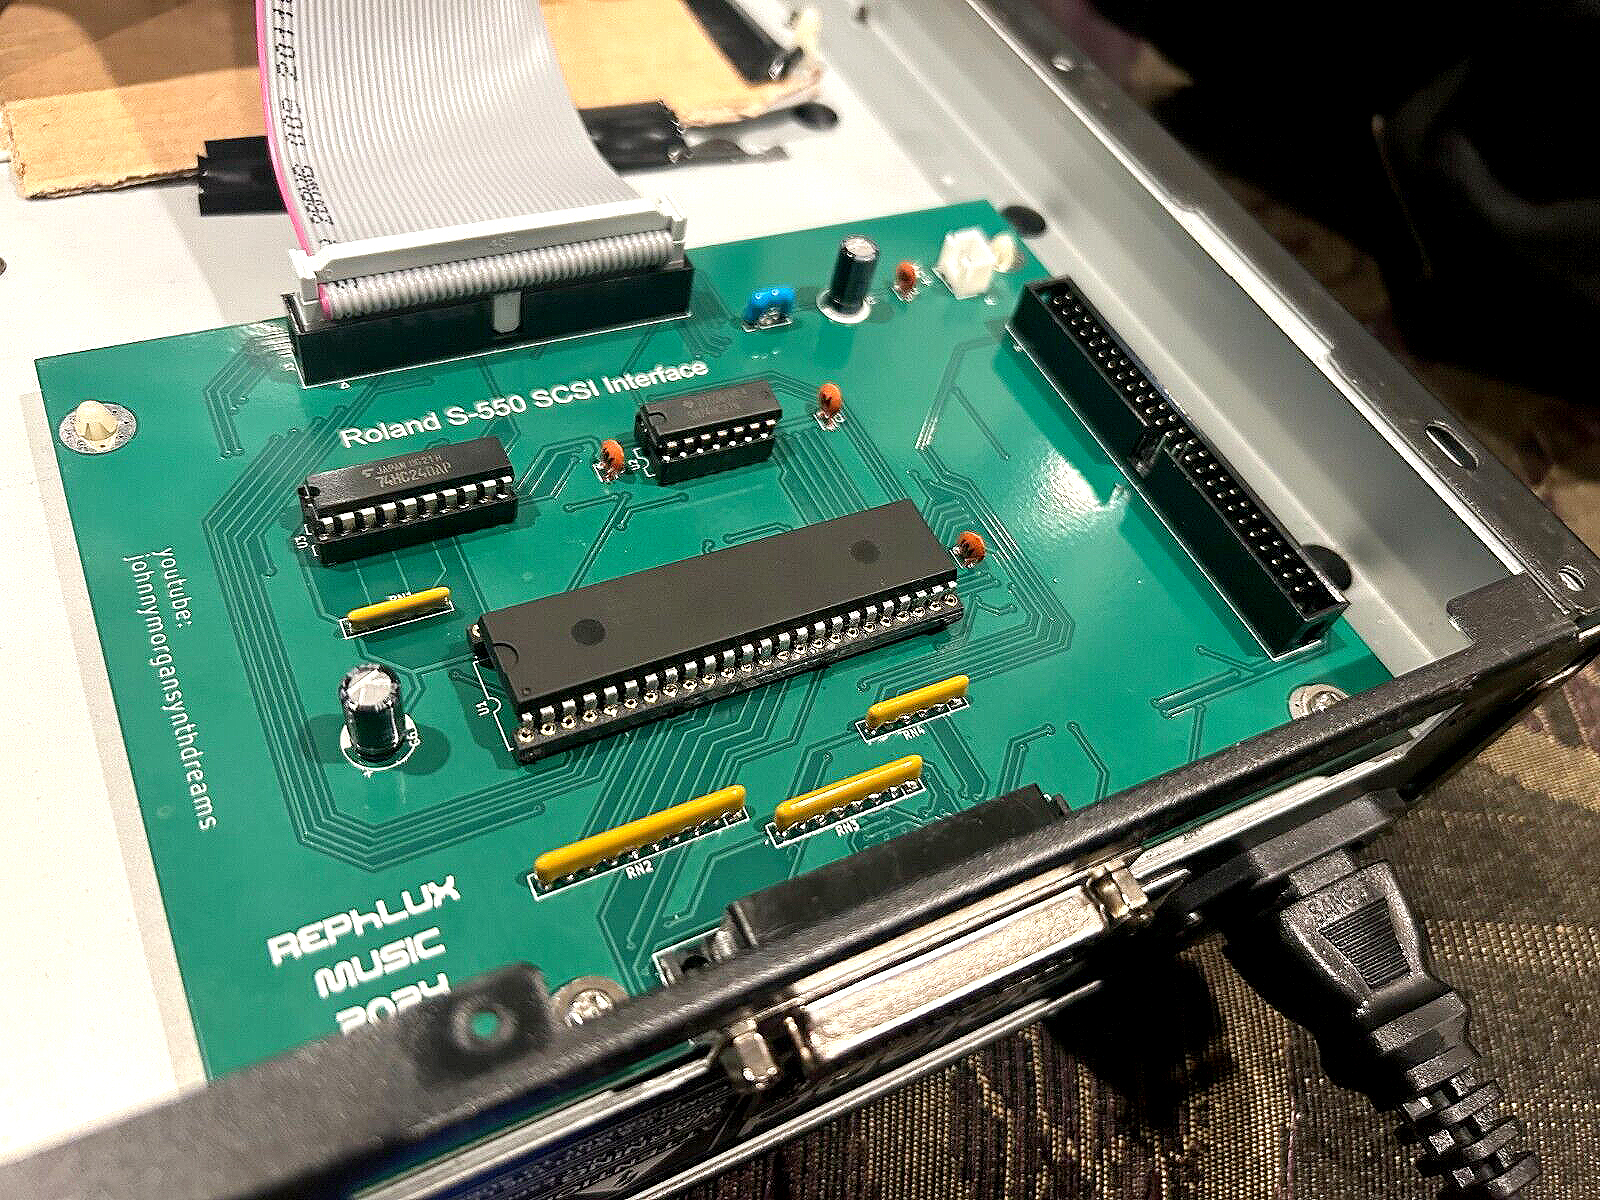
HD5-IF SCSI Board
The original HD5‑IF SCSI board is very hard to source because as I estimate, Roland only manufactured enough of these boards for 10% of the S-550's out there. If you are looking for one... you are in luck because Johnny Morgan has created a new HD5‑IF board! It has been reversed engineered from the original Roland schematics. I've been using this new SCSI board and have been getting fantastic results. The form‑factor is exactly the same as the original and it fits perfectly in my S‑550. I have tested it with SCSI2SD, ZuluSCSI, Quantum UltraSCSI Hard Drives and ZIP Drives. It works great! You can find ordering info and more from these links
 Ordering Info
Johnny Morgan Synth Dreams YouTube Channel
Ordering Info
Johnny Morgan Synth Dreams YouTube Channel
|
(click for larger image) |
|
SCSI Hard Drive

The model I connected has a label on top which reads 'Quantum ProDrive ELS'. The actual model number and the size of the hard drive is somewhat hidden and you can't tell just from looking at the top label. The model number is hidden on the bottom label attached to the 50‑pin SCSI connector and reads '170S' which indicates this is a 160MB SCSI drive*. There are three jumpers on the PCB labeled A0, A1, A2 which are used to set the SCSI ID Select#. You will need to set this to something other than the default '#6' if you have any other device using SCSI ID #6. Detailed info about the jumper settings for the 170S is here. A large list of jumper settings for other makes and models is here
* It's important to note that there are several Quantum ProDrive ELS hard drives with the exact same label on top. Not all of them are SCSI and they all have different storage capacities. The only way to ensure the hard drive will work with an S‑550 or W‑30 is by checking the model number shown on the bottom of the 50‑pin SCSI connector (click on the third image below)
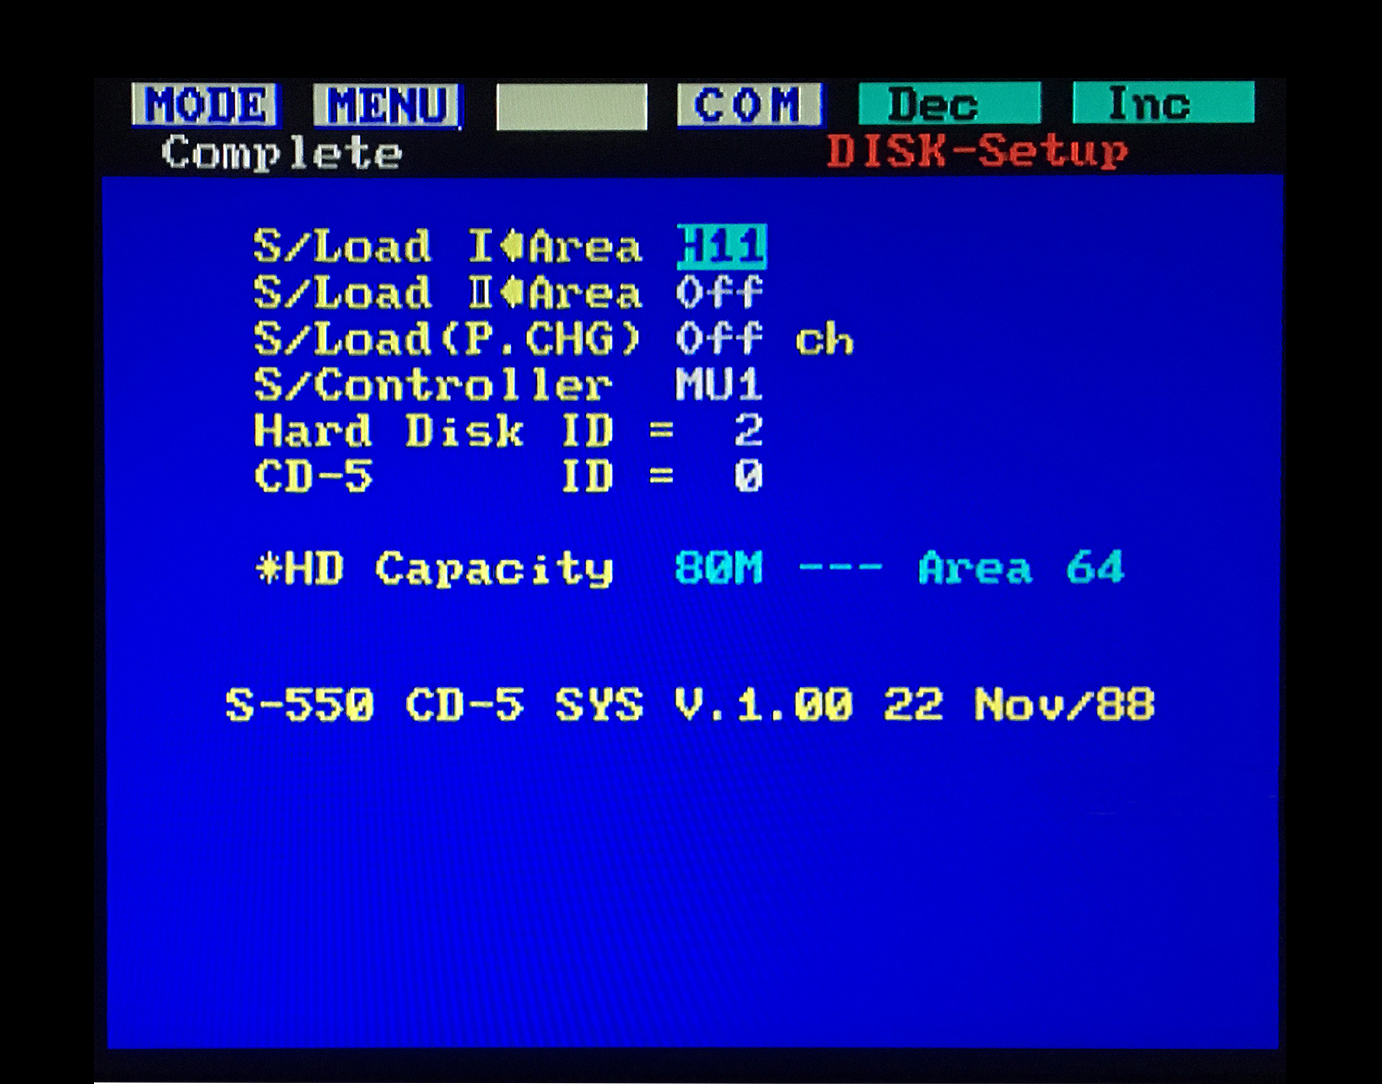
To get the S‑550 to recognize this hard drive, I had to boot from the HD5‑IF Ver. 1.03 Utility Boot Floppy Disk. To get the W‑30 to recognize this hard drive, I had to boot from the W‑30 Hard Drive And CD‑ROM Utility Disk v1.07. For the S‑550, formatting the hard drive was easy by using the drop down menus MODE > DISK > MENU > Setup > COM. Next, click on HD Format. After the format process begins, the messages in order were; HD Formatting ** ‑ HD Initializing ‑ HD Saving System ‑ Working ‑ Complete. The process took only four minutes from beginning to end. Even though the size of this Quantum drive is 160MB, the S‑550 and W‑30 would format it to use only 80MB. This is a limitation of the S‑550 and W‑30 operating system. The hard drive storage area allows up to 64 slots per SCSI hard drive or ZIP drive (64 3.5" floppy disks). The maximum number of slots you can fill at one time using four SCSI storage devices would be 256 which is approximately 185MB (256 3.5" floppy disks). On a scale of 1 to 10 by today's storage capabilities, that's about a 1
VERY IMPORTANT: If you want the S‑550 or W‑30 to boot from the new hard drive and not from the floppy, see this link
(Note: 50‑pin SCSI connector, not 40‑pin IDE)
On my system, the SCSI ZIP drive is not recognized unless I boot from the CD‑5 System Boot Disk Ver. 1.00 (For unknown reasons, the current CD‑5 System Boot Disk Ver. 1.02 and the HD5‑IF System Boot Disk Ver. 1.03 will not work with my ZIP drive. If you have a similar setup, the only way to boot your system and have both SCSI hard drive and SCSI ZIP drive recognized at the same time may require booting from the CD‑5 System Boot Disk Ver. 1.00. One of the rare instances where an O/S upgrade is actually a downgrade

(click for larger image and SIP info)
A Note About On‑Board SCSI Hard Drive Terminating Resistors
At the factory, Quantum installs two, sometimes three resistor networks in sockets on the PCB to terminate the SCSI bus. Only the first device (usually the host) and the last device on a SCSI bus should contain terminating resistors. When installing the Quantum ProDrive ELS in any other position on the SCSI bus, remove the terminating resistors. On my hard drive (Quantum ProDrive ELS / Model 170S), the terminating resistors are located near the 50‑pin SCSI connector. These are labeled on the PCB as RP41 and RP42. They are light green in color, have 10 pins, are 2mm x 25mm, socketed and labeled "E111G 213". I had no need to remove these since the hard drive is the only device in my SCSI chain. If you are experiencing problems, you may need to remove these if the hard drive is somewhere in the middle of the SCSI chain. If you plan to buy one of these used Quantum disk drives on eBay, you may want to verify with the seller that the terminating resistors have not been removed after years of use. If needed, you can find replacements for sale online. Do a search for "Bussed Circuit SIP‑10"
SCSI Device ID#
Just like external CD‑ROM's and ZIP Drives for the S‑550 and W‑30, SCSI Device ID #7 is reserved as the main hardware ID# for the sampler so only use SCSI Device ID #0 through #6 when setting up a Hard Drive
SCSI HD PROS
- You are able to boot the S‑550 and W‑30 from the hard drive. Using an ancient 80GB hard drive with the W‑30, I was able to boot the system in only 26 seconds. The hard drive loads and saves a disk image file twice as fast as compared to a 3.5" floppy disk drive or a USB/FDE
- You are able to easily view up to 64 disk image files on one screen using MODE > DISK > SUB > HD Area I or II. Using a USB stick with a USB/FDE does not offer this convenience
- You are able to easily view, load, mix and match individual Patches or Tones within Wave Bank A or Wave Bank B. This offers a huge advantage over using a USB/FDE or a 3.5" disk drive because it allows you to create custom Wave Banks using up to 64 different disk image files to choose from on one screen. Using a USB/FDE or a 3.5" disk drive to
load individual Patches or Tones is only usable within one disk image file, the one which is currently loaded

(click for larger image)
- After adding up the costs to use everything (Hard Drive, External Case, Terminator, HD5‑IF SCSI Card), I feel that purchasing a USB/FDE is a better bargain in the long run and is just as easy to use without the hassle of having an extra external device, extra cables and the HD5‑IF SCSI Card
- New samples only saved to the hard drive makes it difficult to transfer them onto a computer hard drive for archiving or to send them to other people
- Adding a small capacity 20MB hard drive onto the system hardly seems worth the effort since it will only store the equivalent of sixteen 3.5" floppy diskettes

(80‑Pin SCA to 50/68‑Pin Adapter)
The S‑550 and W‑30 normally use external 50‑Pin SCSI hard drives. It's possible to connect newer 80‑Pin UltraSCSI hard drives using an inexpensive 80‑pin to 50‑pin Single Connector Attachment SCSI Adapter Board (SCA). UltraSCSI SCA hard drives use one cable to supply all of the power and data. This adapter board separates the power from the data and lets you use an old‑style SCSI 50‑pin connector. UltraSCSI SCA adapter boards can be found on eBay and elsewhere for less than $5 (USD). The big advantage this offers is that you can use newer hard drives to replace your old 25+ year‑old dinosaurs which are slowly failing. Although you won't benefit from faster speeds or larger capacities, they do offer a less noisy environment and are more reliable. Compared to the older 50‑pin Quantum hard drives on eBay, these newer 80‑pin UltraSCSI hard drives are far less expensive. I bought an 18GB UltraSCSI hard drive for only $5 (USD) w/warranty. The last 50‑pin Quantum hard drive I bought was over $45 (USD) and it sounds like a broken blender. Setup is very easy and you can use your existing SCSI hard drive case. If you don't have an external SCSI hard drive case, old LaCie SCSI CDROM's are a good eBay purchase. Just pull‑out the CDROM mechanism, pop in the hard drive with the SCA Adapter Board and you're ready
Not every UltraSCSI SCA hard drive will work. The S‑550 and W‑30 are still expecting to see a hard drive with the correct cylinder configuration. The hard drives I tested and verified were 18GB Quantum Atlas V, Model 37URC (Dell P/N: JP‑037URC) and 18GB Quantum Atlas 10K, Model 323U (Dell P/N: 0001323U). I'm not positive, but I'm guessing that just about any 9GB, 18GB, 36GB or 72GB Quantum UltraSCSI SCA hard drive with an SE jumper will work fine. Keep in mind that a smaller GB size will be faster to Format / Clone / Restore if you're planning on performing those tasks often

Complete DIY instructions for the UltraSCSI in this document
S‑550/W‑30 UltraSCSI DIY (PDF)
UltraSCSI HD PROS
- Very cost effective and easy to replace an existing hard drive or add as a new one. I pulled the old 80MB Quantum hard drive out of my external SCSI case and popped in the new UltraSCSI hard drive and adapter board without any hassles
- Newer hardware. My UltraSCSI hard drive was manufactured sometime between 2001 and 2003 and will most likely last longer than my old 80MB Quantum
- Super quiet!
- If you plan to backup/restore this newer hard drive using the "dd" utility or any other method, the UltraSCSI SCA's are large capacity drives and will take a much longer time to backup/restore. The "dd" utility does a bit‑by‑bit copy and copies everything, not just the first 80MB of data
- To date, I've been unable to figure out how to get an UltraSCSI drive to boot the O/S. Starting up a sampler still requires booting the O/S from the FDD, USB/FDE, an older 80MB SCSI-I hard drive or a newer SCSI device (SCSI2SD, ZuluSCSI, etc...)
- If replacing an older 80MB hard drive, the only "quick" way to get your existing data over to the new drive would be using the sampler menu selection "HD Copy", the "dd" utility, or the Windows freeware utility HDD‑Raw‑Copy‑Tool. To perform any of these tasks, you will need an additional hard drive or a ZIP drive connected at the same time
SCSI ZIP Drive

The ZIP100S2 and ZIP250S SCSI drives are able to store up to 80MB of S‑550 or W‑30 sampler data on a single ZIP disk and up to 250MB for the S‑760. This gives you an endless supply of storage space which is only limited by the number of blank ZIP disks you have. There are several models of ZIP drives. Some are parallel, some are USB and some are SCSI. If you plug a parallel ZIP drive into the sampler, you can kiss your SCSI card goodbye because it will fry it... extra crispy. You MUST use a ZIP SCSI model Z100S2 or Z250S. These SCSI models have two selector switches on the back and two DB25 female connectors on the back. One switch selects SCSI ID#5 or #6 and the other switch turns termination ON or OFF. Several users have reported that the ZIP drives are very temperamental. From my experiences, I can say without a doubt, using a ZIP drive with the S‑550 can be very frustrating. At times, the ZIP drive appears to be working fine then suddenly it just disappears from the SCSI chain as if it were disconnected. It takes several SCSI scans from the menu to have the S‑550 find the device again to get it back online. Some people claim that the built‑in termination activated by the switch on back is weak. I decided to buy an Active SCSI Terminator to see if it would help and it did. With the power turned off for the S‑550 and the ZIP drive, I plugged the DB25 Active SCSI Terminator into the open connector on the ZIP drive and set the on‑board termination switch on the back to the OFF position. I noticed that this eliminated the need to constantly refresh the SCSI connection. Over time, I have connected other external devices (hard drives, CD‑ROM's) and I no longer need to use the Active SCSI Terminator. I just set the ZIP drive to SCSI ID#5 and one of the hard drives to SCSI ID#6 and make sure this last hard drive in the SCSI chain is terminated. (Note: Using the ZIP drive with this Active Terminator caused my W‑30 to hang when booting up. Removing the Active Terminator and using the on‑board termination switch eliminated the problem)
Important Steps To Follow

Figure 1
Parallel ZIP (1 Male DB‑25 And 1 Female DB‑25 Connector)

Figure 2
SCSI ZIP (2 Female DB‑25 Connectors)
1) You MUST use the proper 25‑pin cable which was supplied with a new ZIP drive. Most 25‑pin cables you find for everyday computer use are wired for use with data transfer programs, parallel printers, scanners and other non‑SCSI devices. Cables made for most parallel and serial devices will not work and could possibly damage the SCSI card on the sampler. The 25‑pin ZIP cable to use is a straight through cable, 1 to 1, 2 to 2, ......, all the way up......, 25 to 25
2) Make sure the sampler and the ZIP drive are both powered off before connecting the 25‑pin cable. Never plug or unplug the ZIP drive from the sampler when the power is turned on for either device
3) Connect the 25‑pin cable to the ZIP drive connector on the left marked "ZIP". If the ZIP drive is the only SCSI device or is the last SCSI device in the chain and nothing is plugged into the 25‑pin port on the right, make sure the termination switch on the back is set to the "ON" position. If you are using an S‑550, I recommend using an Active SCSI Terminator instead
4) Power on the ZIP drive first then power on the sampler. It is impossible to boot the sampler using a ZIP drive. The S‑550 and the W‑30 both have information hard‑coded onto the boot ROM IC to only recognize Hard Drives or Floppy Drives as a boot device. You must always boot an S‑550 with a 3.5" floppy disk in the drive or from a USB/FDE with a valid boot disk image loaded. The only way I have been able to successfully have the ZIP drive recognized by the S‑550 is by booting the sampler using the CD‑5 System Boot Disk Ver. 1.00 (For unknown reasons, the most current CD‑5 System Boot Disk Ver. 1.02 and the HD5‑IF System Boot Disk Ver. 1.03 will not work with my ZIP drive)
5) If the last device in the SCSI chain is a ZIP drive, then you won't be able to boot from any hard drive! For example, if a ZIP drive were set to SCSI ID#6, it would be the last device in the SCSI chain. At boot time, the sampler will go out to search for the last SCSI ID# which is #6. Since the sampler can't boot from a ZIP drive, it will not boot from any hard drive. Setting the ZIP drive to SCSI ID#5, setting the ZIP drive termination switch to "OFF", setting a hard drive to SCSI ID#6 and terminating the hard drive will solve this problem
Once the ZIP drive is connected and recognized by the sampler, you will need to format a ZIP disk using the Roland proprietary filesystem. It takes about 9 minutes to format a 100MB disk. After that, it's a very long process to get the ZIP drive functioning as an effective storage device because each individual sample disk needs to be loaded into the sampler and then saved over to a corresponding slot on the ZIP drive. There are 64 available slots to use on the ZIP drive and each slot will hold the equivalent of one 3.5" floppy disk. The HD5‑IF Owner's Manual provides detailed instructions about how to get things working. One important thing to note is that regardless of how big the ZIP drive is that you are using, the maximum storage capacity will always be 80MB per ZIP disk no matter what. This is a limitation of the S‑550 and W‑30 operating system. The largest hard drive partition recognized is 80MB and the ZIP drive is treated just like a regular hard drive. Keep this in mind when searching for a used ZIP drive to buy. A more expensive 250MB model with larger capacity ZIP disks will not offer any space advantages over a less expensive 100MB model. The only advantage of buying the more expensive 250MB model is if you plan to share it with other samplers like the S‑760 which is able to take advantage of the extra storage space
I was able to find an inexpensive Z100S2 with power adapter and DB25 cable on eBay for under $17 (USD) so I decided to roll the dice. I can't say that I would or would not recommend using a ZIP drive with the S‑550 or W‑30. I think if you can find an inexpensive SCSI ZIP drive (and get an extra Active SCSI Terminator if it is the only external device connected to an S‑550), the ZIP drive is a great accessory. I'm still undecided about which is better... a USB/FDE or a ZIP drive, mainly because of the following PROS and CONS. Obviously, the best choice is to have both on the same system, but choosing one over the other is a tough decision
 192 Roland Sound Disks In ZIP Drive Image Format
There is a ton of info about archiving/restoring large ZIP drive libraries to/from your S‑550 and W‑30 sampler at the ZIP‑A‑Dee‑Doo‑Dah! page. This page explains a powerful and inexpensive way to share ZIP Disks, Hard Drives and MicroSD cards. Don't let the technical stuff get in your way. Most of the processes use easy point and click utilities for Windows users. The advanced Terminal window commands are reserved for the Mac and LINUX crowd ;^)
ZIP-A-Dee-Doo-Dah Library Archive TutorialSCSI ZIP PROS
- A very large supply of unlimited 80MB sample disks is possible. Each individual ZIP disk will store the equivalent of 64 3.5" floppy disks (80MB) so this method makes archiving samples convenient. It's also easy to swap out ZIP disks to load large banks of different samples. Unlike a fixed hard drive, popping 80MB disks in and out is very easy
- The ZIP drive loads disk image files twice as fast as a 3.5" disk drive or a USB/FDE
- You are able to easily view up to 64 disk image files on one screen using MODE > DISK > SUB > HD Area I or II. Using a USB stick with a USB/FDE does not offer this convenience
- You are able to easily view, load, mix and match individual Patches or Tones within Wave Bank A or Wave Bank B. This offers a huge advantage over using a USB/FDE or a 3.5" disk drive because it allows you to create custom Wave Banks using up to 64 different disk image files to choose from on one screen. Using a USB/FDE or a 3.5" disk drive to
load individual Patches or Tones is only usable within one disk image file, the one which is currently loaded
(click for larger image)
- My ZIP drive would not stay online for more than 15 minutes at a time when connected to an S‑550. I had to constantly refresh the SCSI connection using MODE > DISK > Setup > COM > HD Restart. Using a DB25 SCSI Active Terminator solved this problem with the S‑550 and eliminated the need to constantly refresh the SCSI connection. However, the extra $10 (USD) expense for this terminator was kind of a bummer. When using the same ZIP drive with a W‑30, I did not experience any such problem and the Active Terminator wasn't needed
- After adding up the costs to use everything (ZIP Drive, ZIP Disks, Terminator, HD5‑IF SCSI Card), I feel that purchasing a USB/FDE is a better bargain in the long run and is just as easy to use without the hassle of having an extra external device, extra cables and the HD5‑IF SCSI Card
- New samples only saved onto ZIP disks make it difficult to transfer to a computer hard drive for archiving or to send them to other people
- Old technology. As time marches on and the hardware ages, some ZIP drive owners have experienced the dreaded Click Of Death which results in permanent loss of the ZIP drive and sometimes the ZIP disk currently installed in the drive. As with any media, it is critical to backup any important samples onto more than one medium
KW‑30 SCSI UPGRADE KIT FOR THE W‑30

When the metal plate labeled "OPTION" is removed from
the back, underneath is a DB‑25 Female SCSI connector
This SCSI connector is installed on all factory stock W‑30's
the back, underneath is a DB‑25 Female SCSI connector
This SCSI connector is installed on all factory stock W‑30's

You can check to see if your W‑30 already has this optional SCSI IC installed without opening up the case. There are two ways to do this
(Before continuing, you will need a copy of the W‑30 v1.07 Boot Disk for CD/HD)
- 1) While booting, immediately after the * Welcome * to the world of the Roland W‑30 message, for a brief two seconds will appear "SCSI Interface Not Ready" if the optional SCSI IC is not installed
‑or‑
- 2) If you missed the brief message above on the LCD, after the system has booted
- Press SOUND button
- Use VALUE knob to select 8 (SCSI Check)
- Press ENTER button
- Press F1 button (SCSI Check)
- At the top of the screen will appear "I/F Check"
- If it says "OK" then a SCSI IC is installed
- If it says "NG" then the SCSI IC is not installed -or- there is a problem with the SCSI circuit
Arm yourself with info and here's a $55 discount for ya... You can buy the same Fujitsu SCSI IC chip for only $5 (USD) then download the disk and instructions for free. Vendors on eBay are charging an extra $55 to send you the items in a box. The instructions are basically;
- Open Case
- Install SCSI IC Chip
- Close Case
I found six eBay vendors selling the Fujitsu IC chip and one of the least expensive had a 2 for 1 special price of only $12 (USD). There are several available as of October 2022. My favorite trusted and reliable seller is jkpartsstore
* FYI: when plugging in the Fujitsu MB89352AP IC chip, take note that the machine tooled IC socket installed by Roland is absolutely horrible. It takes an unusually large amount of force to seat the chip correctly. I had to apply so much pressure that I ended up removing the main PCB so I could support the back section. I was worried about cracking the PCB. It was that difficult!!! It's very hard to see because of the tight quarters, but ensure that all the pins are seated securely. Initially, when I installed the IC in my W‑30, the IC chip kept popping out until I reseated it firmly and the pins were all the way down into the sockets
Here's the info you need to get your W‑30 working with SCSI devices;
- Buy one Fujitsu MB89352AP 48‑pin SCSI IC chip
- eBay vendors I have used before are jk_parts and xiaobao_semi (Both have very _F_A_S_T overseas shipping to the USA)
- Download the W‑30 Service Notes v05‑89 (Detailed installation and operation instructions start on Page 16)
- Download the W‑30 Hard Drive And CD‑ROM Utility Disk v1.07HD (You will need this to boot the W‑30 into SCSI mode)
- Download the W‑30 For FD, HD, CD Owner's Manual v04-89
- Updated+Expanded Edition. Hi‑res 300DPI scanned pages → PDF file
- There's already a empty "machine tooled" IC socket installed on the Main PCB. Simply plug in the Fujitsu IC chip. Done!*
- Oh yeah... someone sent me an eMail to say he bought a W‑30 on eBay and the Fujitsu chip was already installed. Bonus!

And... if you think I'm exaggerating about what I consider to be price gouging by Roland, take a look at page 16 under KW‑30 Manual for Service and you will see this notice which makes you think that Roland did not want any W‑30 owners to see how easy the upgrade is;

Good Morning Mr. Phelps. Your mission, should you choose to accept it, is to........
The Elusive External SCSI CD‑ROM

I am always updating my S‑550 / W‑30 CD‑ROM Compatibility Matrix. If you have a working CD‑ROM not featured on this list... please send me an eMail and let me know the external model P/N and the internal mechanism P/N you are using so others may benefit during their search for these old SCSI dinosaurs
W‑30 External CD‑ROM
I was finally able to connect an external CD‑ROM to my W‑30 which actually works. It's an AppleCD 150 with a Sony CDU‑541‑25 internal mechanism + caddy. Another mechanism which also works with the W‑30 is the Plextor PX‑43CS. None of these models will play audio CD's from the sampler menu like the Roland CD‑5 model does but... I can live with that. I had no idea how cool it is to have CD‑ROM access on my sampler. The W‑30 menu for calling up sounds is a dream compared to using floppies or a USB/FDE. I'm finally able to access all of those S‑50 / S‑550 / S‑330 / W‑30 sample disks on the Roland L‑CD1 CD. 165 Floppies worth. Whew! It's been a long wait!!! Rutger Verberkmoes has posted the Roland L‑CD1 CD as a disk image file you can download and burn to CD. The instructions at that webpage are somewhat confusing so I have created an easy 10‑step "L‑CD1 Extract & Burn Guide". The instructions are geared towards Mac users but the app used in the guide also works with a Windows PC. A list of all the floppies on the Roland L‑CD1 CD is here
If you're really feeling adventurous, you can download and burn W‑30 Collection CD #1 and W‑30 Collection CD #2 available at this page.
I've also included some notes about the process I used to create these custom W‑30 CD‑ROM's
SCSI Device ID#
Just like external Hard Drives and ZIP Drives for the S‑550 and W‑30, SCSI DEVICE ID#7 is reserved as the main hardware ID# for the sampler so only use SCSI DEVICE ID #0 through #6 when setting up a CD‑ROM. The factory default for the S‑760 is SCSI ID#7. This can be changed by the user if needed. I prefer to keep this set to SCSI ID#7 to avoid confusion. When booting the S‑760, the SCSI ID# for the sampler will be shown on the LCD or CRT Monitor. If the "UNFORMATTED" error appears on all eight SCSI DEVICE ID#'s when trying to use the LOAD or CONVERT LOAD commands, this usually indicates there are two SCSI devices set to the same SCSI DEVICE ID#. Check and change the SCSI DEVICE ID# so that each SCSI device has a unique ID#. Also ensure that any SCSI DEVICE ID# does not collide with the main S‑760 SCSI DEVICE ID#. The default device number of the S‑760 is set at the factory but this may have changed depending on settings made by a previous owner. You can change the S‑760 SCSI DEVICE ID# easily when you are in Mouse+CRT mode using the following menu commands
      System  >  SCSI  >  S-760 Self SCSI ID  (ID#7 is the Factory Default)

      System  >  LD/SV SysPRM  >  SavePRM  (Responds briefly with "!!Complete")

S‑550 External CD‑ROM
I have completely given up hope in my search for a CD‑ROM to connect to my S‑550. The AppleCD 150 came sooooo very close to working. It's recognized by the O/S, ejects CD's and passes the SCSI test menus but when loading Patches or Tones it locks‑up the S‑550. Most of the info I've read on the Internet shows that the only CD‑ROM compatible with the S‑550 is the Roland CD‑5. Just from looking at the inside of a CD‑5, you can tell it's not a normal CD‑ROM. Off to the side of the mechanism is an additional SCSI board unlike regular Apple CD‑ROM's I have seen
AppleCD 150 Caddy Eject Malfunction
Some AppleCD 150 mechanisms will stop working because they continuously eject the caddy. Over time, defective capacitors on the logic PCB will start to leak. This is a very common problem with Sony CDU‑541 mechanisms and similar Sony mechanisms. AsteronTech has put together a detailed repair guide for replacing the nine defective capacitors. Note: The replacement guide at AsteronTech uses ceramic capacitors in place of electrolytic capacitors to reduce the chance of capacitors leaking in the future. I'm traditional and prefer to use components exactly as shown in schematics. I have compiled a list of mouser.com parts which are exact replacements here

External SCSI CD‑ROM's At Boot‑Time (S-760)
When using an external SCSI CD‑ROM with the S‑760, the start-up boot screen does not always display all of the connected SCSI devices
C = CDROM H = Hard Drive or ZIP Drive * = No Device Connected
Ensuring that a CD‑ROM disc containing valid Roland or AKAI media is inserted into all connected CD‑ROM's prior to powering on the S‑760 will prevent this from happening. This is not a huge issue but it is quite annoying when troubleshooting because you are unable to tell if there are any SCSI device conflicts until you actually boot the sampler and try to load a CD‑ROM disc. As shown in the screenshot to the right, an external SCSI CD‑ROM is connected as Target #0 and Target #4. Both had a valid Roland or AKAI CD‑ROM disc in the caddy prior to powering on the S‑760. If no CD‑ROM disc is inserted, asterisks will fill all of the slots. Unfortunately, this also mimicks a SCSI ID conflict!!! Testing this same scenario with a SCSI2SD showed that it does not matter. If no microSD card is inserted, a "C" will appear regardless. I will assume this behavior also applies to the S‑750/S‑770/DJ‑70MKII.
With the S‑760 and SP‑700, if you plan to load AKAI S1000 and S1100 CD‑ROM's often using the "Convert Load" feature, I highly recommend using a CD mechanism with speeds faster than 1x or 2x. Why? Older 1x and 2x speed CD‑ROM's take forever and a day to load AKAI CD's. "Convert Loading" an AKAI sample will take up to 8x longer than loading a native Roland sample file. Some of the faster mechanisms to consider are the AppleCD 600e (4x), Plextor PX‑43CS (4x), Nakamichi MJ‑4.8si (8x), Nakamichi MJ‑5.16si (16x), LaCie 104737 (32x) & LaCie 104372 (40x). There is a webpage at this link which shows the procedure for loading AKAI CD‑ROM's on the S‑760 and SP‑700. There is also a useful link at that webpage which contains the Partition/Volume Table Of Contents for 500+ AKAI CD‑ROM's. Also, not all CD‑ROM SCSI transfer stats perform as advertised. The LaCie 40x speed CD‑ROM vastly underperforms and is much slower than the Nakamichi MJ‑5.16si. The fastest CD‑ROM I have found for use with the S‑760 is the Nakamichi MJ‑5.16si. I compiled some benchmark tests in this PDF
SCSI Cables
DB25M to SCSI-1 (C50)
I wanted to add this info so that others will not experience wasted time troubleshooting SCSI connections due to using the wrong SCSI cable. I've found bogus cables on eBay and elsewhere which are advertised as DB25M to SCSI‑1 (C50). Some of those cable descriptions are misleading because they will not work with any hard drives, CD‑ROM's or SCSI2SD devices for Roland samplers. They are in fact a very uncommon cable used for older Macintosh interface cards and they use the wrong wiring. Unfortunately, the connectors on the end of those cables are identical to a valid DB25M to SCSI-1 (C50) cable. Can you tell which is which in the image below?

It is impossible to tell just by looking at the connectors but... both of these cables are different. The cable on the left is a valid DB25M to SCSI‑1 (C50) cable. The cable on the right is a Future Domain TCM‑830/845 SCSI‑1 (C50) cable and will not work with Roland samplers. Using the wrong cable will freeze the sampler during the SCSI test phase at boot‑time and in extreme cases will blow a fuse on the sampler and/or fry the SCSI device it's connected to
It's not a hard and fast rule but generally, valid DB25M to SCSI‑1 (C50) cables are short and 45cm to 90cm long and Future Domain TCM‑830/845 cables are 1 meter, or longer. The best thing to do when trying to find a Roland compatible SCSI cable at eBay or elsewhere is to check with the seller to ensure the wiring pinouts are valid. A valid DB25M to SCSI‑1 (C50) Roland SCSI compatible cable is usually advertised as an "Apple Mac SCSI Cable" and uses 38 wires. The incompatible cable uses only 25 wires
Here are the cable pinouts for the two cables which explains the vast differences because of Roland's DB25M SCSI wiring scheme
ROLAND SAMPLER SCSI CABLE PINOUT            FUTURE DOMAIN TCM‑830/845 CABLE PINOUT
                                            (DO NOT USE THIS STYLE CABLE WITH ROLAND GEAR!!!)


Roland DB25M ⟸⟹ SCSI-1 (C50)              TCM-830/845 DB25M ⟸⟹ SCSI-1 (C50)

   (REQ)  1 ⟸⟹ 49                                (GND)  1 ⟸⟹ 1
   (MSG)  2 ⟸⟹ 46                                (DB1)  2 ⟸⟹ 27
   (I/O)  3 ⟸⟹ 50                                (DB3)  3 ⟸⟹ 29
   (RST)  4 ⟸⟹ 45                                (DB5)  4 ⟸⟹ 31
   (ACK)  5 ⟸⟹ 44                                (DB7)  5 ⟸⟹ 33
   (BSY)  6 ⟸⟹ 43                                (GND)  6 ⟸⟹ 5
   (GND)  7 ⟸⟹ 16, 18, 19                        (SEL)  7 ⟸⟹ 47
   (DB0)  8 ⟸⟹ 26                                (GND)  8 ⟸⟹ 10
   (GND)  9 ⟸⟹ 20, 21, 22                    (TERMPWR)  9 ⟸⟹ 15
   (DB3) 10 ⟸⟹ 29                                (RST) 10 ⟸⟹ 45
   (DB5) 11 ⟸⟹ 31                                (C/D) 11 ⟸⟹ 48
   (DB6) 12 ⟸⟹ 32                                (I/O) 12 ⟸⟹ 50
   (DB7) 13 ⟸⟹ 33                                (GND) 13 ⟸⟹ 18
   (GND) 14 ⟸⟹ 1, 2, 3                           (DB0) 14 ⟸⟹ 26
   (C/D) 15 ⟸⟹ 48                                (DB2) 15 ⟸⟹ 28
   (GND) 16 ⟸⟹ 4, 5, 6                           (DB4) 16 ⟸⟹ 30
  (ATTN) 17 ⟸⟹ 41                                (DB6) 17 ⟸⟹ 32
   (GND) 18 ⟸⟹ 7, 8, 9, 11                    (PARITY) 18 ⟸⟹ 34
   (SEL) 19 ⟸⟹ 47                                (GND) 19 ⟸⟹ 21
(PARITY) 20 ⟸⟹ 34                               (ATTN) 20 ⟸⟹ 41
   (DB1) 21 ⟸⟹ 27                                (MSG) 21 ⟸⟹ 46
   (DB2) 22 ⟸⟹ 28                                (ACK) 22 ⟸⟹ 44
   (DB4) 23 ⟸⟹ 30                                (BSY) 23 ⟸⟹ 43
   (GND) 24 ⟸⟹ 23, 24, 25                        (REQ) 24 ⟸⟹ 49
   (N/C) 25 ⟸⟹ 38                                (GND) 25 ⟸⟹ 25
SCSI-1 (C50) to SCSI-1 (C50)
This cable is easy to find on eBay and elsewhere. It is normally used to chain SCSI CD-ROM drives and SCSI Hard Drives together. There's nothing fancy about the wiring for this one. All the pins are straight through connections: 1 ⟸⟹ 1, 2 ⟸⟹ 2 ... ... 49 ⟸⟹ 49, 50 ⟸⟹ 50. It's optimal to use a very short cable for these when chaining Roland SCSI devices

SCSI-1 (C50) to DB25M Adapter
If you have some unused C50 Centronics cables laying around, Monoprice used to sell a useful adapter Product #845 -or- UPC#: 844660008453 for only $4 which I use a lot. It converts one end of a C50 Centronics cable over to a DB25M. Two adapters creates a DB25M to DB25M and it's easy to change back to a regular C50 to C50 Centronics cable if needed. You might be able to locate one of these adapters on eBay or Amazon. Compared to the price of a C50 to DB25M cable, this is a very inexpensive option

Safety Precautions and Disclaimer
Modifications made to any factory stock equipment will always pose an element of risk. Sometimes mistakes are made which are irreversible. Improper soldering and handling of electricity can cause serious injury and damage the synthesizer. Use caution when handling static sensitive devices and the PCB. Make sure you are properly grounded, working on a static‑free workbench or table and wearing eye protection during any soldering tasks. The author is not responsible for any damage or injury resulting from this DIY info. Use this DIY information at your own risk. And, I can't stress enough, the importance of wearing eye protection while soldering. That stuff flies everywhere sometimes!
Modifications made to any factory stock equipment will always pose an element of risk. Sometimes mistakes are made which are irreversible. Improper soldering and handling of electricity can cause serious injury and damage the synthesizer. Use caution when handling static sensitive devices and the PCB. Make sure you are properly grounded, working on a static‑free workbench or table and wearing eye protection during any soldering tasks. The author is not responsible for any damage or injury resulting from this DIY info. Use this DIY information at your own risk. And, I can't stress enough, the importance of wearing eye protection while soldering. That stuff flies everywhere sometimes!


Other Synthesizer And Sampler Homepages I Maintain
All images, text, JavaScript and HTML Code ©1995- by llamamusic.com
The Information On This Page Is Current As Of
The Information On This Page Is Current As Of
