* * * SPECIAL UPDATE * * *
Due to recent shortages of STM Cortex M‑3 IC's which are used in the manufacture of GOTEK's, some models sold on or after April 2021 will most likely contain the newer AT Cortex M‑4 IC. This newer IC version will not work with the instructions and diagrams shown on this webpage. To use any instructions and diagrams on this webpage, check with your vendor to ensure your GOTEK contains the STM Cortex M‑3 IC
USB Floppy Drive Emulator (USB/FDE)
(For Use Only With Roland S‑50, S‑550, S‑330 And W-30 Samplers)
NOTICE
*** There are no instructions on this page for use with FlashFloppy firmware. Nothing. ***
*** The instructions on this page are only for GOTEK Model: SFRM72-FU-DL with the default factory firmware ***
*** Installing FlashFloppy Firmware for use with Roland S‑50, S‑550, S‑330 And W-30 Samplers is available at this link***
*** Additional information about using the S-760 with a GOTEK is at this link ***
There are many methods of making a GOTEK USB/FDE work with the Roland S‑Series and W‑Series samplers. The easiest way is to buy GOTEK Model: SFRM72‑FU‑DL and simply plug it into the sampler where the floppy disk drive used to be. The disadvantage of this is that there are very few bells and whistles available with this model and it costs about $25 (USD). The GOTEK factory firmware on this model has a boring 7‑segment LED display and using the two buttons is a clumsy interface
Before purchasing this model GOTEK USB/FDD, I encourage you to visit Keir Fraser's GitHub webpage and see if installing his free FlashFloppy firmware and mods is something you are interested in. If you are not comfortable with soldering, DIY wiring or flashing firmware and just want an easier solution then read on...
I decided to take the plunge and see if I could figure out how to add a virtual filesystem to replace the old 3.5" floppy diskette technology on my S‑50, S‑550 and W‑30. The internal floppy disk drive had failed so I was looking for a low‑cost replacement solution. I have also installed this same device on my W‑30 and S‑50 samplers and it is working great!!!

Model: SFRM72-FU-DL (USB Floppy Drive Emulator for Roland 720K)
For Use With These Samplers: S‑50 / S‑550 / S‑330 / W‑30
Cost: $28 @eBay (USD)
The GOTEK needs to have "Disk Image Mode", 720KB DS/DD and a 3‑character LED display. Anything with 1.44MB in the description will NOT work. Even then, it may not work unless it's the model number listed above. There's even one listed on eBay as 'SFRM72‑FU 720KB USB/FDE' but it's missing "‑DL" at the end of the part number. No No Uh Uh. Don't go near it because that one only works for non‑image mode disks and it only has a 2‑character LED display. The USB/FDE you need will have a 3‑character LCD. Other models with similar part numbers look good at first but upon closer inspection, their user manual states that their Jumpers are disabled! Yikes!! The PCB silkscreen for the model shown above reads "GOTEK system" and "SFRC922" (Detail)
 If you are handy with a soldering iron, I highly recommend the Mini-Toggle Switch Mod which is an simple 47¢ DIY. This extra toggle switch makes life easier because it eliminates the need to constantly plug/unplug the USB stick when loading/saving image disk files
Here is a list of PROS and CONS to using this model USB/FDE
PROS
- If you recently acquired an S‑50 / S‑330 / S‑550 / W‑30 or if your sample library is very small, this solution eliminates the need to purchase a boatload of expensive 3.5" floppy disks plus, there is no need to always have a dedicated 720KB DS/DD floppy disk drive available on a separate computer to create new 3.5" disks
- You can store different sample libraries on different USB sticks. Having all your disk image files on compact storage media is very convenient and easy to backup
- No mechanical parts. The floppy drives on the S‑50 / S‑330 / S‑550 / W‑30 are notorious for breaking down or requiring maintenance. Replacement floppy drives are difficult to find and cost about $50 (USD). This method offers a less costly alternative to a disk drive replacement IF you can even find one. If you do, it's used, has spiders in it and is already 25+ years old
- The USB stick filesystem for creating and storing the image disks can be created using Mac or Windows
- No complicated third party software to screw around with. There is no need to convert any disk image files over to the *.HFE SD card format either. The *.OUT disk image files you already have simply need to be copied onto a USB stick and renamed with an *.IMG extender. This also eliminates the need for an SD card reader/writer. Chances are good that you already have an unused USB stick gathering dust somewhere
- No soldering and no firmware flashing is required
CONS
- The emulator case is grey and does not match the black Roland color scheme. Blech! However, the circuit board inside is easily removed and some owners have had great luck spray painting the outer shell flat black
- Loading individual disk image files is tedious. There is a lot of USB stick plugging and unplugging. Personally, I don't like having to constantly remove the USB stick multiple times. I would have preferred a solution which enables the USB stick to remain plugged into the emulator all the time. I eventually installed a mini‑toggle switch in‑between the PCB and female USB jack which solves this hassle. It makes using the USB/FDE sooooooo much easier!!! I have posted detailed instructions here for installing a simple 47¢ Mini‑Toggle Switch Mod

- Disk image files are limited to only 99 per USB stick. It would have been nice to be able to have access to more image files on one USB stick
- Once you remove the old mechanical floppy disk drive from the S‑50 / S‑330 / S‑550 / W‑30, that's it. Without having another mechanical floppy disk drive available (i.e. on a Windows computer or on another Roland sampler) you won't be able to access any of your old 3.5" floppy disks unless they have previously been converted to *.OUT files
- Can't compare to all of the new features found by installing custom FlashFloppy firmware, rotary encoder and OLED screen
Instructions for this DIY apply only to an UNMODIFIED
GOTEK USB/FDE Model: SFRM72‑FU‑DL
Using these instructions with any other GOTEK model Will Not Work!!!
Hardware Installation
Installing The USB Floppy Drive Emulator Into An S‑50, S‑550, S‑330 or W‑30
1) Set the jumpers on the USB Floppy Disk Drive Emulator as follows
     JUMPER     POSITION       FUNCTION
       J5       OPEN           (unknown)
       JA ⇒  ⇒  JUMPER         Generates a READY signal on pin 34 of the floppy driver interface
       JC       OPEN           (unknown)
       JB       OPEN           (unknown)
       S0 ⇒  ⇒  JUMPER         Drive Select 0
       S1       OPEN           Drive Select 1
       MO       OPEN           Motor Select

       =======================================================
       Special Note For DJ-70MKI Owners: Use Jumpers JB And S0
       =======================================================

2) Unplug the S‑50 / S‑330 / S‑550 / W‑30 power cable from the wall outlet!!!
3) Open the case and remove the old 3.5" floppy disk drive (Observe safe ESD practices by grounding yourself and don't touch any static sensitive components). Note: If you are installing this in a W‑30, be prepared for an all night project. Several components in the W‑30 need to be removed before you can gain access to the floppy disk drive. Disassembling the W‑30 can be a real nightmare


* Special Note For S-550 Owners *

Over The Years, I Have Opened Up And Repaired Eleven S‑550's. All Of Them Had The 34-Pin FDD IDC Ribbon Cable Connector Installed Backwards At The Factory!!!!! Be Sure To Double‑Check That Pin #1 Is On The Correct Side When Plugging It Into The 34‑Pin Connector Because The Polarizing Notch Will Most Likely Be Reversed!!!!!
4) Add the USB/FDE. - - - IMPORTANT - - - Take extra care to orient the ribbon cable correctly!!! Don't rely on the cable polarizing notch. If you plug it in backwards you will blow the fuse on the sampler power supply board! The red wire on the ribbon cable plugs into Pin #1 on the USB/FDE (Note: Some ribbon cables will use a green or black wire to indicate Pin #1)
5) To test that the hardware is operational, hold down both buttons on the USB/FDE while powering on the sampler. The 3‑Character LED display will briefly show the GOTEK model number followed by the firmware revision number. Mine shows:
- F21 for one second (this indicates it is Model: SFRM72-FU-DL)
- 129 for one second (this indicates the firmware revision number)
- 10.0. or 00.0. (this number depends on how long or how short both buttons were held down at power up)
- Note: If the 3‑Character LED display reads E16, it's in an ERROR STATE so power off the S‑550 and try the test again from the start
- For more detailed info, you can read the GOTEK Model: SFRM72-FU-DL Operation Manual
Software Installation
Creating The Virtual Filesystem
In order for the USB/FDE to load files into the sampler, a virtual filesystem on a USB stick is needed. This virtual filesystem contains the S‑50, S‑550, S‑330 or W‑30 System Boot Disk and up to 99 3.5" floppy disk image files which contain the sample libraries. The USB stick needs to be formatted using the Master Boot Record (MBR) option. This setup process is very easy and no software is required. In fact, if your USB/FDE came with some free software, throw it away. It will only confuse things ;^)
1) Format a USB stick using the MBR option. I have used USB sticks from 1GB up to 32GB so size doesn't matter (...insert joke here...)
Choose your operating system flavor from the choices below
Mac OS X
- Run the Disk Utility application and choose the USB stick you want to format
- Select Erase then set these options in the pop‑up window;
- Name: (Your choice ‑ You can leave this field blank if you want)
- Format: MS‑DOS (FAT)
- (Do Not Use ExFAT, OSX Extended, GUID Partition Map or Apple Partition Map)
- Scheme: Master Boot Record
- NOTE: If you don't see Scheme as an option, turn on "Show All Devices" using the drop down "View" selection (circled in red)
- NOTE: If you don't see Scheme as an option, turn on "Show All Devices" using the drop down "View" selection (circled in red)
- Name: (Your choice ‑ You can leave this field blank if you want)
- Select Erase then set these options in the pop‑up window;

Example: Formatting a generic USB stick using the Disk Utility app with Mac OS X

You can verify the USB stick was formatted using MBR by looking at the "Partition Map:"
Windows XP
- Right‑click My Computer
- Left‑click Manage
- Left‑click Disk Management
- Select FAT32 and verify it is formatted using the MBR option using this guide
- NOTE: I've had mixed results using Windows XP. Sometimes it won't format using the MBR option so...... Keep Trying Until It Works
Windows 7 Professional (32-bit)
- Run the Disk Management program by clicking the START button and enter diskmgmt.msc
- Right‑click on the volume for the USB then Left‑click on Format
- Select FAT32 and MBR then press the OK button
Windows 7 Ultimate (32-bit)
- Run the Disk Management program by clicking the START button and enter diskmgmt.msc
- In the Upper Section of the window where all the disk drives and CD-ROM's are listed
- Right-click on the USB Stick listed under the column named Volume
- Select FAT32 and Default then press the OK button
To verify the USB stick was properly formatted using MBR, from the same window for the diskmgmt.msc program- In the Lower Section of the window where all the disk drives and CD-ROM's are listed
- Right‑click on Disk# where # = the USB stick
- Left‑click on Properties then Left‑click the Volumes tab at the top
- Note: In some cases, you might also need to click on the Populate button to display all info
- Look at the info displayed under "Partition style:" and it should read Partition style: Master Boot Record (MBR)
Windows 8
- The MBR option was replaced with GPT on this crappy Windows O/S version so a third‑party app is needed to format the USB stick
Windows 10 - Pro & Home Editions (64-bit)
- Run the Disk Management program by typing diskmgmt.msc in the search text box field at the lower right on the Desktop
- In the Upper Section of the window where all the disk drives and CD-ROM's are listed
- Right-click on the USB Stick listed under the column named Volume
- Left-click on Format
- Volume label: (Your choice ‑ You can leave this field blank if you want)
- File System: FAT32
- Allocation unit size: Default
- Volume label: (Your choice ‑ You can leave this field blank if you want)
To verify the USB stick was properly formatted using MBR, from the same window for the diskmgmt.msc program- In the Lower Section of the window where all the disk drives and CD-ROM's are listed
- On the far left side of the window, Right‑click on Disk# where # = the USB stick you just formatted
- Left‑click on Properties then Left‑click the Volumes tab at the top
- Look at the info displayed under "Partition style:" and it should read Partition style: Master Boot Record (MBR)
- In the Upper Section of the window where all the disk drives and CD-ROM's are listed
2) Create a new folder on the USB stick called IMG720 (The folder must be this name and is case sensitive. No other name will work)
3) Take your collection of S‑550 *.OUT files and copy them into the IMG720 directory (a maximum of 99 *.OUT files + 1 S‑550 System Boot Disk *.OUT file). If you download disk image files from the Internet with extensions of *.S50, *.S33 *.W30, etc..., you can simply rename these by using the *.OUT extension

Note: If you want to save some time, the entire S‑550 Sample Library, the entire S‑50 Sample Library (converted to S‑550 format), System Boot Disks and Utility Disks are in separate 100‑file collections for downloading. That way you can just download these *.ZIP files, uncompress them and pop them onto some different USB sticks. All of these *.OUT files have been renamed to *.IMG so they will work with this USB/FDE (P/N: SFRM72-FU-DL). This enables you to skip the tedious renaming procedures shown below. Be patient when downloading the files... they're big
 60 Disks (S‑550 Library RSB‑5501‑1 through RSB‑5506‑10)
80 Disks (S‑50 Converted To S‑550 Format ‑ RSB‑501‑1 to RSB‑508‑10)
60 Disks (S‑550 Library RSB‑5501‑1 through RSB‑5506‑10)
80 Disks (S‑50 Converted To S‑550 Format ‑ RSB‑501‑1 to RSB‑508‑10)
4) Rename each *.OUT file starting at 001 and give each file an IMG extender
Example:    BEFORE               AFTER
            5501_1.OUT           001.IMG
            5501_2.OUT           002.IMG
            5501_3.OUT           003.IMG
            . . . . .            . . . .
            5506_8.OUT           058.IMG
            5506_9.OUT           059.IMG
            5506_10.OUT          060.IMG
            . . . . .            . . . .
            COSMOS.OUT           097.IMG
            REVERSEJX10.OUT      098.IMG
            MELLOTRON.OUT        099.IMG
Note: Starting with Mac O/S 10.10, a new Batch Rename feature is built‑in to the Finder App which lets you rename multiple files at once
Copy your S‑550 System Startup Boot Disk *.OUT file into the same IMG720 directory. Rename this file to 000.IMG
Note: Download links for S‑50, S‑550, S‑330 and W‑30 Startup Boot Disk *.OUT files are at the INFO page
Example:    BEFORE           AFTER
            S550113.OUT      000.IMG
Note: If you have a hard disk drive and/or CD‑ROM connected to your S‑550 or W‑30 and you use the HD5‑IF or CD‑5 floppy disk to boot your sampler, use that *.IMG file instead of the S‑550 System Boot Disk *.IMG File (I have included both of these disk image files in the large *.ZIP file mentioned above). Also, if you plan to boot the S‑550 or W‑30 from an external hard drive, please review the special setup instructions at the SCSI HD Boot Page
The directory structure on the USB stick should look like this (The drive letter H: is arbitrary)
H:_____
       |
       IMG720_____
                  |
                  000.IMG
                  001.IMG
                  002.IMG
                  003.IMG
                  . . . .
                  . . . .
                  097.IMG
                  098.IMG
                  099.IMG
With no USB stick plugged in, hold down both buttons on the USB/FDE and power on the S‑550
The 3‑character LED will briefly display the firmware version number (If it reads E16, power off the S‑550 and try again)
At this point the LED should read 10.0. (or 00.0. depending on how long or how short the buttons were held down)
Keep pressing both buttons simultaneously until the LED display reads b0.0.
Insert the USB stick and press the button on the right one time
The LED will briefly display d0 and the USB stick LED, if it has one, will flash on and off while the disk image loads
(If E0 is displayed, the image data on the USB stick is not valid or does not exist)
The 000.IMG file has just been copied into the emulator memory. It will remain there even if the S‑550 is powered off
Remove the USB stick from the emulator
Power off the S‑550 and wait 30 seconds
With no USB stick plugged in, hold down both buttons on the USB/FDE and power on the S‑550
The 000.IMG file will automatically load from the emulator (This is the S‑550 System Boot Disk Image loading now)
Loading Samples
After the S‑550 system loads, and with no USB stick plugged in, press both buttons simultaneously until the LED display reads b0.0.
Now you can choose one of the 99 disk images to load by pressing the left button (tens) and the right button (ones)
Example: To load disk image #52, press the left button five times and press the right button two times
The LED display should read b5.2.
Insert the USB stick and press the button on the RIGHT to load the image file
The LED will briefly display d0 and the USB stick LED, if it has one, will flash on and off while the disk image loads
(If E0 is displayed, the image data on the USB stick is not valid or does not exist)
The 052.IMG file has now been loaded into the memory of the emulator
On the S‑550, load this disk image file using the menu just as you would normally load a 3.5" floppy disk
Using A Mouse?
MODE > DISK > MENU > LOAD > LOAD SET I (or II)
Using The Front Panel Keypad?
DISK > MENU > Arrows to select LOAD > EXECUTE > Arrows to select LOAD SET I (or II) > EXECUTE
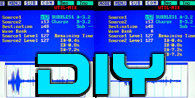
The screen on the S‑550 will count down from 80 to 0, the same as it did before when loading a 3.5" floppy disk
During this load process, the green LED over the left button on the Gotek will light up
After the image file has loaded, remove the USB stick from the emulator
Saving Samples
With no USB stick plugged in, press both buttons simultaneously until the LED display character on the right reads b
Now you can choose one of the 99 disk images to save by pressing the left button (tens) and the right button (ones)
Example: To save disk image #75, press the left button seven times and press the right button five times
The LED display should read b7.5.
On the S‑550, save this disk image file using the menu just as you would normally save a 3.5" floppy disk
Using A Mouse?
MODE > DISK > MENU > SAVE > SAVE SET I (or II)
Using The Front Panel Keypad?
DISK > MENU > Arrows to select SAVE > EXECUTE > Arrows to select SAVE SET I (or II) > EXECUTE
The screen on the S‑550 will count down from 80 to 0, the same as it did before when saving a 3.5" floppy disk
During this save process, the green LED over the left button on the Gotek will light up
The disk image has now been stored into the memory of the floppy emulator but not onto the USB stick
Insert the USB stick and press the LEFT BUTTON to save the disk image file
The LED will briefly display d2 (The disk image file is being transferred from the emulator memory onto the USB stick)
The 075.IMG file has now been saved onto the USB stick
After the image file has been saved, remove the USB stick from the emulator
The USB stick can be plugged into a computer and the 075.IMG file archived for your sample library or it can be loaded back into the S‑550 at any time. Remember to change the filename extender to *.OUT on your computer if you want to send the file to someone or create an actual 3.5" floppy disk using OMNIFLOP, SDISKW, SDISK, etc...
To Make Things Simpler, Please Consider The Following
- Right before you turn off the sampler and call it a day, load the System Boot Disk Image file 000.IMG into the memory of the emulator. This way, the next time you power on the sampler, the operating system will boot automatically and you will be ready to rock
- When powering on the sampler, you will ALWAYS need to hold down both buttons on the USB/FDE. Otherwise it will not work and the error message E16 will appear on the 3‑character LED display
- Get into the habit of always removing the USB stick right after the sampler counts down from 80 to 0 after each disk load or disk save procedure. This will help you keep track of whether or not a new disk image needs to be transferred to the emulator. To make thing REALLY simple, you could install a 74¢ mini‑toggle switch which completely eliminates the need for swapping the USB stick in and out all the time. Super simple instructions for adding a mini‑toggle switch are at this link
- When using the S‑550 Utility Ver. 1.13 System Boot Disk previously with a 3.5" floppy drive, whenever you tried to convert load S‑50 disks, edit wave functions, or use other utilities, the System Boot Disk had to be in the floppy drive in order to load and use the utility programs. Whenever you try to convert load S‑50 disks, edit wave functions, or use other utilities using the new USB/FDE, you will need to load the 000.IMG file into the emulator memory... the same method as using a 3.5" floppy disk just like before
- When powering on an S‑550, it will default to the system setting which is saved on the Startup Utility Boot Disk (which is now 000.IMG). If the default setting in this image file is for an S‑550 which had a mouse connected to the EXT CTRL port, MENU selections on the S‑550 display screen won't respond normally when using buttons on the front panel keypad, the arrow buttons will not work, the cursor will float to the bottom of the screen, etc... Keep this in mind when you choose or create a Startup Utility Boot Disk image file to use. The Startup Utility Boot Disk image file I have supplied in the large *.ZIP files (S‑550_USB_Set‑1.zip / S‑550_USB_Set‑2.zip / S‑550_USB_Set‑3.zip) is set‑up for an S‑550 using a mouse

- If the vendor selling the USB/FDE is able to provide images of the PCB prior to purchasing, check to see that it has "GOTEK system" silkscreened on the board. One step closer to avoiding counterfeit electronics
- When the USB stick is plugged into the emulator, it's quite easy to accidentally press the button on the left when you meant to press the button on the right. Pressing the button on the left will overwrite the currently selected image file on the USB stick. I would suggest locking important disk image files on the USB stick. For example, lock all of the RSB‑5501 through RSB‑5506 disk image files since you will most likely never modify those files. The easy way to lock the disk image files would be by plugging the USB stick into a computer, select the files then right‑click the mouse and choose Get Info (Mac) or Properties (Windows) then lock the files by placing a checkmark in the Locked box (Mac) or in the Read‑only box (Windows). Don't bother trying to lock the entire IMG720 directory. You can't set a directory to Read‑only mode on a USB stick
- Just like a floppy disk, you don't want to remove the USB stick during a load or save process. Nothing good will happen

- As with any hack, this modification is trying to make the sampler do something it normally wouldn't do. I'm unable to guarantee it will work with every S‑50 / S‑330 / S‑550 / W‑30. There is always a risk when merging old technology with new technology

User enilenis over at YouTube has put together an excellent step‑by‑step DIY video for installing the SFRM72‑FU‑DL USB Floppy Drive Emulator in a Roland MC‑300 / MC‑500 / MC‑500MKII Sequencer and a follow‑up video for more advanced mods. Everything demonstrated applies to the S‑550, S‑330 and W‑30 samplers as well. Great stuff!
UPDATE ‑ APRIL 2016
I ordered a SPDT mini‑toggle switch (only 74¢ from taydaelectronics.com) and rigged up an ON/OFF switch which effectively disconnects the USB stick from the emulator. This is very useful because it keeps you from having to constantly plug and unplug the USB stick. There's already a dimple in the exact location where you need to drill a hole for the mini‑toggle switch. It's a little bit of extra work but in terms of convenience, in the long run it yields a huge payoff. A detailed DIY guide for adding a mini‑toggle switch is at this link
A visitor to this website sent me an eMail about how he disassembled his USB/FDD and used some flat black spray paint to make it match the S‑550 color scheme. Lookin' good!

UPDATE ‑ OCTOBER 2019
I found a different model GOTEK that "kind‑of works" with the S‑760. It might also work with the with S‑750 and S‑770 but I've only been able to test it with the S‑760. It uses a higher density of 1.44MB. There are some gotcha's to look out for when using this other "plain‑Jane" model. It's not the best solution and I recommend using a less expensive GOTEK which has its firmware updated with FlashFloppy. DIY details for this other "plain‑Jane" model are shown at this link
Safety Precautions
Modifications made to any factory stock equipment will always pose an element of risk. Sometimes mistakes are made which are irreversible. Improper soldering and handling of electricity can cause serious injury and damage the synthesizer. Use caution when handling static sensitive devices and the PCB. Make sure you are properly grounded, working on a static-free workbench or table and wearing eye protection during any soldering tasks. The author is not responsible for any damage or injury resulting from this DIY info. Use this DIY information at your own risk. And, I can't stress enough, the importance of wearing eye protection while soldering. That stuff flies everywhere sometimes!
Modifications made to any factory stock equipment will always pose an element of risk. Sometimes mistakes are made which are irreversible. Improper soldering and handling of electricity can cause serious injury and damage the synthesizer. Use caution when handling static sensitive devices and the PCB. Make sure you are properly grounded, working on a static-free workbench or table and wearing eye protection during any soldering tasks. The author is not responsible for any damage or injury resulting from this DIY info. Use this DIY information at your own risk. And, I can't stress enough, the importance of wearing eye protection while soldering. That stuff flies everywhere sometimes!
All images, text, JavaScript and HTML Code ©1995- by llamamusic.com
The Information On This Page Is Current As Of
The Information On This Page Is Current As Of
WEBSITE DISCLAIMER
Last updated October 31, 2014
1) You may not copy, reproduce, republish, disassemble, decompile, reverse engineer, post, make available to the public, or otherwise use the content of this website (including all software applications, scripts, webpages, design elements, and graphics) for commercial gain in any way
2) By using the llamamusic.com website and its services you agree to be bound by these terms, which shall take effect immediately on your first use of this website. You may not use llamamusic.com services if you do not accept the terms. If you do not agree to be bound by all of the following terms please do not access and use llamamusic.com. llamamusic.com reserves rights to block violators of these terms from using its services or restrict their access in any form at any time
3) You agree that lawful owners of llamamusic.com own all legal right, title, copyrights, design rights, and other intellectual property rights (registered and unregistered) in this website and all content (including all software applications) located on the site
4) llamamusic.com website content and services are provided "AS IS" and on an "AS AVAILABLE" basis. To the extent permitted by law, llamamusic.com excludes all representations and warranties (whether express or implied by law), including the implied warranties of satisfactory quality, fitness for a particular purpose, non‑infringement, compatibility, security, and accuracy. llamamusic.com does not guarantee the accuracy, completeness, or performance of the website or any of the content and services. While we try to ensure that all functionality provided is correct, no responsibility is accepted by or on behalf of llamamusic.com for any errors or inaccurate content on the website
5) llamamusic.com shall not be liable for any of the following losses or damage (whether such damage or losses were foreseen, foreseeable, known, or otherwise): (a) loss of data; (b) loss of revenue or anticipated profits; (c) loss of business; (d) loss of opportunity; (e) loss of goodwill or injury to reputation; (f) losses suffered by third parties; or (g) any indirect, consequential, special or exemplary damages arising from the use of llamamusic.com and its services regardless of the form of action
6) You agree to use this website only for lawful purposes, and in a way that does not infringe the rights of, restrict or inhibit anyone else’s use of llamamusic.com
7) The information provided by llamamusic.com ("we," "us," or "our") on llamamusic.com (the "Site") is for general informational purposes only. All information on the Site is provided in good faith, however we make no representation or warranty of any kind, express or implied, regarding the accuracy, adequacy, validity, reliability, availability, or completeness of any information on the Site. UNDER NO CIRCUMSTANCE SHALL WE HAVE ANY LIABILITY TO YOU FOR ANY LOSS OR DAMAGE OF ANY KIND INCURRED AS A RESULT OF THE USE OF THE SITE OR RELIANCE ON ANY INFORMATION PROVIDED ON THE SITE. YOUR USE OF THE SITE AND YOUR RELIANCE ON ANY INFORMATION ON THE SITE IS SOLELY AT YOUR OWN RISK
EXTERNAL LINKS DISCLAIMER
The Site may contain (or you may be sent through the Site) links to other websites or content belonging to or originating from third parties or links to websites and features in banners or other advertising. Such external links are not investigated, monitored, or checked for accuracy, adequacy, validity, reliability, availability, or completeness by us. WE DO NOT WARRANT, ENDORSE, GUARANTEE, OR ASSUME RESPONSIBILITY FOR THE ACCURACY OR RELIABILITY OF ANY INFORMATION OFFERED BY THIRD‑PARTY WEBSITES LINKED THROUGH THE SITE OR ANY WEBSITE OR FEATURE LINKED IN ANY BANNER OR OTHER ADVERTISING. WE WILL NOT BE A PARTY TO OR IN ANY WAY BE RESPONSIBLE FOR MONITORING ANY TRANSACTION BETWEEN YOU AND THIRD‑PARTY PROVIDERS OF PRODUCTS OR SERVICES
AFFILIATES DISCLAIMER
The Site may contain links to affiliate websites. Our affiliates include the following:
• supersynthprojects.com • vecoven.com • super-jx.com
