 Join the "Roland Sampler Information Exchange" group on Facebook
If you find some of this DIY info useful, please consider donating a small amount. All donations are used for future DIY sampler development and free info. Thanks!

|

|


This page contains S‑50, S‑330, S‑550, W-30, S‑7xx and SP‑700 information about;
 GOTEK, GOTEK, GOTEK - By Far, The Most Heavily Traveled Path On This Website!
STARTUP/UTILITY DISKS - Creating Boot Disks & Booting The Sampler
S‑50 SUPPORT FILES + INFO - Startup Disks, Library Disks & Manuals
W‑30 SUPPORT FILES + INFO - Startup Disks, Tips, Tricks & Manuals
S‑550 SUPPORT FILES + INFO - Startup Disks, Library Disks & Manuals
S‑330 SUPPORT FILES + INFO - Startup Disks, Library Disks & Manuals
S‑7xx SUPPORT FILES + INFO - S‑750, S‑760 & S‑770 Startup Disks, Library Disks & Manuals
SP‑700 SUPPORT FILES + INFO - The Quirky But VERY Powerful Playback Sampler ACCESSORIES ‑ Color Monitors, Composite Video, Mouse, RC-100, DT‑100 Digitizer Tablet
DISK FORMATS - Formats Shared Between The Various Samplers
MAGAZINE ARTICLES - Reviews & Feature Reports From "The Old Days"
SAMPLER SPECIFICATIONS - Weight, Dimensions, Memory, Audio Outs, etc..
FDD SUPPORT FILES + INFO - Inexpensive After‑Market Floppy Disk Drive DIY's
CD‑5 SUPPORT FILES + INFO - Tech Info & Reference Photos
OPERATING SYSTEM MATRIX - Current, Legacy & Recommended O/S
AKAI CD‑ROM COMPATIBILITY - An Online Utility To Test Roland Compatibility w/AKAI
FAVORITE DIY TOOLS VENDORS - Tips For DIY Freaks Who Like To Save $$$
ALTERNATE SAMPLE LIBRARIES - Freebies For Your Sample Library
*.OUT / *.IMG / *.S50 / *.W30 FILES - Share Your Sampler Library With Others
CONTROL INPUTS AND OUTPUTS - A Visual Guide Of Sampler IN's and OUT's
BOOT SAMPLER FROM HARD DRIVE OR SCSI DEVICE ‑ S‑550 / W‑30 / S-760
HOW TO LOAD AKAI CD‑ROM's ON ROLAND SAMPLERS - Step-By-Step Guide GOTEK, GOTEK, GOTEK - By Far, The Most Heavily Traveled Path On This Website!
STARTUP/UTILITY DISKS - Creating Boot Disks & Booting The Sampler
S‑50 SUPPORT FILES + INFO - Startup Disks, Library Disks & Manuals
W‑30 SUPPORT FILES + INFO - Startup Disks, Tips, Tricks & Manuals
S‑550 SUPPORT FILES + INFO - Startup Disks, Library Disks & Manuals
S‑330 SUPPORT FILES + INFO - Startup Disks, Library Disks & Manuals
S‑7xx SUPPORT FILES + INFO - S‑750, S‑760 & S‑770 Startup Disks, Library Disks & Manuals
SP‑700 SUPPORT FILES + INFO - The Quirky But VERY Powerful Playback Sampler ACCESSORIES ‑ Color Monitors, Composite Video, Mouse, RC-100, DT‑100 Digitizer Tablet
DISK FORMATS - Formats Shared Between The Various Samplers
MAGAZINE ARTICLES - Reviews & Feature Reports From "The Old Days"
SAMPLER SPECIFICATIONS - Weight, Dimensions, Memory, Audio Outs, etc..
FDD SUPPORT FILES + INFO - Inexpensive After‑Market Floppy Disk Drive DIY's
CD‑5 SUPPORT FILES + INFO - Tech Info & Reference Photos
OPERATING SYSTEM MATRIX - Current, Legacy & Recommended O/S
AKAI CD‑ROM COMPATIBILITY - An Online Utility To Test Roland Compatibility w/AKAI
FAVORITE DIY TOOLS VENDORS - Tips For DIY Freaks Who Like To Save $$$
ALTERNATE SAMPLE LIBRARIES - Freebies For Your Sample Library
*.OUT / *.IMG / *.S50 / *.W30 FILES - Share Your Sampler Library With Others
CONTROL INPUTS AND OUTPUTS - A Visual Guide Of Sampler IN's and OUT's
BOOT SAMPLER FROM HARD DRIVE OR SCSI DEVICE ‑ S‑550 / W‑30 / S-760
HOW TO LOAD AKAI CD‑ROM's ON ROLAND SAMPLERS - Step-By-Step Guide
|
 I think these two topics are important enough to place at the top of all my synth INFO webpages I think these two topics are important enough to place at the top of all my synth INFO webpages

2) I receive a lot of eMails and field many questions at synth related forums and also on Facebook. The most common question I get about problems with a synth has to do with errors when trying to load Patches and Tones. About 99.9% of the time, the problem always turns out to be a crappy MIDI interface. If you have a cheapo MIDI interface which looks similar to the one shown on the right... throw this piece of shit in the trash! Do It Now. Seriously! This thing is total junk and you get what you pay for. Inexpensive MIDI interfaces like this are unable to properly regulate the buffering of MIDI data. They will work fine with simple messages such as CC, Note On, Note Off, etc... however, when you try to send SysEx messages which are much longer, the SysEx data cuts off after only sending a few bytes. Investing in a higher quality MIDI interface will solve Load/Save errors and other communication problems. Also, if you experience errors when transferring Patch and Tone data from a computer to a synthesizer, DON'T use a USB hub. Plug your MIDI interface directly from the computer to the synthesizer. Why? Some external USB hubs fail when multiple USB devices are attached because there is not enough power to share. Small power sags will suddenly cause one or ALL of the attached USB devices connected to the hub to fail, often accompanied with a "disconnect" signal |
These MIDI interfaces have been tested and will work with large SysEx Dumps:
       ✓ ESI Midimate II                  ✓ MOTU 823 mk3                ✓ RME FireFace UC 2X2
       ✓ Focusrite Scarlett 2i4 2nd Gen   ✓ M-Audio Profire 2626        ✓ ESI Midimate eX
       ✓ Focusrite Scarlett 4i4 2nd Gen   ✓ Miditech MIDIface II Thru   ✓ Yamaha UX 16 USB/MIDI
       ✓ Focusrite Scarlett 6i6 3rd Gen   ✓ Tie Studio MIDI 1i1o        ✓ Miditech MIDIface 4x4
       ✓ iConnectivity mio 1x1            ✓ iConnectivity mioXC 1x1
These MIDI interfaces are shit and do not work with large SysEx Dumps (some might w/special driver): ✗ AVID/M-Audio Fast Track Pro ✗ M-Audio MIDISport UNO ✗ M-Audio MIDISport 1x1 ✗ M-Audio MIDISport 2X2 ✗ M-Audio Uno ✗ Lekato MIDI USB ✗ DigitalLife MIDI-C01 ✗ Fore MIDI Interface ✗ Hosa USM-422 MIDI ✗ Hosongnic, Urweonu, HiFangeow, etc... |
STARTUP/UTILITY DISKS 
If you recently purchased an S‑50, S‑550, S‑330, S‑7xx or W‑30 sampler, you might find yourself without the required Startup/Utility Boot disk to get things rolling. Unlike a regular synthesizer, you can't power on an S‑Series or W‑Series sampler and start playing sounds right away. An operating system needs to be loaded manually before it will work
The four options you have are;
 Additional Info: For those of you who want to ship 3.5" floppy disks to other sampler owners via USPS mail, these disks are considered a "Media Mail" item and can be shipped at significantly reduced rates. The cost to ship four disks at regular postage rates will range from $8 to $11 but... using the "Media Mail" rate is less than $5. The only caveat is you can't send blank floppy disks. The disks must have media on them. However, you would be hard‑pressed to find a USPS worker using a PC with a floppy disk drive to verify blank media so... I think you're safe either way


 S‑50 RSB Disk Image Library (80 Disks)
This 80 disk set contains the entire S‑50 Sampler Library issued by Roland
S‑550 RSB Disk Image Library Converted To S‑50 Format (60 Disks)
This 60 disk set contains the entire S‑550 Sampler Library issued by Roland
S‑50 L-Series Disks (L-501 through L-509)
This 45‑disk set was released in 1987 and also appears on the LCD‑1 CD‑ROM
Some of these samples are not in the S‑50, S‑550 or S‑330 RSB Libraries
NOTE: The S‑50 will not work with any type of mouse. The EXT CONTROLLER port on the back of the S‑50 will only work with the optional DT‑100 Digitizer Tablet. If you plug a mouse into the EXT CONTROLLER port, you run the risk of causing a short circuit in the sampler. Likewise, if you plug a non‑Roland mouse into the EXT CTRL port on the S‑550, S‑330, S‑750, S‑760 or S‑770, you run the risk of causing a short circuit. If this happens, see the Roland Fuse Reference Webpage
Q: How Do I Use S‑550 and S‑330 Sound Disks With An S‑50?
A: Create an SYS‑505 Utility Disk then boot the S‑50 with the SYS‑505 Utility Disk. Using the S‑50 "Convert Load Function" will enable S‑550 and S‑330 disks to be loaded into the S‑50. Likewise, using the "Convert Disk Function" will enable S‑550 and S‑330 disks to be converted to the S‑50 sample format and then saved (See Page 8 of the SYS‑505 Library Converter Manual)
Q: The S‑50 has a 25‑pin connector on the back. What is this port used for?
A: This is a DB25 SCSI port (shown at this link) but Roland never developed the required hardware or software to make it functional. In the early 1990's, a company called ToneGenics Corporation developed hardware and custom boot disk software for adding external SCSI Hard Drives but... it was quite expensive at $500 and never gained popularity
S‑50 System Utility/Boot Disk v2.0
This 3.5" floppy disk image file allows you to create a System Utility Disk which is used to boot an S‑50
File Format: *.OUT file for use with the OMNIFLOP, SDISK, SDISKW or "dd" utility. To use with factory firmware on a GOTEK FDD/USB, rename the file to 000.IMG
S‑50 System Utility/Boot Disk v2.0 (!!! Total Volume Issue !!!)
Note: For unknown reasons, this System Boot/Utility Disk on the Roland website has the Total Volume Output set to zero and it's
been online for downloading like this for 38+ years now and they haven't fixed it! Weird!! Once this disk is loaded, to get
any sound out of your S‑50, use the following procedure:
S‑50 SYS‑505 Utility Disk v1.00
The SYS‑505 Utility Disk will convert S‑550 or S‑330 Roland Sound Library disks for use with an S‑50
File Format: *.OUT file for use with the OMNIFLOP, SDISK, SDISKW or "dd" utility
SYS‑505 Utility Disk v1.00
SYS‑505 Library Converter Manual
S-50 Director-S Sequencer (Dongle Free & Original Demos) & Owner's Manual
Official Roland document and Director-S downloads
File Format: *.OUT file & *.PDF File
S-50 Director-S Sequencer Owner's Manual
Director-S Sequencer Youtube Overview & Tutorial
S-50 Director-S Sequencer - Dongle Free Version (SYS‑503)
S-50 Director-S Sequencer - Demo Disks #1 And #2 (SYS‑503)
(A dongle is required only if you want to save songs/sequences. These versions are useful because they contain SYS‑503 Sound & Song Data)
OMNIFLOP Utility
Point‑and‑click WINDOWS program for creating Roland sampler 3.5" floppy disks from *.OUT disk image files
OMNIFLOP is a better alternative than using the outdated DOS based SDISK Utility
You will need to make sure that the floppy disk drive you are using is internal and is able to read/write 720KB disks
I have used OMNIFLOP with excellent results on Windows 7 (Ultimate 32‑bit) and also Windows XP (Professional)
 I created some useful installation notes here
File Format: *.EXE File For WINDOWS
Download OMNIFLOP here
S-50 Internal 720KB DS/DD 3.5" Floppy Disk Drive
Toshiba P/N: FDD4261A0K (Original Factory Installed Model - Early Production Runs)
Toshiba P/N: FDD4261G0K (Original Factory Installed Model - Late Production Runs)
Chinon P/N: FZ-357 (After-Market FDD Works By Simply Moving Jumpers)
Sony P/N: MPF920-Z/121 (After‑Market / DIY Requiring Some Soldering)
Panasonic P/N: JU256A-488PC (After‑Market / DIY Requiring Some Soldering)
Samsung SFD-321B/LE (After-Market FDD Requires Some DIY Wiring)
Mitsubishi P/N: MF355F‑3490UC (After‑Market / DIY Requiring Some Soldering)
Note: Mitsubishi P/N: MF355F‑3490UC has a White Bezel
* More info about installing these inexpensive After‑Market FDD's can be found at this link
The S‑50 reads and writes sampler data using the 720KB DS/DD format. Some users say they use 1.44MB HD 3.5" blank disks by covering up the hole on the opposite side of the write‑protect tab with opaque tape. I have had mixed results in the past so I only use the hard to find and (usually) more expensive 720KB DS/DD disks. Different magnetic coatings are used on 1.44MB HD vs. 720KB DS/DD disks. There are also some differences in how the drives work reading HD vs. DS/DD disks. Data written in the DS/DD format onto HD discs will probably not be readable for very long. If you fake the drive out by taping over the HD disk identifying hole to use HD disks as DS/DD, it uses a lower than normal magnetic force normally required for writing data onto DS/DD discs. This can lead to higher error rates and sometimes the data will just disappear without warning. There is some more detailed info at retrotechnology.com about the different magnetic coatings used on 1.44MB HD vs. 720KB DS/DD disks
An excellent source for inexpensive recycled 720KB DS/DD 3.5" floppy disks is floppydisk.com
Note: All floppy disks are reformatted, tested and relabeled. I highly recommend this vendor!
If the sampler refuses to boot, the first step to take is carefully clean the read/write head on the 3.5" floppy disk drive (FDD) using a Q-Tip and 91% isopropyl alcohol (IPA). If that does not solve the booting isssue, the most common failure reported by S‑50 owners is a broken 3.5" FDD. After 35+ years of use, these mechanical dinosaurs simply crap out and die. In most cases, the only repairable parts are the three sensor switches which are activated whenever a disk is inserted:
❖ Density Mode (DD/HD)
❖ Disk Inserted (YES/NO)
❖ Write Protection (ON/OFF)
If any of these switches are broken or dirty, it could prevent the sampler O/S from working properly. Some users have reported success at solving some boot failure issues by performing maintenance on these switches. Depending on the model and manufacturer, these switches can be either mechanical or optical. Optical switches use an infrared emitter/sensor combo which look like a pair of clear and/or opaque LED's. Over time, optical sensor switches have a tendency to gather dust and debris. Spraying compressed air will sometime clean out the area. More intense accumulation requires disassembly and a thorough cleaning with a Q-Tip and 91% IPA. Mechanical switches are somewhat harder to clean and usually require some DeoxIT lube cleaner or a Q-Tip with 91% IPA
If you are considering updating your S‑50 to work with a GOTEK USB Floppy Drive Emulator, see the information at this link

Starting Up & Powering Off The S‑50
Before turning the power on or off
Creating Sub Tones On The S-50
The S-50 Owner's Manual and Supplemental Notes have a section detailing the steps for creating Sub Tones
Unfortunately, those instructions do not work
I have created a webpage with detailed instructions showing the correct procedure
File Format: Webpage Link
Creating Sub Tones On The S‑50
 Continuous-Looping Reverse Samples On The S-50
I like to create unusual samples on the S‑50 & S‑550. One of the most useful functions for me is the REVERSE loop mode. Unfortunately, there is no easy way within any of the S‑50 menus to create a "continuous‑looping reverse" sample. I have put together a step‑by‑step method to create a "continuous‑looping reverse" sample. This little trick bypasses a limitation of the sampler O/S and adds a new sampling feature. It's great news for others out there who like to create weird samples!
File Format: Webpage Link
Continuous-Looping Reverse Samples On The S‑50
Hidden Modes On The S-50
S‑50 designer Akira Matsui has hidden a very special test mode inside the system software that will enable you to take the S‑50 out of Rotary mode and set the voices to "Retrigger" operation. It enables you to operate your S‑50 in a special mode that retriggers a voice, rather than play sounds in the usual rotary manner. Another hidden feature will enable you to identify the MIDI note number for any key you touch on the keyboard. It leaves the voicing system in "Rotary" or "Normal" mode but will display MIDI note number information on your CRT monitor. Details for unlocking these two modes are here to download
File Format: PDF Document
Hidden Modes On The S-50
S‑50 Noise, Static or Distortion Problems?

Two solutions are available at the DIY Page
S‑50 YouTube Tutorials (Johnny Morgan)
Johnny Morgan has a YouTube channel with some very informative S‑50 & S‑550 tutorials. Definitely worth a visit if you are a new S‑50 owner
Roland S‑50 Patch Editing
Roland S‑50 Sampling and Tech Overview
S‑50 YouTube Demo & Review (Espen Kraft)
Espen Kraft has a YouTube channel with some very informative S‑50 & S‑550 tutorials. Definitely worth a visit if you are a new S‑50 owner
https://www.youtube.com/watch?v=hej0PmH4qic Roland S‑50 Demo & Review
S-50 Owner's Manuals, Service Notes & Supplemental Notes
Official Roland documents with details about Performance Disks, Patches, Sub Tones, Sampling, Schematics and more
File Format: *.PDF File
S‑50 Supplemental Notes
S‑50 Owner's Manual v2.0
S‑50 Service Notes v10‑88
Manuel du Propriétaire du Roland S-50 v1.0 (Français)


S‑550 RSB Disk Image Library (60 Disks)
This 60 disk set contains the entire S‑50 Sampler Library issued by Roland
S‑50 RSB Disk Image Library Converted To S‑550 and S‑330 Formats (80 Disks)
This is the entire 80 disk S‑50 RSB Library converted over to the S‑550 and S‑330 formats
S‑550 L-Series Disks (L-501 through L-509)
This 45 disk set was released in 1987 and also appears on the LCD‑1 CD‑ROM
Some of these samples are not in the S‑50, S‑550 or S‑330 RSB Libraries
Q: How Do I Use S‑50 RSB Sampler Library Disks With An S‑550?
A: Use the S‑550 UTILITY menu selection called "Convert Load" which enables S‑50 disks to be loaded and saved for the S‑550 sampler (See page 147 of the S‑550 Owner's Manual v1.1)
S‑550 System Utility Disk v1.13 (This is the O/S I recommend using all the time for floppy disk drive or USB/FDE systems without SCSI)
This 3.5" floppy disk image file allows you to create a System Utility Disk which is used to boot an S‑550 (for systems without an HD5-IF SCSI card)
File Format: *.OUT disk image files for use with the OMNIFLOP, SDISK, SDISKW or "dd" utility. To use with a factory firmware FDD/USB, rename the file to 000.IMG
S‑550 System Utility Disk v1.13
S‑550 CD‑5 CD-ROM Utility Disk v1.00 (This is the O/S I recommend using all the time for systems with the HD5-IF SCSI card installed)
This 3.5" floppy disk image enables use of external SCSI devices such as Hard Drives, CD‑ROM Drives, ZIP Drives, SCSI2SD, raSCSI, ZuluSCSI and other external devices. It's name originates from the unobtainable external CD‑5 external CD‑ROM drive which is no longer available. Some S‑550 owners, including myself, have had problems using Version 1.02 with ZIP drives and multiple SCSI devices. Using this older Version 1.00 solves that problem with SCSI device compatibility. VERY IMPORTANT: If you want the S‑550 to boot from a Hard Drive and not from the floppy drive, you will need to configure the S‑550 CD‑5 CD-ROM Utility Disk v1.00 differently from its default setting. Detailed instructions are at this link
File Format: *.OUT disk image files for use with the OMNIFLOP, SDISK, SDISKW or "dd" utility
CD‑5 CD‑ROM Utility Disk v1.00
CD‑5 Owner's Manual (v.88-11)
S‑550 HD5‑IF Hard Disk Utility Disk v1.03 (I DO NOT recommend using this O/S version! It seems to have many bugs)
↳ Use the CD‑5 CD‑ROM Utility Disk v1.00 instead ↵
S‑550 CD‑5 CD-ROM Utility Disk v1.02 (I DO NOT recommend using this O/S version! It seems to have many bugs)
↳ Use the CD‑5 CD‑ROM Utility Disk v1.00 instead ↵
S-550 Director-S Sequencer (Dongle Free) & Owner's Manual
Official Roland document and Director-S downloads
File Format: *.OUT file & *.PDF File
S-550 Director-S Sequencer Owner's Manual
Director-S Sequencer Youtube Overview & Tutorial
S-550 Director-S Sequencer - Dongle Free Version (SYS‑553)
S-550 Director-S Sequencer + Demo Disks A & B
(A dongle is required only if you want to save songs/sequences. These disks are useful because they contain the SYS‑553 Sound & Song Data)
OMNIFLOP Utility
Point‑and‑click WINDOWS program for creating Roland sampler 3.5" floppy disks from *.OUT disk image file s
OMNIFLOP is a better alternative than using the outdated DOS based SDISK Utility
You will need to make sure that the floppy disk drive you are using is internal and is able to read/write 720KB disks
I have used OMNIFLOP with excellent results using Windows 7 Ultimate 32‑bit and Windows XP
I created some useful installation notes here
File Format: *.EXE File For WINDOWS
OMNIFLOP
S-550 Internal 720KB DS/DD 3.5" Floppy Disk Drive
Toshiba P/N: FDD4261A0K (The Original Factory Installed Model - Early Production Runs)
Toshiba P/N: FDD4261G0K (The Original Factory Installed Model - Late Production Runs)
Chinon P/N: FZ-357 (After‑Market FDD Works By Simply Moving Jumpers)
Sony P/N: MPF920-Z/121 (After‑Market / DIY Requiring Some Soldering)
Panasonic P/N: JU256A-488PC (After‑Market / DIY Requiring Some Soldering)
Mitsubishi P/N: MF355F‑3490UC (After‑Market / DIY Requiring Some Soldering)
Note: Mitsubishi P/N: MF355F‑3490UC has a White Bezel
* More info about installing these inexpensive After‑Market FDD's can be found at this link
The S‑550 reads and writes sampler data using the 720KB DS/DD format. Some users say they use 1.44MB HD 3.5" blank disks by covering up the hole on the opposite side of the write‑protect tab with opaque tape. I have had mixed results in the past so I only use the hard to find and (usually) more expensive 720KB DS/DD disks. Different magnetic coatings are used on 1.44MB HD vs. 720KB DS/DD disks. There are also some differences in how the drives work reading HD vs. DS/DD disks. Data written in the DS/DD format onto HD discs will probably not be readable for very long. If you fake the drive out by taping over the HD disk identifying hole to use HD disks as DS/DD, it uses a lower than normal magnetic force normally required for writing data onto DS/DD discs. This can lead to higher error rates and sometimes the data will just disappear without warning. There is some more detailed info at retrotechnology.com about the different magnetic coatings used on 1.44MB HD vs. 720KB DS/DD disks
An excellent source for inexpensive recycled 720KB DS/DD 3.5" floppy disks is floppydisk.com
Note: All floppy disks are reformatted, tested and relabeled. I highly recommend this vendor!
If the sampler refuses to boot, the first step to take is carefully clean the read/write head on the 3.5" floppy disk drive (FDD) using a Q-Tip and 91% isopropyl alcohol (IPA). If that does not solve the booting isssue, the most common failure reported by S‑550 owners is a broken 3.5" FDD. After 35+ years of use, these mechanical dinosaurs simply crap out and die. In most cases, the only repairable parts are the three sensor switches which are activated whenever a disk is inserted:
❖ Density Mode (DD/HD)
❖ Disk Inserted (YES/NO)
❖ Write Protection (ON/OFF)
If any of these switches are broken or dirty, it could prevent the sampler O/S from working properly. Some users have reported success at solving some boot failure issues by performing maintenance on these switches. Depending on the model and manufacturer, these switches can be either mechanical or optical. Optical switches use an infrared emitter/sensor combo which look like a pair of clear and/or opaque LED's. Over time, optical sensor switches have a tendency to gather dust and debris. Spraying compressed air will sometime clean out the area. More intense accumulation requires disassembly and a thorough cleaning with a Q-Tip and 91% IPA. Mechanical switches are somewhat harder to clean and usually require some DeoxIT lube cleaner or a Q-Tip with 91% IPA
If you are considering updating your S‑550 to work with a USB Floppy Drive Emulator, see the information at this link
 Take special care when working with FDD's on the S-550. Why? All of the S‑550 ribbon cables I've ever seen were installed backwards at the factory (see Figure 1). Never trust the keyed notch, arrow or stripe on the S‑550's 34‑Pin ribbon cable connector. Ensure that Pin‑1 on the ribbon cable connected at the Main PCB section matches up with Pin‑1 on the disk drive. Pin‑1 is usually silk‑screened on the FDD PCB somewhere and also on the S‑550 Main PCB
Starting Up And Powering Off The S‑550
Before turning on the power, you should follow these steps to ensure the sampler works properly

Booting The S‑550 From A Hard Drive, SCSI2SD Or ZuluSCSI Device
S‑550 External Boot Configuration
Continuous-Looping Reverse Samples On The S-550
I like to create unusual samples on the S‑550 & S‑50. One of the most useful functions for me is the REVERSE loop mode. Unfortunately, there is no easy way within any of the S‑550 menus to create a "continuous‑looping reverse" sample. I have put together a step‑by‑step method to create a "continuous‑looping reverse" sample. This little trick bypasses a limitation of the sampler O/S and adds a new sampling feature. It's great news for others out there who like to create weird samples!
File Format: Webpage Link
Continuous-Looping Reverse Samples On The S‑550
Turning On System Exclusive For The S-550
The S-550 O/S is quite precise when navigating via mouse or the numeric keypad. Sometimes the cursor needs to be in a specific location before any other parameter slot can be chosen and changed. As seen in the image to the right, trying to select the EXCLUSIVE ON/OFF parameter while in MIDI MODE is impossible unless the cursor is first moved to the slot directly above (green arrow) and then down one slot. If the cursor is located in a different location (i.e. red arrow), it's impossible to move the cursor down at all. Another important thing to make System Exclusive operational is to have DEVICE ID and CHANNEL set to "1" (orange arrows). More info can be found starting at Page 117 of the S‑550 Owners Manual
File Format: *.JPG Image
Turning On System Exclusive For The S-550

S‑550 YouTube Demo (SynthMania)
Espen Kraft has a YouTube channel with some very informative sampler Demos. Definitely worth a visit if you are a new S‑550 owner
Roland S‑550 Demo
YouTube Tutorials* (Johnny Morgan)
Johnny Morgan has a YouTube channel with some very informative S‑50 & S‑550 tutorials. Definitely worth a visit if you are a new S‑550 owner
* Although these two links cover S‑50 operation, they are quite useful for new S‑550 owners because the O/S is nearly idential (i.e. Navigation, Alpha-Dial operation & several button inputs are the same)
Roland S‑50 Patch Editing
Roland S‑50 Sampling and Tech Overview
New HD5‑IF SCSI Board (Johnny Morgan)
The original HD5‑IF SCSI board is very hard to source because as I estimate, Roland only manufactured enough of these boards for 10% of the S-550's out there. If you are looking for one... you are in luck because Johnny Morgan has created a new HD5‑IF board! It has been reversed engineered from the original Roland schematics. I've been using this new SCSI board and have been getting fantastic results. The form‑factor is exactly the same as the original and it fits perfectly in my S‑550. I have tested it with SCSI2SD, ZuluSCSI, Quantum UltraSCSI Hard Drives and ZIP Drives. It works great! You can find ordering info and more from these links
Ordering Info
Johnny Morgan Synth Dreams - YouTube Channel
S-550 Owner's Manual, Service Notes & Supplemental Notes
Official Roland documents with details about Performance Disks, Patches, Sub Tones, Sampling, Schematics, SCSI, O/S differences and more
File Format: *.PDF File
S‑550 Supplemental Notes v03-98
S‑550 Supplementary Explanation - System Disk Sound Library v01-87
CD‑5 Owner's Manual (v.88-11)
S‑550 Owner's Manual v1.1 (09-87)
S‑550 Service Notes v11‑88


S‑330 System And Utility Disks
The S‑330 System Disk and the Utility Disk Image *.OUT files plus system documentation are available at the Li'l Chips Systems homepage in the Roland Support section;
"Li'l Chips Systems" Roland Download Page (filename: Roland_S-330_Sampler.zip)
S‑330 Sound Library
S‑330 Sound Library
The S‑330 is able to read all S‑550 Sound Disks
Plenty are available for downloading at the SAMPLES Page
S-330 Director-S Sequencer (Dongle Free) & Owner's Manual
Official Roland document and Director-S downloads
File Format: *.OUT file & *.PDF File
S-330 Director-S Sequencer Owner's Manual
Director-S Sequencer Youtube Overview & Tutorial
S-330 Director-S Sequencer - Dongle Free Version (SYS‑333)
Director-S Original Song Data Disk (A) And Sound Data Disk (B)
(These two Song & Sound disks are for the S-550. Untested but... they might load via MENU commands on the S-50, S-330 & W-30)
S-330 Internal 720KB DS/DD 3.5" Floppy Disk Drive
Teac P/N: FD-235HF-A527(The Original Factory Installed Model - Early Production Runs)
Toshiba P/N: ND-352S-A (The Original Factory Installed Model - Late Production Runs)
The S‑330 reads and writes sampler data using the 720KB DS/DD format. Some users say they use 1.44MB HD 3.5" blank disks by covering up the hole on the opposite side of the write‑protect tab with opaque tape. I have had mixed results in the past so I only use the hard to find and (usually) more expensive 720KB DS/DD disks. Different magnetic coatings are used on 1.44MB HD vs. 720KB DS/DD disks. There are also some differences in how the drives work reading HD vs. DS/DD disks. Data written in the DS/DD format onto HD discs will probably not be readable for very long. If you fake the drive out by taping over the HD disk identifying hole to use HD disks as DS/DD, it uses a lower than normal magnetic force normally required for writing data onto DS/DD discs. This can lead to higher error rates and sometimes the data will just disappear without warning. There is some more detailed info at retrotechnology.com about the different magnetic coatings used on 1.44MB HD vs. 720KB DS/DD disks
An excellent source for inexpensive recycled 720KB DS/DD 3.5" floppy disks is floppydisk.com
Note: All floppy disks are reformatted, tested and relabeled. I highly recommend this vendor!
If the sampler refuses to boot, the first step to take is carefully clean the read/write head on the 3.5" floppy disk drive (FDD) using a Q-Tip and 91% isopropyl alcohol (IPA). If that does not solve the booting isssue, the most common failure reported by S‑330 owners is a broken 3.5" FDD. After 35+ years of use, these mechanical dinosaurs simply crap out and die. In most cases, the only repairable parts are the three sensor switches which are activated whenever a disk is inserted:
❖ Density Mode (DD/HD)
❖ Disk Inserted (YES/NO)
❖ Write Protection (ON/OFF)
If any of these switches are broken or dirty, it could prevent the sampler O/S from working properly. Some users have reported success at solving some boot failure issues by performing maintenance on these switches. Depending on the model and manufacturer, these switches can be either mechanical or optical. Optical switches use an infrared emitter/sensor combo which look like a pair of clear and/or opaque LED's. Over time, optical sensor switches have a tendency to gather dust and debris. Spraying compressed air will sometime clean out the area. More intense accumulation requires disassembly and a thorough cleaning with a Q-Tip and 91% IPA. Mechanical switches are somewhat harder to clean and usually require some DeoxIT lube cleaner or a Q-Tip with 91% IPA
If you are considering updating your S‑330 to work with a USB Floppy Drive Emulator, see the information at this link
Starting Up And Powering Off The S‑330
Before turning on the power, you should follow these steps to ensure the sampler works properly
Is Your S‑330 Freezing, Locking Up Or Experiencing Strange Behavior?
When the S‑330 was manufactured in 1988, square 68‑pin IC's were starting to gain popularity in consumer electronics. Roland installed a 68‑pin socketed IC for the S‑330 main micro‑controller (Figure A - click image for a larger view). Over time, if the S‑330 gets moved around a lot and/or overheats, stress on this PCB area will eventually cause the 68‑pin IC to become unseated from the socket (Figure B). All LED's on the sampler will light‑up and the sampler freezes/locks‑up. In most cases, the solution is to remove the 68‑pin IC and reseat it. Easier said than done! Back in the 1980's, I worked as a computer repair tech and have reseated hundreds of these IC's. Removing these 68‑pin IC's is no easy task. I had to use a special PLCC Extraction Tool (Figure C). You can find these brand new on eBay or Amazon for only $5 (USD). It's worth the investment compared to using a homemade tool. Don't risk damaging that irreplaceable IC! Once you get that IC removed, I suggest taking a sewing needle and "VERY GENTLY" inserting it between the outer plastic and the pin contact (Figure D). This forces the pin contact inward and creates better contact with the IC. It's time consuming but do this for all 68 pin contacts and don't force them inward very far. Just do it slightly. After all 68 pin contacts are done, observe the orientation notch for pin #1 and carefully press the 68‑pin IC back into the socket. This is the method I used for years and it worked 100% of the time. As always, before removing the cover on any synth or sampler, ensure that it is unplugged from the power source. Also, double‑check you are properly grounded using an anti‑static wristband and are working on a static‑free workbench
Note: Manufacturers noticed that these 68‑pin IC's were popping loose from their sockets so they started installing metal covers to keep the IC in place. These work some of the time... but not always. Also, note that some of the early S‑330 production models do not have this metal cover installed
S-330 Owner's Manual, Service Notes & Supplemental Notes
Official Roland documents with details about Sampling, Schematics, SCSI, O/S differences and more
File Format: *.PDF File
S‑330 Owner's Manual + Guide Book v12‑88
S‑330 Service Notes v05‑88


W‑30 Sound Library
W‑30 Sound Library
The W‑30 is able to read all S‑50, S‑550 and S‑330 Sound Disks
Plenty are available for downloading at the SAMPLES Page
W‑30 System Utility Disk v1.10 (non-SCSI Systems Only)
This 3.5" floppy disk image file allows you to create a System Utility Disk used to boot a W‑30
File Format: *.OUT disk image files for use with the OMNIFLOP, SDISK, SDISKW or "dd" utility. To use with a factory firmware FDD/USB, rename the file to 000.IMG
W‑30 System Utility Disk v1.10
W‑30 Hard Drive And CD-ROM SCSI Utility Disk v1.07
This 3.5" floppy disk image enables use of the optional KW30 SCSI IC chip and Hard Drives, ZIP Drives, CD‑ROM's, SCSI2SD and ZuluSCSI
VERY IMPORTANT: If you want the W‑30 to boot from a SCSI device, read the setup suggestions found at this link
File Format: *.OUT disk image files for use with the OMNIFLOP, SDISK, SDISKW or "dd" utility. To use with a factory firmware FDD/USB, rename the file to 000.IMG
W‑30 Hard Drive And CD-ROM Utility Disk v1.07HD
OMNIFLOP Utility
Point-and-click WINDOWS program for creating Roland sampler 3.5" floppy disks from *.OUT disk image files
You will need to make sure that the floppy disk drive you are using is internal and is able to read/write 720KB disks
I have used OMNIFLOP with excellent results using Windows 7 Ultimate 32-bit and Windows XP
I created some useful installation notes here
File Format: *.EXE File For WINDOWS
OMNIFLOP
W‑30 Internal 720KB DS/DD 3.5" Floppy Disk Drive
 Chinon P/N: FX‑354 (The Original Factory Installed Model)
Chinon P/N: FZ‑357 (After‑Market FDD Works By Simply Moving Jumpers)
Teac P/N: FD‑235HF‑C529 (After‑Market FDD Works By Simply Moving Jumpers)
Teac P/N: FD‑235HF‑C929 (After‑Market FDD Works By Simply Moving Jumpers)
NEC P/N: FD1231T (After‑Market / DIY Requiring Some Soldering)
Sony P/N: MPF920‑Z/121 (After‑Market / DIY Requiring Some Soldering)
Panasonic P/N: JU256A‑488PC (After‑Market / DIY Requiring Some Soldering)
Mitsubishi P/N: MF355F‑3490UC (After‑Market / DIY Requiring Some Soldering)
Note: Mitsubishi P/N: MF355F‑3490UC has a White Bezel
* More info about installing these inexpensive After‑Market FDD's can be found here
The W‑30 reads and writes sampler data using the 720KB DS/DD format. Some users say they use 1.44MB HD 3.5" blank disks by covering up the hole on the opposite side of the write‑protect tab with opaque tape. I have had mixed results in the past so I only use the hard to find and (usually) more expensive 720KB DS/DD disks. Different magnetic coatings are used on 1.44MB HD vs. 720KB DS/DD disks. There are also some differences in how the drives work reading HD vs. DS/DD disks. Data written in the DS/DD format onto HD discs will probably not be readable for very long. If you fake the drive out by taping over the HD disk identifying hole to use HD disks as DS/DD, it uses a lower than normal magnetic force normally required for writing data onto DS/DD discs. This can lead to higher error rates and sometimes the data will just disappear without warning. There is some more detailed info at retrotechnology.com about the different magnetic coatings used on 1.44MB HD vs. 720KB DS/DD disks
An excellent source for inexpensive recycled 720KB DS/DD 3.5" floppy disks is floppydisk.com
Note: All floppy disks are reformatted, tested and relabeled. I highly recommend this vendor!
If the sampler refuses to boot, the first step to take is carefully clean the read/write head on the 3.5" floppy disk drive (FDD) using a Q-Tip and 91% isopropyl alcohol (IPA). If that does not solve the booting isssue, the most common failure reported by W‑30 owners is a broken 3.5" FDD. After 35+ years of use, these mechanical dinosaurs simply crap out and die. In most cases, the only repairable parts are the three sensor switches which are activated whenever a disk is inserted:
❖ Density Mode (DD/HD)
❖ Disk Inserted (YES/NO)
❖ Write Protection (ON/OFF)
If any of these switches are broken or dirty, it could prevent the sampler O/S from working properly. Some users have reported success at solving some boot failure issues by performing maintenance on these switches. Depending on the model and manufacturer, these switches can be either mechanical or optical. Optical switches use an infrared emitter/sensor combo which look like a pair of clear and/or opaque LED's. Over time, optical sensor switches have a tendency to gather dust and debris. Spraying compressed air will sometime clean out the area. More intense accumulation requires disassembly and a thorough cleaning with a Q-Tip and 91% IPA. Mechanical switches are somewhat harder to clean and usually require some DeoxIT lube cleaner or a Q-Tip with 91% IPA
If you are considering updating your W‑30 to work with a USB Floppy Drive Emulator, see the information at this link
W‑30 3.5" Floppy Disk Load Errors
If you see an error message on the LCD window which reads "DISK LOAD ERROR xx", the following have been my experiences:
DISK LOAD ERROR 08 ‑ Usually a non‑O/S 3.5" floppy diskette, a damaged floppy diskette or incorrect density (should be 720KB DS/DD)
DISK LOAD ERROR 10 ‑ Almost always traced to a 3.5" disk drive hardware failure -or- the ribbon cable is plugged in upside‑down
DISK LOAD ERROR 18 ‑ Miscellaneous hardware failure (3.5" disk drive or external Hard Drive)
Starting Up & Powering Off The W‑30
Before turning the power ON or OFF
W‑30 Tips And Tricks
Menu Navigation
When I first got my W‑30, there were a couple of simple things I couldn't figure out and finding how to do it in the manual was a lost cause (as is the case with most Roland Owner's Manuals from this era). Take note of these tidbits;
 The Screaming Banshees From Hell
Over time, the high voltage inverter circuit which drives the bright blue electroluminescent panel for the LCD backlight will fail. It causes a high pitched and incredibly annoying shrill. Replacing the electroluminescent panel will not solve this issue. The only solution is to replace the entire LCD assembly. It's a lot of DIY work but luckily, you can find an inexpensive modern day replacement LCD for only $26 (USD). This replacement completely removes the high voltage inverter circuit and does not rely on a backlight panel. As a bonus, there are four colors to choose from with the new LCD - White (over Black), Black (over White), White (over Blue) or Black (over Monkey Vomit Green)
W-30 LCD Replacement DIY - Ver. 20190321
Update May 2025:
Real‑Time Filter Control For Your W‑30
A very cool, easy and inexpensive DIY using a minimal amount of parts


W‑30 Encoder Woes
I'll try to be polite as possible when I talk about the W‑30 encoders. They are total shit! OK... I failed miserably. For unknown reasons, Roland in their infinite wisdom decided to make the rotary encoders AND the jog wheels out of cheapo plastic. Usually the first thing to break or fall off of the W‑30 are the jog wheels and soon after the encoders will fail. All is not lost. I created a webpage dedicated to replacement options for new encoders made out of metal and jog wheels also made of durable aluminum. These new jog wheels use set screws so they won't fall off and they wont wobble like the old ones. Three different styles to choose from at this link
Hidden W‑30 Patches
There are 16 extra Patches hidden on W‑30 boot disks. You can access these Patches by using the W‑30 Utility Disk v1.10 boot disk or Hard Drive And CD‑ROM Utility Disk v1.07 boot disk. Because a maximum of only 16 Patches can reside in sampler RAM memory, these extra Patches are not loaded automatically at boot time. To use them, you will need to temporarily delete a few Patches residing in sampler RAM memory. This method will work regardless if you boot the sampler from a floppy drive, Hard Drive, GOTEK, SCSI2SD or ZuluSCSI. As long as you don't Save FD or Save System, the Patches you temporarily delete will remain intact the next time you boot‑up the sampler. You can listen to the Alternate Factory B Samples here
W‑30 Techno Stuff
In lieu of reposting a lot of W‑30 technical info which is already online, I'll suggest that you visit two of the best W‑30 webpages I've seen. "The Unofficial W‑30 Homepage" is an archived site from the 1990's but there are a LOT of goodies to be found there, especially in the TIPS/INSTRUCTIONS, EXPANSION, and FAQ sections. Another excellent resource, especially for electronic freaks like myself, are the twelve detailed webpages at "Neil's Webbly World"
Unofficial W‑30 Homepage
Neil's Webbly World (W-30 Page)
Booting The W‑30 From A Hard Drive, SCSI2SD Or ZuluSCSI Device
W‑30 External Boot Configuration

W‑30 YouTube Overview (Riva Lima)
Riva Lima has put together a very informative overview of the W-30 on his YouTube channel. You can click on the CC button to display text in English
Roland W‑30 Overview
W‑30 Owner's Manual and Service Notes
File Format: *.PDF File
W‑30 For FD, HD, CD Owner's Manual v89‑04A3 (Updated + Expanded)
W‑30 Service Notes v05‑89 (Note: Also known as the KW‑30 SCSI Upgrade Kit Manual)


"The Roland S-760 Digital Sampler is probably one of the most complex musical instruments Roland has ever designed. Because of this, sampler novices and in some cases hardcore sampler users find the S‑760 difficult to grasp." -- Sweetwater Music Support Website
S‑750 / S‑760 / S‑770 Sound Library (Actually the S‑770 library... but these also work with S‑750 and S‑760)
S‑750 / S‑760 / S‑770 Sound Library
S‑750 System Boot Disk v2.25
This 3.5" floppy disk image file allows you to create a System Utility Disk used to boot an S‑750
File Format: *.OUT disk image files for use with the OMNIFLOP, SDISK, SDISKW or "dd" utility
S‑750 System Utility Disk v2.25
S‑750 Legacy System Boot Disks v2.21 / v2.23 / v2.24
These 3.5" floppy disk image files are for those who like to experiment with older S‑750 boot disks
Note: The current System Boot Disk for the S‑750 is v2.25 (above)
File Format: *.OUT disk image files for use with the OMNIFLOP, SDISK, SDISKW or "dd" utility
S‑750 Legacy System Utility Disks v2.21 / v2.23 / v2.24
S‑760 System Boot Disk v2.24
This 3.5" floppy disk image file allows you to create a System Utility Disk used to boot an S‑760
File Format: *.OUT disk image files for use with the OMNIFLOP, SDISK, SDISKW or "dd" utility
S‑760 System Utility Disk v2.24
S‑770 System Boot Disk v2.25
This 3.5" floppy disk image file allows you to create a System Utility Disk used to boot an S‑770
File Format: *.OUT disk image files for use with the OMNIFLOP, SDISK, SDISKW or "dd" utility
S‑770 System Utility Disk v2.25
S‑770 Legacy System Boot Disks v2.21 / v2.23 / v2.24
These 3.5" floppy disk image files are for those who like to experiment with older S‑770 boot disks
Note: The current System Boot Disk for the S‑770 is v2.25 (above)
File Format: *.OUT disk image files for use with the OMNIFLOP, SDISK, SDISKW or "dd" utility
S‑770 Legacy System Utility Disks v2.21 / v2.23 / v2.24
S‑760 Internal 1.44MB DD/HD 3.5" Floppy Disk Drive
Chinon P/N: FZ-357 (The Original Factory Installed Model)
The S‑760 reads and writes sampler data to the 3.5" floppy disk drive using the 1.44MB DD/HD format. Note the unusual Jumper configuration on the back of the FZ‑357 disk drive. Detailed info about some possible drive replacements here
An excellent source for inexpensive recycled 1.44MB DD/HD 3.5" floppy disks is floppydisk.com
Note: All floppy disks are reformatted, tested and relabeled. I highly recommend this vendor!
If the sampler refuses to boot, the first step to take is carefully clean the read/write head on the 3.5" floppy disk drive (FDD) using a Q-Tip and 91% isopropyl alcohol (IPA). If that does not solve the booting isssue, the most common failure reported by S‑760 owners is a broken 3.5" FDD. After 35+ years of use, these mechanical dinosaurs simply crap out and die. In most cases, the only repairable parts are the three sensor switches which are activated whenever a disk is inserted:
❖ Density Mode (DD/HD)
❖ Disk Inserted (YES/NO)
❖ Write Protection (ON/OFF)
If any of these switches are broken or dirty, it could prevent the sampler O/S from working properly. Some users have reported success at solving some boot failure issues by performing maintenance on these switches. Depending on the model and manufacturer, these switches can be either mechanical or optical. Optical switches use an infrared emitter/sensor combo which look like a pair of clear and/or opaque LED's. Over time, optical sensor switches have a tendency to gather dust and debris. Spraying compressed air will sometime clean out the area. More intense accumulation requires disassembly and a thorough cleaning with a Q-Tip and 91% IPA. Mechanical switches are somewhat harder to clean and usually require some DeoxIT lube cleaner or a Q-Tip with 91% IPA
If you are considering updating your S‑760 to work with a USB Floppy Drive Emulator, see the information at this link
S‑760 Encoder Replacement DIY
Although it's not exactly a "Drop-In" solution, this rotary encoder replacement works extremely well. It requires an inexpensive custom PCB, a low‑cost commonly found rotary encoder and little bit of soldering
S-760 Encoder Replacement DIY


The most common failure on the S‑760 is the custom made LCD display. Almost every S‑760 owner has had a LCD screen failure of some kind in the sampler's life. The problems are usually broken lines, missing/illegible text, a black screen or a bright green screen with no text at all. It's impossible to fix this problem even if you disassemble and clean contact surfaces inside the display. The only solution is to use an external Mouse+CRT -or- find a New Old Stock (NOS) LCD replacement on eBay. The problem with using an external Mouse+CRT is you need to read the LCD in order to set the sampler into the correct display mode. It's a Catch‑22! Something else to note about the original LCD (DMF‑50374NYU‑LY)... the S‑760 Service Notes list the screen resolution as 320x80 pixels. This is most likely a misprint because the actual resolution of this LCD is 160x64 pixels
Increasing S‑760 Sample Wave Memory (SIMM's)
 You can verify how much memory is installed when the sampler is powered on during the Wave Memory Check. A factory fresh S‑760 has 2MB Wave Memory on‑board which can be expanded up to 32MB
There are four ways to expand the Wave Memory:
(2 x 16MB SIMM) = 32MB1
(1 x 8MB SIMM) + (1 x 16MB SIMM) + (2MB On‑Board) = 26MB
(1 x 16MB SIMM) + (2MB On‑Board) = 18MB
(1 x 8MB SIMM) + (2MB On‑Board) = 10MB
1 If (2 x 16MB SIMM's) are installed, the 2MB On‑Board memory is ignored. The S‑760 maximum memory is 32MB
2 You cannot install (2 x 8MB SIMM's) - Sweetwater Tech Document
There are two SIMM slots inside. When increasing Sample Wave Memory, one SIMM or a combination of 8MB and 16MB SIMM's can be used (See Bullet #2 above). The SIMM's must be 72‑pin, non‑parity and the speed must be 80ns or faster. Be aware that they are NOT the same style SIMM's used on S‑750 or S‑770 samplers. I've been able to find brand‑new 72‑pin SIMM's very cheap on eBay, reverb.com and elsewhere. When searching, look for high quality Macintosh compatible 72‑pin, non‑parity SIMM's. Two brand names I've used with success are IBM and Kingston
SPECIAL NOTE: For a SIMM upgrade on any Roland Sampler, use the highest quality memory possible. Otherwise you will experience data corruption ("crackling"). Detailed info about SIMM's specific to the S‑760 +plus+ installation tips can be found in the S-760 Supplemental Manual (PDF)
 S‑760 Crackling, Distortion Or Static?
If you experience these symptoms during sample playback and have ruled out all issues related to defective or incorrect RAM SIMM's, there are two things to verify
To identify your version of the S‑760 boot EPROM (IC15), hold down the PREVIEW(PUSH) knob and the F1 button at the same time while turning on the power. The current firmware version will appear on either the LCD screen or the CRT screen. The final firmware version is v1.11 which can be downloaded for free at the Synth & Sampler Firmware webpage in the event you want to burn your own EPROM IC. A list of differences between the older firmware version v1.01 and the current v1.11 can be downloaded at this link
S‑760 Test Disk + Test Modes
Is your S‑760 acting strange? An extensive array of tests including FDD, SCSI Drive, LCD, SIMMS, LED's, Dials, MIDI, Sampling, Digital I/O, Voice, Sample Memory and more are explained in detail starting on Page 6 of the S‑760 Service Notes v12‑93
There are two ways to use this Test Disk
1) If a 3.5" FDD is installed, the Windows *.EXE file automatically creates a 3.5" floppy Test Disk
2) If a GOTEK USB/FDE installed, the *.OUT Test Disk file can boot the sampler directly
Both versions of the S‑760 Test Disk can be downloaded here
Booting The S‑760 From A Hard Drive, ZIP Drive, SCSI2SD Or ZuluSCSI Device
When booting the S‑760 from a FDD or GOTEK, loading the O/S portion takes 36 seconds. After configuring it to boot from a Hard Drive, ZIP Drive, SCSI2SD or ZuluSCSI, it takes less than 1 second. You will need to change the boot configuration using the LCD panel. Setup is quite easy and detailed instructions are here

Loading AKAI CD‑ROM's From An External CD‑ROM, SCSI2SD Or ZuluSCSI Device
The S‑760 and SP‑700 are the only S‑Series samplers which have the ability to load AKAI S1000 and S1100 library format CD‑ROM's. This greatly expands the capabilities of these two samplers because the AKAI library of CD‑ROM's is gigantic. Instructions for loading AKAI CD‑ROM's can be found here
External SCSI CD‑ROM Benchmarks (S-760)
 With the S‑760 and SP‑700, if you plan to load AKAI S1000 and S1100 CD‑ROM's often using the "Convert Load" feature, I highly recommend using a CD mechanism with speeds faster than 1x or 2x. Why? Older 1x and 2x speed CD‑ROM's take forever and a day to load AKAI CD's. "Convert Loading" an AKAI sample will take up to 8x longer than loading a native Roland sample file. Some of the faster mechanisms to consider are the AppleCD 600e (4x), Plextor PX‑43CS (4x), Nakamichi MJ‑4.8si (8x), Nakamichi MJ‑5.16si (16x), LaCie 104737 (32x) & LaCie 104372 (40x). Also, not all CD‑ROM SCSI transfer stats perform as advertised. The LaCie 40x speed CD‑ROM vastly underperforms and is much slower than the Nakamichi MJ‑5.16si. The fastest CD‑ROM I have found for use with the S‑760 is the Nakamichi MJ‑5.16si. I compiled some benchmark tests in this PDF
Powering Up & Powering Down The S‑760
S‑760 "UNFORMATTED" Errors
These are two of the most common "UNFORMATTED" errors on the S‑760 when trying to load samples from CDROM, SCSI2SD, ZuluSCSI, Floppy Disk or GOTEK

S‑760 Timing Errors???
It's not exactly a timing error, but more an issue with the triggering of envelopes which is more pronounced on short percussive sounds
User LAWRON over at gearspace.com has posted his solution
DA-400 4-Channel D/A Converter (External Expansion For The S‑760)

At the 1994 NAMM show in January, Roland introduced the DA‑400, a 4‑Channel Digital/Analog signal converter designed to work alongside the S‑760. The retail price was $599 (USD) and it proved to be a popular add‑on. The DA‑400 is both a Digital/Analog converter and an output expander, ideal for use with the S‑760 Digital Sampler/OP‑760‑1 combination. The converters were matched to those of the sampler, so sounds would stay of the same characteristics as opposed to being modified by the conversion process of another make and model. It converts two stereo digital inputs into four analog outputs. When using it with an S‑760, the optional OP‑760‑1 board is required and will expand the S‑760 to eight analog outputs. It will accept both Coaxial and Optical digital inputs. You can use either balanced or unbalanced jacks for the Analog Outputs. It's rare to find a DA‑400 on the used market because most S‑760 owners cherish having one in their studio and will never part with it. Another reason is because the crisp and clear digital sound conversion is not just limited for use with Roland gear. This expansion box also works with third‑party synths such as the Proteus 2000, Yamaha Motif and Alesis Quadrasynth
S-760 Support Documents
File Format: *.PDF File
S-760 Supplemental Manual (Quick Tour, Owner's Manual Corrections, SCSI and more - Roland Document SN29)
S-760 MIDI Implementation (Roland Document 111893 v1.0)
SCSI Transfers With The S-760 (Roland Document SN44 v2.0)
S-760 Demystified (Roland Version) (Roland Document SN42 v1.0 - Same as Keyboard Magazine article. Reprinted in B&W w/o images)
Digital Sampler Compatibility Guide (Roland Document SN33 v1/01 - Contains a very complete list of compatible external SCSI devices)
CD-ROM Audio Drivers For The S-760 (Roland Document SN43 v2.0)
Digital Sampler Compatibility Guide (v2010) (Another list of compatible external SCSI devices)
S-760 Demystified (Keyboard Magazine Version) (Original December 1996 Keyboard Magazine version with detailed info and images)
DA-400 Owner's Manual (Roland Document 00458990 / 041494)
S-760 Owner's Manual and Service Notes

File Format: *.PDF File
S‑760 Owner's Manual v11-93 (Advanced) + v0196 (Basic) (English)
OP-760-1 Expansion + S-760 Software V2.xx Owner's Manual v09-96 (English)
S-760 Service Notes v12‑93 (English)
S‑760 Owner's Manual v2 (Dutch)
S‑760 Owner's Manual v2 (Italian)
S‑760 Owner's Manual v2 (Hungarian)
S‑760 Owner's Manual v2 (Japanese)
 SPECIAL NOTE: For a SIMM upgrade on any Roland Sampler, use the highest quality memory possible. Otherwise you will experience data corruption ("crackling")
Increasing S‑750 Sample Wave Memory (SIMM's)
To increase Sample Wave Memory in the S‑750, the optional RAS-750E Expansion Board is required. Long out of production, you might be able to find a used one on eBay or at reverb.com. This expansion board uses 4MB SIMM's installed in pairs. The maximum memory allowed on the S‑750 is 18MB (16MB + 2MB already on‑board) so to reach this level you will need a total of 4 x 4MB SIMM's. The 4MB SIMM's must be 30‑pin, non‑parity and the speed must be 100ns or faster. See page 265 of the S‑750 Owner's Manual for detailed info
Increasing S‑770 Sample Wave Memory (SIMM's)
To increase Sample Wave Memory in the S‑770, the optional RAS-770 Expansion Board is required. Long out of production, you might be able to find a used one on eBay or at reverb.com. This expansion board uses 1MB SIMM's installed in pairs. The maximum memory allowed on the S‑770 is 16MB (14MB + 2MB already on‑board) so to reach this level you will need a total of 14 x 1MB SIMM's. The 1MB SIMM's must be 30‑pin, non‑parity and the speed must be 100ns or faster. See page 272 of the S‑770 Owner's Manual for detailed info


System Overview
The SP‑700 does not have a floppy disk drive like most other samplers in the S‑Series. The operating system is loaded automatically from two on‑board EPROM's. The module does not have an Audio Input Jack like other S‑Series samplers so it is unable to create new samples directly by using a microphone or an instrument via external input. It is strictly a playback sampler. However, you are still able to edit a million, zillion sample parameters like TVF & TVA Filters, Resonance, Waveforms, Velocity, Envelopes, etc... and then save any changes to an external SCSI device (Hard Drive, ZIP Drive, SCSI2SD or ZuluSCSI). Just like the S‑760, the SP‑700 has an advantage over the S‑750 and S‑770 samplers because it is able to load AKAI S1000 and S1100 CD‑ROM's. It is also able to load all samples from the S‑330, S‑550, S‑750, S‑760, S‑770 and W‑30 RSB libraries. The snag is that since there is no floppy disk drive on this model, all samples must be loaded using a Hard Drive, ZIP Drive, SCSI2SD, ZuluSCSI, or other external SCSI device. This sampler is compatible with any S‑550 or W‑30 ZIP Drive, SCSI2SD, ZuluSCSI or Hard Drive already formatted and loaded with samples. Simply connect an S‑550 or W‑30 ZIP Drive, SCSI2SD, ZuluSCSI or Hard Drive and use the "Convert Load" menu selection to load S‑550 or W‑30 samples. There are some SP‑700 compatible 80MB hard drive and 100 MB ZIP disk image files to download at this link
Unique Features
Some of the more interesting features about this sampler include Quick Load and Load While Playing. The SP‑700 also sports a 1M‑bit Non‑Volatile Flash Memory EPROM which was cutting edge technology way back in 1992
LCD Issues

SP-700 LCD Replacement DIY - Ver. 20220928
Update May 2025:

Increasing Sample Wave Memory (SIMM's)
SPECIAL NOTE: Use the highest quality memory possible
Otherwise you will experience data corruption ("crackling")
To increase the SP‑700 Sample Wave Memory, use 4MB SIMM's installed in pairs. The maximum memory allowed is 32MB so to reach this level you will need a total of eight 4MB SIMM's. The SIMM's must be 30‑pin, non‑parity and the speed must be 100ns or faster. These are the same style SIMM's used on the S‑750 sampler. Be aware that they are NOT the same style SIMM's used on the S‑760 or S‑770 samplers. The S‑760 SIMM's have 72‑pins and the S‑770 SIMM's are only 1MB. I've been able to find brand‑new 30‑pin SIMM's very cheap on eBay, reverb.com and elsewhere. When searching, look for high quality Macintosh compatible non‑parity SIMM's. Increasing the memory is a breeze because of the easy‑access lid on top of the case. Remove two screws and you're ready to go. See Appendix Pages 2 through 5 of the SP‑700 Owner's Manual for detailed info

SCSI
If you plan to use a SCSI2SD or ZuluSCSI device with this sampler, be aware that you can power either of these without the need for an external +5VDC power supply. You will need to ensure that the switch labeled TERM POWER (located on the Main Board inside the SP‑700) is set to the ON position. This supplies a line on the SCSI bus (Pin #25) with +5VDC which in turn will provide the required power for these devices. This switch is easily accessible without having to remove the entire case and is located directly beneath the SIMM memory access lid. Remove two screws and you're ready to go
SP‑700 "UNFORMATTED" Errors
Two of the most common "UNFORMATTED" errors on the SP‑700 when trying to load samples from CDROM, SCSI2SD, or ZuluSCSI are the same as those on the S‑760. See the section above titled "S‑760 "UNFORMATTED" Errors"
SP‑700 "WAVE MEMORY FULL" Error
When it was shipped from the factory, powering on the sampler will default by allocating all available sample memory to Bank A. If all memory SIMM's are installed with 32MB total RAM, this automatically sets Bank A to 363.8 seconds of free sample memory and zero seconds to Bank B. If you try to load or copy any samples into Bank B, you will see an error message that reads "WAVE MEMORY FULL". The way to get around this is to change some system parameters and allocate more sample memory to Bank B. From the front panel press the following button sequence:
SYSTEM > PRM(F1) > PAGE/NEXT > PAGE/NEXT > S1/DEC to decrease ‑or‑ S2/INC to increase the wave memory
After you have allocated the desired memory for Bank A and Bank B, press EXEC(F5) to save the new setting to the FLASH IC. The next time you power on the sampler, these new sample wave memory settings will be the default
SP‑700 "WAVE MEMORY CHECK ERROR" During TEST Mode
If you see a "WAVE MEMORY CHECK ERROR" during TEST mode this might be due to the fact that the switch labeled TERM POWER (located on the Main Board inside the SP‑700) is set to the OFF position and/or a SCSI device is missing a terminator. Power off the sampler, set the TERM POWER switch to the ON position and/or check for an un‑terminated SCSI device then run TEST mode again
SP‑700 "FREEZE/LOCK-UP" Error
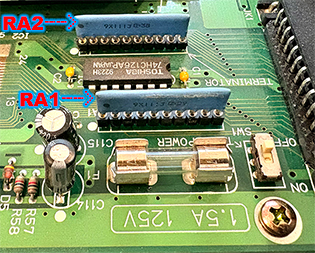
During the power up phase and system check, if the sampler freezes and locks‑up when checking SCSI devices, the problem might lie with the two termination SIP bussed resistor arrays at PCB locations RA1 and RA2. If either of these components are defective, plugged in backwards or have a broken pin, the sampler will not boot. If RA1 and RA2 are missing or defective, the modern day replacement is Bourns P/N: 4610X‑101‑111LF. It's available here at mouser.com
2‑Prong Power Cable Replacement DIY
Back in the 1980's and 1990's there were no rules in the USA which required synth and sampler manufacturers to use 3‑prong grounded power cables. Naturally, Roland took advantage of this and cut their production costs by only installing 2‑prong power cables. As the business credo says, "Who gives a shit about safety when there's a profit to be made?"
 So why is this an important modification? Just ask any synth or sampler owner who has plugged their gear into an ungrounded mixing board. It's a quick way to fry transistors in a synth or sampler audio circuit. Grounding also provides an extra level of safety in the event of a major short circuit
SP‑700 AC Power Receptacle Replacement DIY
Loading AKAI CD‑ROM's From An External CD‑ROM, SCSI2SD Or ZuluSCSI Device
The S‑760 and SP‑700 are the only S‑Series samplers which have the ability to load AKAI S1000 and S1100 library format CD‑ROM's. This greatly expands the capabilities of these two samplers because the AKAI library of CD‑ROM's is gigantic. Instructions for loading AKAI CD‑ROM's can be found here
SP‑700 Owner's Manual and Service Notes
File Format: *.PDF File
SP‑700 Owner's Manual v12‑92
SP‑700 Service Notes v04‑93
SP-700 Sales Brochure


After‑Market Floppy Disk Drives
DIY info for replacing an unreliable or broken FDD using inexpensive Chinon, Teac, Panasonic, Mitsubishi, NEC & other brands. Some of the instructions are easy as moving/adding jumpers while others require a steady hand w/advanced soldering skills
FDD Tech


ACCESSORIES: COLOR MONITOR / COMPOSITE VIDEO / MOUSE / RC‑100 / DT‑100

Q: Can I plug an LCD Flat Screen VGA Color Monitor into the S‑50, S‑330, S‑550, S‑750, S‑760 or S‑770 DIGITAL RGB Port for use as the display device?
A: LOL! You should know by now that almost EVERYTHING Roland makes uses proprietary external devices and it's never easy getting things to work correctly. Making a 15‑pin LCD Flat Screen VGA Color Monitor work is much trickier than just using a simple adapter cable. Several solutions are available and they all require additional external electronics. One of the more interesting and cost effective solutions is the use of a GBS 8200 CGA To VGA Video Converter Board. The current cost on eBay is about $29 USD and you will also need to buy an 8‑pin DIN male connector, an inexpensive wall‑wart power supply and an enclosure for the board. This video board is a compact device measuring 4.0" x 4.5" x 0.75". I have put together a DIY guide with detailed instructions about how to connect this board to an S‑50, S‑550 or S‑330 (See the DIY PAGE)
Q: Can I plug an old‑style CGA, EGA, or RGB color monitor into the S‑50, S‑330, S‑550, S‑750, S‑760 or S‑770 DIGITAL RGB Port for use as the display device?
A: Again... LOL! Roland Proprietary. There are several old‑style CGA, EGA and RGB monitors which are known to work well with the S‑50, S‑330, S‑550, S‑750, S‑760 and S‑770. However, you can't just plug the monitor in directly. Each one requires a special adapter cable before it can work. Each monitor will require a different style cable because Roland monitors use 8‑pin plugs, Commodore monitors use 9‑pin plugs, Atari monitors use 13‑pin plugs, etc...


Q: What are my options if I don't have an CGA, EGA or VGA color monitor?
A: The S‑50, S‑550 and S‑330 all have a Composite Video OUT jack which is used to connect an RCA cable to a TV or a monochrome CRT. The output video signal is monochrome but it is still very usable when making on‑screen menu selections
One option for using the Composite Video signal is an inexpensive device called the EasyCap‑DC60 which enables a Composite Video IN signal using the USB port on your PC or laptop via the supplied software. EasyCap‑DC60 knock‑offs sell for $10 (USD) on eBay and Amazon
 If your TV, monitor or computer has a Composite Video IN jack, you can simply use an RCA cable to get a Composite Video OUT signal from the S‑50, S‑550 or S‑330. If your TV, monitor or computer has a video input with an S‑Video IN jack, you can make an easy DIY cable using a 4‑pin mini DIN plug, a 470pF capacitor, and an RCA plug. Because this is a video signal, be sure to use shielded cable. Non‑standard 7‑pin mini‑DIN connectors (termed "7P") are used on some computer video cards [PC and Mac]. A 7‑pin socket accepts, and is pin compatible, with a standard 4‑pin S‑Video plug which is the type used for this DIY cable [Click to enlarge image]
Used ATI Radeon X1300 PCI-E Video Cards sell for less than $9 on eBay. I used a similar card like this one for years to view the composite video output from my S‑50. It was not in color but it did the job. The big advantage was that this card plugged into my Windows PC which eliminated the need for an additional monitor or TV

Another low‑cost option is an unused VHS deck gathering dust somewhere. Some models have S‑Video and/or Composite Video IN jacks. Connect the sampler's Composite OUT signal to the VHS deck, then connect the VHS deck Video OUT to a TV or a computer video card and for little or no investment... you're good to go. If you are trying to connect your S‑50, S‑550 or S‑330 to equipment using PAL and not NTSC video standards, all bets are off. I can't provide any help. When PAL is involved, my eyes glaze over and everything starts to get foggy... just like the snow on a TV that can't receive a good signal. I know absolutely nothing about PAL
Q: Can I use a regular PC mouse with the EXT CONTROL Port on the S‑550, S‑330 or S‑7xx?
A: And Again... LOL! Roland Proprietary. Plugging a regular PC mouse into an S‑Series sampler will fry the PICO® fuse so don't try it. The only type of mouse which works when plugged in directly is the Roland MU‑1 or other MSX‑type mouse. These are nearly impossible to find and are insanely expensive compared to a normal PC mouse. However, there is a way to use an inexpensive PS/2 mouse. See the DIY PAGE for more info
NOTE: The S‑50 will not work with any type of mouse. The EXT CONTROLLER port on the back of the S‑50 will only work with the optional DT‑100 Digitizer Tablet. If you plug a mouse into the EXT CONTROLLER port, you run the risk of causing a short circuit in the sampler. Likewise, if you plug a non‑Roland mouse into the EXT CTRL port on the S‑550, S‑330, S‑750, S‑760 or S‑770, you run the risk of causing a short circuit. If this happens, see the Roland Fuse Reference Webpage

Q: What is an RC‑100 Remote Controller? A: The RC‑100 has a very long hard‑wired cable which plugs into the EXT CONTROL Port of the S‑330, S‑550 or S‑750/760/770. It adds the same alpha dial found on the S‑50 and duplicates all of the front panel buttons as a convenience device so that you won't need to hover over the sampler while editing. It also has a 9‑pin connector on the back so either a mouse or a DT‑100 (but not both) can be used. The RC‑100 is nearly impossible to find on eBay or from other sources
Q: What is a DT‑100 Digitizer Tablet?
A: The DT‑100 plugs into the EXT CONTROL Port of the S‑50. It has a stylus and a flat surface which is used to draw waveforms. The DT‑100 also performs menu navigations just like an MU‑1 mouse. There is a clip at the top which is used to hold paper in place over the tablet to protect the drawing surface. The DT‑100 CANNOT be plugged into the EXT CONTROL Port of the S‑550, S‑330 or W‑30. There are no menu choices to support it. However, the DT‑100 CAN be used with the S‑550 and S‑330 if it is plugged into the EXT CONTROL Port on the optional RC‑100 device. A high‑res scan of the most boring manual Roland ever printed is here

*.OUT AND *.IMG FILES - SHARE YOUR SAMPLER LIBRARY
Q: Is it easy to share samples with other S‑50 / S‑550 / S‑330 / S‑760 / W‑30 owners?
A: Absolutely! The OMNIFLOP (Windows) and "dd" (Mac) utilities make it super simple to create your own 3.5" disk image files which can be uploaded or eMailed
Q: Where can I find more info about the S‑50, S‑550, S‑330 W‑30 and S‑7xx samplers?
A: Since the early 1990's, John Sellens has maintained an excellent resource for the S‑Series and W‑Series samplers. Plenty of downloads, sample libraries, utilities, info and newsgroup discussions from the 1980's & 1990's is there. Luckily for us, it is still operational to this day. I was using it when it was just an FTP site and web browsers weren't even developed yet. You can find everything under the sun about the S‑Series samplers at sgroup.ca. There is also a special interest group geared towards the S‑Series and W‑Series samplers at Facebook called the Roland Sampler Information Exchange. Joining is FREE and easy.
S-Series Resource: SGroup.ca
Facebook: Roland Sampler Information Exchange

ALTERNATE SAMPLE LIBRARIES
File Format: Freebie *.OUT Disk Image Files here

SYSTEM AND UTILITY VERSIONS (CURRENT AND LEGACY)
Q: What are the current System and Utility versions for some of the Roland samplers?
A: This list is unverified and by no means complete but it's pretty close. I was able to compile these by reading the headers on various 3.5" floppy disks
DISK FORMATS SHARED BETWEEN DIFFERENT SAMPLER MODELS
Q: Can I load floppy disks, Hard Drives and CD‑ROM's formatted for other sampler models onto my Roland sampler?
A: Yes and No. There are several options available. Some will load directly & others need to use a "Convert Load" command or a separate utility disk
MAGAZINES - KEYBOARD CLINICS - MISCELLANEOUS DOCUMENTS

(Click For Larger Image)


(Click For Larger Image)

(Click For Larger Image)


If you recently purchased an S‑50, S‑550, S‑330, S‑7xx or W‑30 sampler, you might find yourself without the required Startup/Utility Boot disk to get things rolling. Unlike a regular synthesizer, you can't power on an S‑Series or W‑Series sampler and start playing sounds right away. An operating system needs to be loaded manually before it will work
The four options you have are;
- I. Create your own Startup Disk using one of these freeware utilities on a computer
- MAC & LINUX ‑ The "dd" utility for creating Startup Utility disks is built‑in to OS/X and LINUX. Notes for using "dd" here
- WINDOWS
- OMNIFLOP ‑ Requires an internal 34-pin 720KB DS/DD 3.5" Floppy Disk Drive (FDD). Install notes are here
- SDISKW v1.7 - Requires an internal - or - external 34-pin 720KB DS/DD 3.5" FDD - or - USB 720KB DS/DD 3.5" FDD
- MAC & LINUX ‑ The "dd" utility for creating Startup Utility disks is built‑in to OS/X and LINUX. Notes for using "dd" here
- II. Replace the S‑50 / S‑550 / S‑330 / S‑7xx / W‑30 internal 3.5" FDD with a USB Floppy Drive Emulator (USB/FDE)
- There are a few hardware devices on the market which do this. They range anywhere from $26 (USD) to $190 (USD)
- I highly recommend buying a low‑cost USB/FDE and updating it with the free FlashFloppy firmware. It makes using the sampler sooooo much easier. Plus, there's no need to worry about any FDD mechanical failures down the road. The cost you save from not having to buy any more 3.5" floppy disks will quickly pay for the cost of the USB/FDE. There are also ways to transfer all of your existing custom 3.5" floppy sample disks over to the new format for use with a USB/FDE
- There are a few hardware devices on the market which do this. They range anywhere from $26 (USD) to $190 (USD)
- III. Purchase a Startup Utility Disk from eBay
- The average cost is about $12 USD
- You will eventually need one of these options to build‑up your sampler library
- 3.5" 720KB DS/DD FDD for your computer and a zillion DS/DD floppy disks
- USB/FDE installed inside the S‑50, S‑550, S‑330, S‑7xxx or W‑30
- External SCSI Hard Drive, ZIP Drive, CD‑ROM, SCSI2SD and/or ZuluSCSI (None are compatible with the S‑50 or S‑330)
- Only certain types and sizes of Hard Drives and specific models of CD‑ROM's and ZIP drives are compatible
- The W‑30 requires the KW‑30 SCSI IC chip upgrade which is very inexpensive and easy to find on eBay
- The S‑550 requires the HD5‑IF SCSI Interface Card which is nearly impossible to find these days
- The original HD5‑IF SCSI board is very hard to source because as I estimate, Roland only manufactured enough of these boards for 10% of the S-550's out there. If you are looking for one... you are in luck because Johnny Morgan has created a new HD5‑IF board! It has been reversed engineered from the original Roland schematics. I've been using this new SCSI board and have been getting fantastic results. The form‑factor is exactly the same as the original and it fits perfectly in my S‑550. I have tested it with SCSI2SD, ZuluSCSI, Quantum UltraSCSI Hard Drives and ZIP Drives. It works great! You can find ordering info and more from these links
Ordering Info
Johnny Morgan Synth Dreams - YouTube Channel
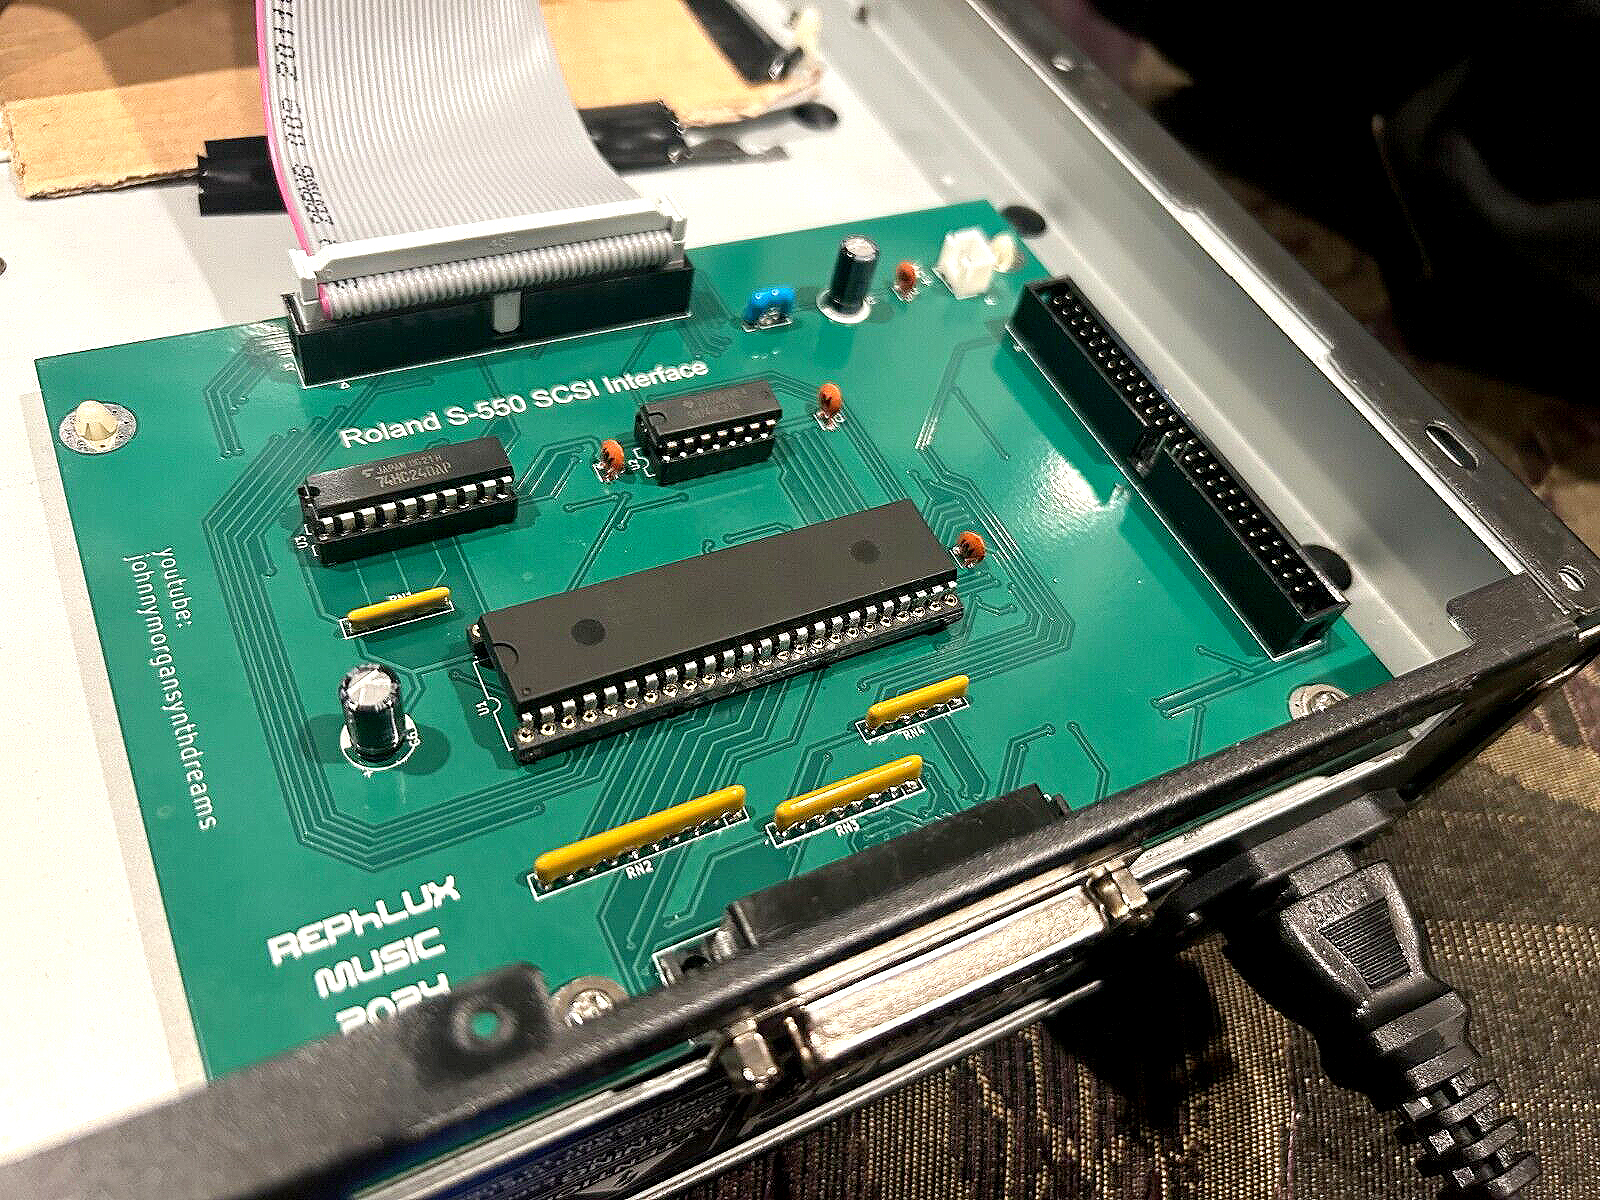
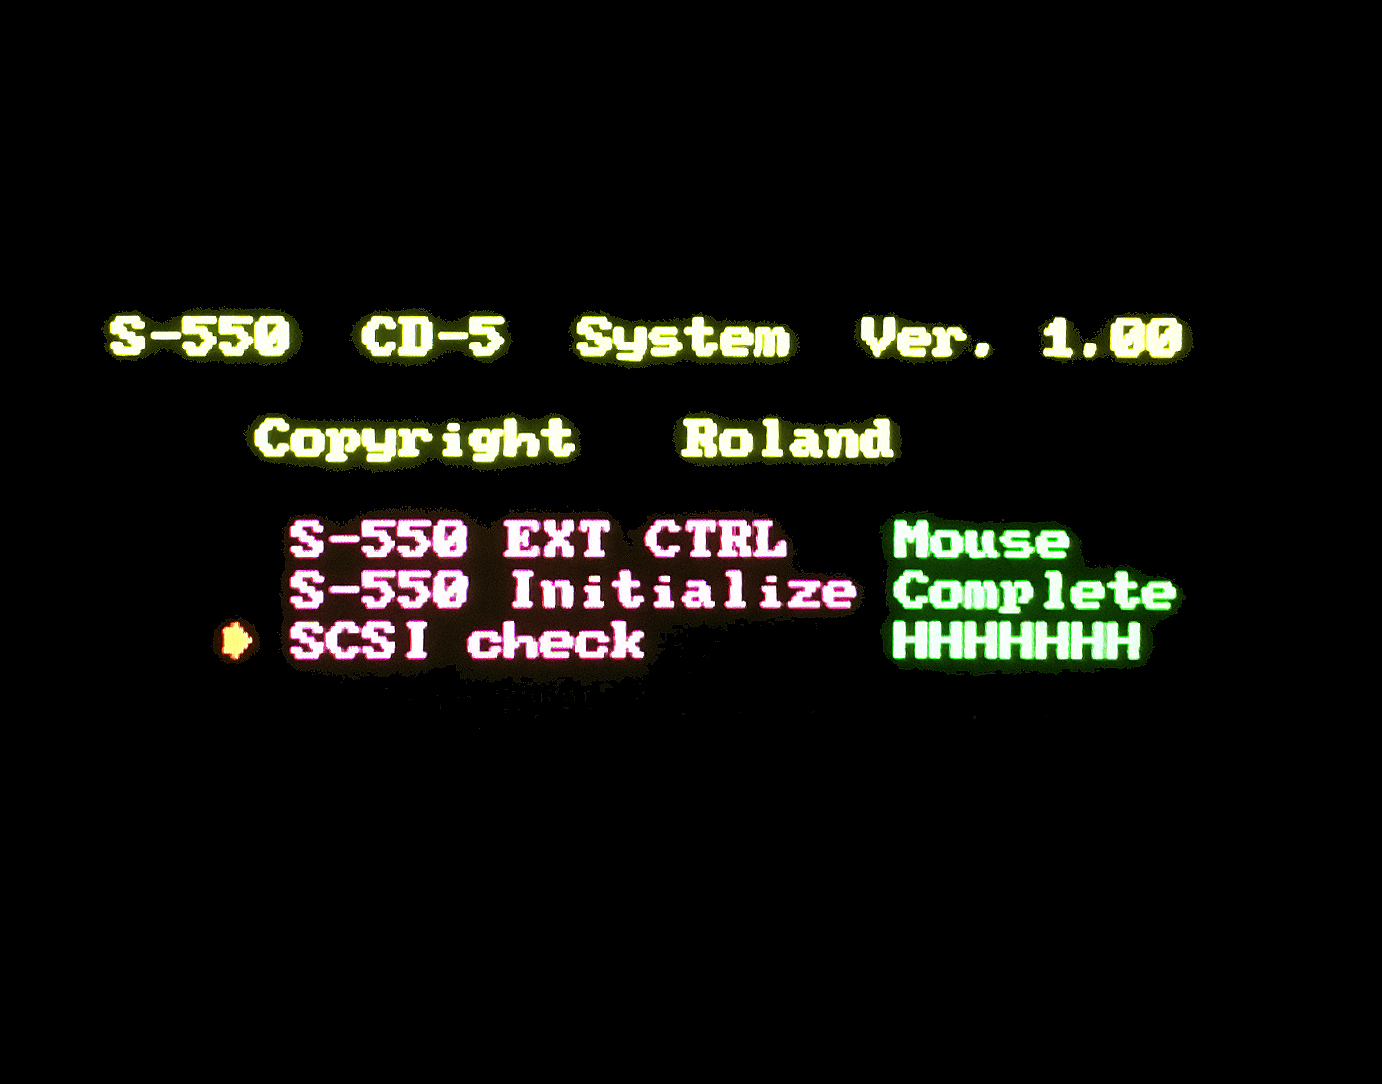
(click for larger image)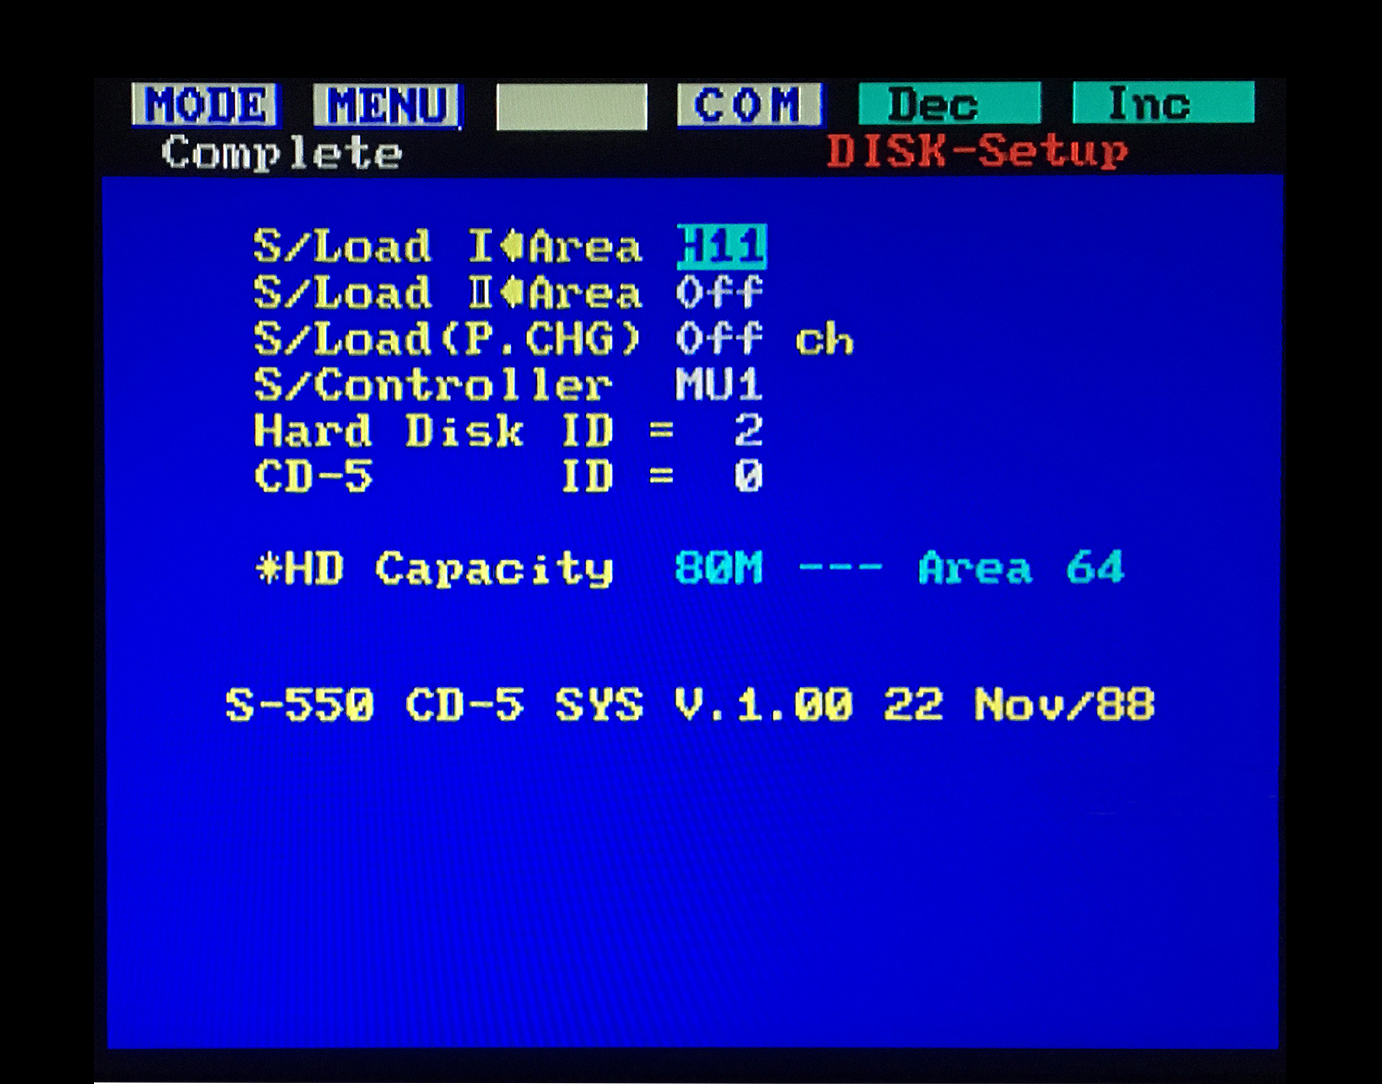
- The average cost is about $12 USD
- IV. Get a FREE Startup/Utility Disk (If you live in the USA)
- If you have exhausted all possible avenues of acquiring a Startup/Utility Disk (as shown above) or are having problems creating your own disk and you live in the USA, I'll send you one for free to get your new sampler up and running. Send me an e‑Mail
- Apologies to those outside the USA but... I don't make international deliveries anymore to Europe, Australia and beyond because of the high shipping costs, customs hassles and long delays. The last set of disks I sent to Stellenbosch, South Africa took 54 days. Yeow!

- Apologies to those outside the USA but... I don't make international deliveries anymore to Europe, Australia and beyond because of the high shipping costs, customs hassles and long delays. The last set of disks I sent to Stellenbosch, South Africa took 54 days. Yeow!
- If you have exhausted all possible avenues of acquiring a Startup/Utility Disk (as shown above) or are having problems creating your own disk and you live in the USA, I'll send you one for free to get your new sampler up and running. Send me an e‑Mail
Additional Info: For those of you who want to ship 3.5" floppy disks to other sampler owners via USPS mail, these disks are considered a "Media Mail" item and can be shipped at significantly reduced rates. The cost to ship four disks at regular postage rates will range from $8 to $11 but... using the "Media Mail" rate is less than $5. The only caveat is you can't send blank floppy disks. The disks must have media on them. However, you would be hard‑pressed to find a USPS worker using a PC with a floppy disk drive to verify blank media so... I think you're safe either way
S‑50 RSB Disk Image Library (80 Disks)
This 80 disk set contains the entire S‑50 Sampler Library issued by Roland
S‑550 RSB Disk Image Library Converted To S‑50 Format (60 Disks)
This 60 disk set contains the entire S‑550 Sampler Library issued by Roland
S‑50 L-Series Disks (L-501 through L-509)
This 45‑disk set was released in 1987 and also appears on the LCD‑1 CD‑ROM
Some of these samples are not in the S‑50, S‑550 or S‑330 RSB Libraries
NOTE: The S‑50 will not work with any type of mouse. The EXT CONTROLLER port on the back of the S‑50 will only work with the optional DT‑100 Digitizer Tablet. If you plug a mouse into the EXT CONTROLLER port, you run the risk of causing a short circuit in the sampler. Likewise, if you plug a non‑Roland mouse into the EXT CTRL port on the S‑550, S‑330, S‑750, S‑760 or S‑770, you run the risk of causing a short circuit. If this happens, see the Roland Fuse Reference Webpage
Q: How Do I Use S‑550 and S‑330 Sound Disks With An S‑50?
A: Create an SYS‑505 Utility Disk then boot the S‑50 with the SYS‑505 Utility Disk. Using the S‑50 "Convert Load Function" will enable S‑550 and S‑330 disks to be loaded into the S‑50. Likewise, using the "Convert Disk Function" will enable S‑550 and S‑330 disks to be converted to the S‑50 sample format and then saved (See Page 8 of the SYS‑505 Library Converter Manual)
Q: The S‑50 has a 25‑pin connector on the back. What is this port used for?
A: This is a DB25 SCSI port (shown at this link) but Roland never developed the required hardware or software to make it functional. In the early 1990's, a company called ToneGenics Corporation developed hardware and custom boot disk software for adding external SCSI Hard Drives but... it was quite expensive at $500 and never gained popularity
S‑50 System Utility/Boot Disk v2.0
This 3.5" floppy disk image file allows you to create a System Utility Disk which is used to boot an S‑50
File Format: *.OUT file for use with the OMNIFLOP, SDISK, SDISKW or "dd" utility. To use with factory firmware on a GOTEK FDD/USB, rename the file to 000.IMG
S‑50 System Utility/Boot Disk v2.0 (!!! Total Volume Issue !!!)
Note: For unknown reasons, this System Boot/Utility Disk on the Roland website has the Total Volume Output set to zero and it's
been online for downloading like this for 38+ years now and they haven't fixed it! Weird!! Once this disk is loaded, to get
any sound out of your S‑50, use the following procedure:
             ➤ Press FUNCTION
             ➤ Press P7
             ➤ Press Arrow Down 3 Times ▽ ▽ ▽
             ➤ The display should now read "17 Multi Patch Level A 0"
             ➤ Use the Alpha Dial to increase the Volume Output from 0 to 127 (or whatever level you want)
             ➤ Remove the v2.0 Boot Disk, insert a new Sound Disk and use the 11 Load All command
             ➤ You should now hear some sound

             To save these settings for the next time you turn on the sampler
             ➤ Insert the System Boot/Utility Disk v2.0
             ➤ Use the 22 SAVE FUNC and 25 SAVE SYS commands so you won't need to change settings every time
                 ✓ 22 SAVE FUNC - Press PLAY > DISK > PATCH > P2 (SAVE FUNC) > SHIFT (EXECUTE) > ENTER
                 ✓ 25 SAVE SYS  - Press PLAY > DISK > PATCH > P5 (SAVE SYS)  > SHIFT (EXECUTE) > ENTER
                 ✓ These commands are detailed in the S‑50 Owner's Manual on p.106 & p.109, respectively
              Special thanks go out to S‑50 sampler owner "Open Mirror" for this very useful fix!!!

         TIP: New to S‑50 menus?
                   The PATCH button acts as a toggle between some hidden menus (Owner's Manual p.23)
                   You can also change Page Screen Menus by using the -PAGE or +PAGE buttons
S‑50 SYS‑505 Utility Disk v1.00
The SYS‑505 Utility Disk will convert S‑550 or S‑330 Roland Sound Library disks for use with an S‑50
File Format: *.OUT file for use with the OMNIFLOP, SDISK, SDISKW or "dd" utility
SYS‑505 Utility Disk v1.00
SYS‑505 Library Converter Manual
S-50 Director-S Sequencer (Dongle Free & Original Demos) & Owner's Manual
Official Roland document and Director-S downloads
File Format: *.OUT file & *.PDF File
S-50 Director-S Sequencer Owner's Manual
Director-S Sequencer Youtube Overview & Tutorial
S-50 Director-S Sequencer - Dongle Free Version (SYS‑503)
S-50 Director-S Sequencer - Demo Disks #1 And #2 (SYS‑503)
(A dongle is required only if you want to save songs/sequences. These versions are useful because they contain SYS‑503 Sound & Song Data)
OMNIFLOP Utility
Point‑and‑click WINDOWS program for creating Roland sampler 3.5" floppy disks from *.OUT disk image files
OMNIFLOP is a better alternative than using the outdated DOS based SDISK Utility
You will need to make sure that the floppy disk drive you are using is internal and is able to read/write 720KB disks
I have used OMNIFLOP with excellent results on Windows 7 (Ultimate 32‑bit) and also Windows XP (Professional)
I created some useful installation notes here
File Format: *.EXE File For WINDOWS
Download OMNIFLOP here
S-50 Internal 720KB DS/DD 3.5" Floppy Disk Drive
Toshiba P/N: FDD4261A0K (Original Factory Installed Model - Early Production Runs)
Toshiba P/N: FDD4261G0K (Original Factory Installed Model - Late Production Runs)
Chinon P/N: FZ-357 (After-Market FDD Works By Simply Moving Jumpers)
Sony P/N: MPF920-Z/121 (After‑Market / DIY Requiring Some Soldering)
Panasonic P/N: JU256A-488PC (After‑Market / DIY Requiring Some Soldering)
Samsung SFD-321B/LE (After-Market FDD Requires Some DIY Wiring)
Mitsubishi P/N: MF355F‑3490UC (After‑Market / DIY Requiring Some Soldering)
Note: Mitsubishi P/N: MF355F‑3490UC has a White Bezel
* More info about installing these inexpensive After‑Market FDD's can be found at this link
The S‑50 reads and writes sampler data using the 720KB DS/DD format. Some users say they use 1.44MB HD 3.5" blank disks by covering up the hole on the opposite side of the write‑protect tab with opaque tape. I have had mixed results in the past so I only use the hard to find and (usually) more expensive 720KB DS/DD disks. Different magnetic coatings are used on 1.44MB HD vs. 720KB DS/DD disks. There are also some differences in how the drives work reading HD vs. DS/DD disks. Data written in the DS/DD format onto HD discs will probably not be readable for very long. If you fake the drive out by taping over the HD disk identifying hole to use HD disks as DS/DD, it uses a lower than normal magnetic force normally required for writing data onto DS/DD discs. This can lead to higher error rates and sometimes the data will just disappear without warning. There is some more detailed info at retrotechnology.com about the different magnetic coatings used on 1.44MB HD vs. 720KB DS/DD disks
An excellent source for inexpensive recycled 720KB DS/DD 3.5" floppy disks is floppydisk.com
Note: All floppy disks are reformatted, tested and relabeled. I highly recommend this vendor!
If the sampler refuses to boot, the first step to take is carefully clean the read/write head on the 3.5" floppy disk drive (FDD) using a Q-Tip and 91% isopropyl alcohol (IPA). If that does not solve the booting isssue, the most common failure reported by S‑50 owners is a broken 3.5" FDD. After 35+ years of use, these mechanical dinosaurs simply crap out and die. In most cases, the only repairable parts are the three sensor switches which are activated whenever a disk is inserted:

❖ Density Mode (DD/HD)
❖ Disk Inserted (YES/NO)
❖ Write Protection (ON/OFF)
If any of these switches are broken or dirty, it could prevent the sampler O/S from working properly. Some users have reported success at solving some boot failure issues by performing maintenance on these switches. Depending on the model and manufacturer, these switches can be either mechanical or optical. Optical switches use an infrared emitter/sensor combo which look like a pair of clear and/or opaque LED's. Over time, optical sensor switches have a tendency to gather dust and debris. Spraying compressed air will sometime clean out the area. More intense accumulation requires disassembly and a thorough cleaning with a Q-Tip and 91% IPA. Mechanical switches are somewhat harder to clean and usually require some DeoxIT lube cleaner or a Q-Tip with 91% IPA
If you are considering updating your S‑50 to work with a GOTEK USB Floppy Drive Emulator, see the information at this link
Starting Up & Powering Off The S‑50
Before turning the power on or off
- Make sure there is no disk in the 3.5" floppy disk drive!
- Why? When power is initially applied to the disk drive or when it is powered off, in some instances, a momentary power surge is created which can damage data on the disk
Creating Sub Tones On The S-50
The S-50 Owner's Manual and Supplemental Notes have a section detailing the steps for creating Sub Tones
Unfortunately, those instructions do not work
I have created a webpage with detailed instructions showing the correct procedure
File Format: Webpage Link
Creating Sub Tones On The S‑50
I like to create unusual samples on the S‑50 & S‑550. One of the most useful functions for me is the REVERSE loop mode. Unfortunately, there is no easy way within any of the S‑50 menus to create a "continuous‑looping reverse" sample. I have put together a step‑by‑step method to create a "continuous‑looping reverse" sample. This little trick bypasses a limitation of the sampler O/S and adds a new sampling feature. It's great news for others out there who like to create weird samples!
File Format: Webpage Link
Continuous-Looping Reverse Samples On The S‑50
Hidden Modes On The S-50
S‑50 designer Akira Matsui has hidden a very special test mode inside the system software that will enable you to take the S‑50 out of Rotary mode and set the voices to "Retrigger" operation. It enables you to operate your S‑50 in a special mode that retriggers a voice, rather than play sounds in the usual rotary manner. Another hidden feature will enable you to identify the MIDI note number for any key you touch on the keyboard. It leaves the voicing system in "Rotary" or "Normal" mode but will display MIDI note number information on your CRT monitor. Details for unlocking these two modes are here to download
File Format: PDF Document
Hidden Modes On The S-50
S‑50 Noise, Static or Distortion Problems?
Two solutions are available at the DIY Page
S‑50 YouTube Tutorials (Johnny Morgan)
Johnny Morgan has a YouTube channel with some very informative S‑50 & S‑550 tutorials. Definitely worth a visit if you are a new S‑50 owner
Roland S‑50 Patch Editing
Roland S‑50 Sampling and Tech Overview
S‑50 YouTube Demo & Review (Espen Kraft)
Espen Kraft has a YouTube channel with some very informative S‑50 & S‑550 tutorials. Definitely worth a visit if you are a new S‑50 owner
https://www.youtube.com/watch?v=hej0PmH4qic
Roland S‑50 Demo & Review
S-50 Owner's Manuals, Service Notes & Supplemental Notes
Official Roland documents with details about Performance Disks, Patches, Sub Tones, Sampling, Schematics and more
File Format: *.PDF File
S‑50 Supplemental Notes S‑50 Owner's Manual v2.0
S‑50 Service Notes v10‑88
Manuel du Propriétaire du Roland S-50 v1.0 (Français)
S‑550 RSB Disk Image Library (60 Disks)
This 60 disk set contains the entire S‑50 Sampler Library issued by Roland
S‑50 RSB Disk Image Library Converted To S‑550 and S‑330 Formats (80 Disks)
This is the entire 80 disk S‑50 RSB Library converted over to the S‑550 and S‑330 formats
S‑550 L-Series Disks (L-501 through L-509)
This 45 disk set was released in 1987 and also appears on the LCD‑1 CD‑ROM
Some of these samples are not in the S‑50, S‑550 or S‑330 RSB Libraries
Q: How Do I Use S‑50 RSB Sampler Library Disks With An S‑550?
A: Use the S‑550 UTILITY menu selection called "Convert Load" which enables S‑50 disks to be loaded and saved for the S‑550 sampler (See page 147 of the S‑550 Owner's Manual v1.1)
S‑550 System Utility Disk v1.13 (This is the O/S I recommend using all the time for floppy disk drive or USB/FDE systems without SCSI)
This 3.5" floppy disk image file allows you to create a System Utility Disk which is used to boot an S‑550 (for systems without an HD5-IF SCSI card)
File Format: *.OUT disk image files for use with the OMNIFLOP, SDISK, SDISKW or "dd" utility. To use with a factory firmware FDD/USB, rename the file to 000.IMG
S‑550 System Utility Disk v1.13
- ↳ Special Note For System Utility Disk v1.13 Users ↵ When accessing advanced commands from the menu such as SAMPLING, WAVE DRAW, TRUNCATE, etc..., the v1.13 System Boot Disk must remain in the floppy disk drive! This is because the sampler O/S needs to periodically access the floppy disk and load program code to run various menu subroutines. Likewise, if you are using a GOTEK USB/FDE, the v1.13 System Boot Disk image must be the current disk image selected on the USB stick
S‑550 CD‑5 CD-ROM Utility Disk v1.00 (This is the O/S I recommend using all the time for systems with the HD5-IF SCSI card installed)
This 3.5" floppy disk image enables use of external SCSI devices such as Hard Drives, CD‑ROM Drives, ZIP Drives, SCSI2SD, raSCSI, ZuluSCSI and other external devices. It's name originates from the unobtainable external CD‑5 external CD‑ROM drive which is no longer available. Some S‑550 owners, including myself, have had problems using Version 1.02 with ZIP drives and multiple SCSI devices. Using this older Version 1.00 solves that problem with SCSI device compatibility. VERY IMPORTANT: If you want the S‑550 to boot from a Hard Drive and not from the floppy drive, you will need to configure the S‑550 CD‑5 CD-ROM Utility Disk v1.00 differently from its default setting. Detailed instructions are at this link
File Format: *.OUT disk image files for use with the OMNIFLOP, SDISK, SDISKW or "dd" utility
CD‑5 CD‑ROM Utility Disk v1.00
CD‑5 Owner's Manual (v.88-11)
- ↳ Special Note For CD‑5 CD‑ROM Utility Disk v1.00 Users ↵ If you are using your S‑550 with external SCSI devices such as 80MB Hard Drive(s), SCSI2SD or ZuluSCSI, it is optimal to boot the sampler from the SCSI device and not from the floppy disk drive or GOTEK USB/FDE. Why? When accessing advanced commands from the menu such as SAMPLING, WAVE DRAW, TRUNCATE, etc..., the sampler O/S needs to periodically access the System Boot Disk and load program code to run subroutines. If you are using a floppy disk drive to boot the sampler, the CD‑5 CD‑ROM Utility Disk v1.00 Boot Disk must remain loaded in the floppy disk drive. Likewise, if you are using a USB/FDE to boot the sampler, the CD‑5 CD‑ROM Utility Disk v1.00 Boot Disk image must be the current disk image selected on the USB stick. Having the S‑550 system boot from a SCSI device greatly speeds up the overall convenience and system response time by not having to access the slower loading floppy disk drive or USB/FDE. This also eliminates the need to keep track of which disk is currently loaded in the floppy drive (or USB/FDE) when using advanced menu commands
S‑550 HD5‑IF Hard Disk Utility Disk v1.03 (I DO NOT recommend using this O/S version! It seems to have many bugs)
↳ Use the CD‑5 CD‑ROM Utility Disk v1.00 instead ↵
S‑550 CD‑5 CD-ROM Utility Disk v1.02 (I DO NOT recommend using this O/S version! It seems to have many bugs)
↳ Use the CD‑5 CD‑ROM Utility Disk v1.00 instead ↵
S-550 Director-S Sequencer (Dongle Free) & Owner's Manual
Official Roland document and Director-S downloads
File Format: *.OUT file & *.PDF File
S-550 Director-S Sequencer Owner's Manual
Director-S Sequencer Youtube Overview & Tutorial
S-550 Director-S Sequencer - Dongle Free Version (SYS‑553)
S-550 Director-S Sequencer + Demo Disks A & B
(A dongle is required only if you want to save songs/sequences. These disks are useful because they contain the SYS‑553 Sound & Song Data)
OMNIFLOP Utility
Point‑and‑click WINDOWS program for creating Roland sampler 3.5" floppy disks from *.OUT disk image file s
OMNIFLOP is a better alternative than using the outdated DOS based SDISK Utility
You will need to make sure that the floppy disk drive you are using is internal and is able to read/write 720KB disks
I have used OMNIFLOP with excellent results using Windows 7 Ultimate 32‑bit and Windows XP
I created some useful installation notes here
File Format: *.EXE File For WINDOWS
OMNIFLOP
S-550 Internal 720KB DS/DD 3.5" Floppy Disk Drive
Toshiba P/N: FDD4261A0K (The Original Factory Installed Model - Early Production Runs)
Toshiba P/N: FDD4261G0K (The Original Factory Installed Model - Late Production Runs)
Chinon P/N: FZ-357 (After‑Market FDD Works By Simply Moving Jumpers)
Sony P/N: MPF920-Z/121 (After‑Market / DIY Requiring Some Soldering)
Panasonic P/N: JU256A-488PC (After‑Market / DIY Requiring Some Soldering)
Mitsubishi P/N: MF355F‑3490UC (After‑Market / DIY Requiring Some Soldering)
Note: Mitsubishi P/N: MF355F‑3490UC has a White Bezel
* More info about installing these inexpensive After‑Market FDD's can be found at this link
The S‑550 reads and writes sampler data using the 720KB DS/DD format. Some users say they use 1.44MB HD 3.5" blank disks by covering up the hole on the opposite side of the write‑protect tab with opaque tape. I have had mixed results in the past so I only use the hard to find and (usually) more expensive 720KB DS/DD disks. Different magnetic coatings are used on 1.44MB HD vs. 720KB DS/DD disks. There are also some differences in how the drives work reading HD vs. DS/DD disks. Data written in the DS/DD format onto HD discs will probably not be readable for very long. If you fake the drive out by taping over the HD disk identifying hole to use HD disks as DS/DD, it uses a lower than normal magnetic force normally required for writing data onto DS/DD discs. This can lead to higher error rates and sometimes the data will just disappear without warning. There is some more detailed info at retrotechnology.com about the different magnetic coatings used on 1.44MB HD vs. 720KB DS/DD disks
An excellent source for inexpensive recycled 720KB DS/DD 3.5" floppy disks is floppydisk.com
Note: All floppy disks are reformatted, tested and relabeled. I highly recommend this vendor!
If the sampler refuses to boot, the first step to take is carefully clean the read/write head on the 3.5" floppy disk drive (FDD) using a Q-Tip and 91% isopropyl alcohol (IPA). If that does not solve the booting isssue, the most common failure reported by S‑550 owners is a broken 3.5" FDD. After 35+ years of use, these mechanical dinosaurs simply crap out and die. In most cases, the only repairable parts are the three sensor switches which are activated whenever a disk is inserted:
❖ Density Mode (DD/HD)
❖ Disk Inserted (YES/NO)
❖ Write Protection (ON/OFF)
If any of these switches are broken or dirty, it could prevent the sampler O/S from working properly. Some users have reported success at solving some boot failure issues by performing maintenance on these switches. Depending on the model and manufacturer, these switches can be either mechanical or optical. Optical switches use an infrared emitter/sensor combo which look like a pair of clear and/or opaque LED's. Over time, optical sensor switches have a tendency to gather dust and debris. Spraying compressed air will sometime clean out the area. More intense accumulation requires disassembly and a thorough cleaning with a Q-Tip and 91% IPA. Mechanical switches are somewhat harder to clean and usually require some DeoxIT lube cleaner or a Q-Tip with 91% IPA
If you are considering updating your S‑550 to work with a USB Floppy Drive Emulator, see the information at this link
Figure 1
(click for larger image)
(click for larger image)
Starting Up And Powering Off The S‑550
Before turning on the power, you should follow these steps to ensure the sampler works properly
- Make sure there is no disk in the 3.5" floppy disk drive!
- Why? When power is initially applied to the disk drive, in some instances, a momentary power surge is created which can damage data on the disk
- If NOTHING will be plugged into the 9‑Pin EXT CTRL Port on the front
- Hold down the numeric "1" button on the front panel while turning on the power
- If you don't, you will be unable to navigate any of the menus using the front panel buttons
- Hold down the numeric "1" button on the front panel while turning on the power
- To use a MOUSE with the 9‑Pin EXT CTRL Port on the front
- Hold down the numeric "2" button on the front panel when turning on the power
- If you don't, the mouse will not work properly
- Hold down the numeric "2" button on the front panel when turning on the power
- To use an RC‑100 REMOTE CONTROLLER with the 9-Pin EXT CTRL Port on the front
- Hold down the numeric "3" button on the front panel when turning on the power
- If you don't, the RC-100 will not work properly
- Hold down the numeric "3" button on the front panel when turning on the power
- If no button is held down during power‑up, the system will default to the settings previously saved on the Start‑up Utility Disk
- Saving the default start‑up settings on the Start‑up Utility Disk for OFF, MOUSE or RC‑100 is not explained very well in the S‑550 Owner's Manual
- Press the DISK button followed by the MENU button
- Use the arrow buttons to select SAVE SYS and then press the EXECUTE button
- With NOTHING plugged into the EXT CTRL port, press the numeric '1' button followed by the ENTER button (this setting will appear in the text box as OFF)
- With a MOUSE plugged into the EXT CTRL port, press the numeric '2' button followed by the ENTER button
- With an RC‑100 CONTROLLER plugged into the EXT CTRL port, press the numeric '3' button followed by the ENTER button
- Press the COMMAND button followed by the EXECUTE button to save the new default setting you have chosen onto the start‑up disk (OFF, MOUSE or RC‑100)
- Note: For convenience, you can save these default start‑up settings onto any disk which contains a valid S‑550 System O/S
- Saving the default start‑up settings on the Start‑up Utility Disk for OFF, MOUSE or RC‑100 is not explained very well in the S‑550 Owner's Manual
- After owning an S‑550 for a while, I never knew how to bypass that annoying message, "Load Next Disk?". It turns out all you need to do is press the DEC/NO button
- Before powering off the S‑550, make sure there is no disk in the 3.5" floppy disk drive!
- Why? When power is disconnected from the disk drive, in some instances, a momentary power surge is created which can damage data on the disk
Booting The S‑550 From A Hard Drive, SCSI2SD Or ZuluSCSI Device
S‑550 External Boot Configuration
Continuous-Looping Reverse Samples On The S-550
I like to create unusual samples on the S‑550 & S‑50. One of the most useful functions for me is the REVERSE loop mode. Unfortunately, there is no easy way within any of the S‑550 menus to create a "continuous‑looping reverse" sample. I have put together a step‑by‑step method to create a "continuous‑looping reverse" sample. This little trick bypasses a limitation of the sampler O/S and adds a new sampling feature. It's great news for others out there who like to create weird samples!
File Format: Webpage Link
Continuous-Looping Reverse Samples On The S‑550

Turning On System Exclusive For The S-550
The S-550 O/S is quite precise when navigating via mouse or the numeric keypad. Sometimes the cursor needs to be in a specific location before any other parameter slot can be chosen and changed. As seen in the image to the right, trying to select the EXCLUSIVE ON/OFF parameter while in MIDI MODE is impossible unless the cursor is first moved to the slot directly above (green arrow) and then down one slot. If the cursor is located in a different location (i.e. red arrow), it's impossible to move the cursor down at all. Another important thing to make System Exclusive operational is to have DEVICE ID and CHANNEL set to "1" (orange arrows). More info can be found starting at Page 117 of the S‑550 Owners Manual
File Format: *.JPG Image
Turning On System Exclusive For The S-550
S‑550 YouTube Demo (SynthMania)
Espen Kraft has a YouTube channel with some very informative sampler Demos. Definitely worth a visit if you are a new S‑550 owner
Roland S‑550 Demo
YouTube Tutorials* (Johnny Morgan)
Johnny Morgan has a YouTube channel with some very informative S‑50 & S‑550 tutorials. Definitely worth a visit if you are a new S‑550 owner
* Although these two links cover S‑50 operation, they are quite useful for new S‑550 owners because the O/S is nearly idential (i.e. Navigation, Alpha-Dial operation & several button inputs are the same)
Roland S‑50 Patch Editing
Roland S‑50 Sampling and Tech Overview
New HD5‑IF SCSI Board (Johnny Morgan)
The original HD5‑IF SCSI board is very hard to source because as I estimate, Roland only manufactured enough of these boards for 10% of the S-550's out there. If you are looking for one... you are in luck because Johnny Morgan has created a new HD5‑IF board! It has been reversed engineered from the original Roland schematics. I've been using this new SCSI board and have been getting fantastic results. The form‑factor is exactly the same as the original and it fits perfectly in my S‑550. I have tested it with SCSI2SD, ZuluSCSI, Quantum UltraSCSI Hard Drives and ZIP Drives. It works great! You can find ordering info and more from these links
Ordering Info
Johnny Morgan Synth Dreams - YouTube Channel
|
|
(click for larger image) |
|
S-550 Owner's Manual, Service Notes & Supplemental Notes
Official Roland documents with details about Performance Disks, Patches, Sub Tones, Sampling, Schematics, SCSI, O/S differences and more
File Format: *.PDF File
S‑550 Supplemental Notes v03-98
S‑550 Supplementary Explanation - System Disk Sound Library v01-87
CD‑5 Owner's Manual (v.88-11)
S‑550 Owner's Manual v1.1 (09-87)
S‑550 Service Notes v11‑88
S‑330 System And Utility Disks
The S‑330 System Disk and the Utility Disk Image *.OUT files plus system documentation are available at the Li'l Chips Systems homepage in the Roland Support section;
   S‑330 System Boot Disk    v1.03      S‑330 System/Sound Disk I  v1.00 (Piano)
   S‑330 System Utility Disk v1.03      S‑330 System/Sound Disk II v1.00 (Multi Patch)
"Li'l Chips Systems" Roland Download Page (filename: Roland_S-330_Sampler.zip)
S‑330 Sound Library
S‑330 Sound Library
The S‑330 is able to read all S‑550 Sound Disks
Plenty are available for downloading at the SAMPLES Page
S-330 Director-S Sequencer (Dongle Free) & Owner's Manual
Official Roland document and Director-S downloads
File Format: *.OUT file & *.PDF File
S-330 Director-S Sequencer Owner's Manual
Director-S Sequencer Youtube Overview & Tutorial
S-330 Director-S Sequencer - Dongle Free Version (SYS‑333)
Director-S Original Song Data Disk (A) And Sound Data Disk (B)
(These two Song & Sound disks are for the S-550. Untested but... they might load via MENU commands on the S-50, S-330 & W-30)
S-330 Internal 720KB DS/DD 3.5" Floppy Disk Drive
Teac P/N: FD-235HF-A527(The Original Factory Installed Model - Early Production Runs)
Toshiba P/N: ND-352S-A
(The Original Factory Installed Model - Late Production Runs)
The S‑330 reads and writes sampler data using the 720KB DS/DD format. Some users say they use 1.44MB HD 3.5" blank disks by covering up the hole on the opposite side of the write‑protect tab with opaque tape. I have had mixed results in the past so I only use the hard to find and (usually) more expensive 720KB DS/DD disks. Different magnetic coatings are used on 1.44MB HD vs. 720KB DS/DD disks. There are also some differences in how the drives work reading HD vs. DS/DD disks. Data written in the DS/DD format onto HD discs will probably not be readable for very long. If you fake the drive out by taping over the HD disk identifying hole to use HD disks as DS/DD, it uses a lower than normal magnetic force normally required for writing data onto DS/DD discs. This can lead to higher error rates and sometimes the data will just disappear without warning. There is some more detailed info at retrotechnology.com about the different magnetic coatings used on 1.44MB HD vs. 720KB DS/DD disks
An excellent source for inexpensive recycled 720KB DS/DD 3.5" floppy disks is floppydisk.com
Note: All floppy disks are reformatted, tested and relabeled. I highly recommend this vendor!
If the sampler refuses to boot, the first step to take is carefully clean the read/write head on the 3.5" floppy disk drive (FDD) using a Q-Tip and 91% isopropyl alcohol (IPA). If that does not solve the booting isssue, the most common failure reported by S‑330 owners is a broken 3.5" FDD. After 35+ years of use, these mechanical dinosaurs simply crap out and die. In most cases, the only repairable parts are the three sensor switches which are activated whenever a disk is inserted:
❖ Density Mode (DD/HD)
❖ Disk Inserted (YES/NO)
❖ Write Protection (ON/OFF)
If any of these switches are broken or dirty, it could prevent the sampler O/S from working properly. Some users have reported success at solving some boot failure issues by performing maintenance on these switches. Depending on the model and manufacturer, these switches can be either mechanical or optical. Optical switches use an infrared emitter/sensor combo which look like a pair of clear and/or opaque LED's. Over time, optical sensor switches have a tendency to gather dust and debris. Spraying compressed air will sometime clean out the area. More intense accumulation requires disassembly and a thorough cleaning with a Q-Tip and 91% IPA. Mechanical switches are somewhat harder to clean and usually require some DeoxIT lube cleaner or a Q-Tip with 91% IPA
If you are considering updating your S‑330 to work with a USB Floppy Drive Emulator, see the information at this link
Starting Up And Powering Off The S‑330
Before turning on the power, you should follow these steps to ensure the sampler works properly
- Make sure there is no disk in the 3.5" floppy disk drive!
- Why? When power is initially applied to the disk drive, in some instances, a momentary power surge is created which can damage data on the disk
- If NOTHING will be plugged into the 9‑Pin EXT CTRL Port on the front
- Hold down the ← button on the front panel while turning on the power (Left Arrow Button)
- If you don't, you will be unable to navigate any of the menus using the front panel buttons
- Hold down the ← button on the front panel while turning on the power (Left Arrow Button)
- To use a MOUSE with the 9-Pin EXT CTRL Port on the front
- Hold down the ↓ button on the front panel when turning on the power (Down Arrow Button)
- If you don't, the mouse will not work properly
- Hold down the ↓ button on the front panel when turning on the power (Down Arrow Button)
- To use an RC-100 REMOTE CONTROLLER with the 9-Pin EXT CTRL Port on the front
- Hold down the → button on the front panel while turning on the power (Right Arrow Button)
- If you don't, the RC-100 will not work properly
- Hold down the → button on the front panel while turning on the power (Right Arrow Button)
- If no button is held down during power‑up, the system will default to the settings saved on the Startup Utility Disk
- If the settings on the Startup Utility Disk are set for use with a Mouse or RC‑100 and nothing is connected to the 9‑Pin EXT CTRL Port, none of the buttons on the front panel will work
- After owning an S‑550 for a while, I never knew how to bypass that annoying message, "Load Next Disk?". It turns out all you need to do is press the DEC/NO button. I'm assuming the same applies to the S‑330
- Before powering off the S‑330, make sure there is no disk in the 3.5" floppy disk drive!
- Why? When power is disconnected from the disk drive, in some instances, a momentary power surge is created which can damage data on the disk
Is Your S‑330 Freezing, Locking Up Or Experiencing Strange Behavior?

When the S‑330 was manufactured in 1988, square 68‑pin IC's were starting to gain popularity in consumer electronics. Roland installed a 68‑pin socketed IC for the S‑330 main micro‑controller (Figure A - click image for a larger view). Over time, if the S‑330 gets moved around a lot and/or overheats, stress on this PCB area will eventually cause the 68‑pin IC to become unseated from the socket (Figure B). All LED's on the sampler will light‑up and the sampler freezes/locks‑up. In most cases, the solution is to remove the 68‑pin IC and reseat it. Easier said than done! Back in the 1980's, I worked as a computer repair tech and have reseated hundreds of these IC's. Removing these 68‑pin IC's is no easy task. I had to use a special PLCC Extraction Tool (Figure C). You can find these brand new on eBay or Amazon for only $5 (USD). It's worth the investment compared to using a homemade tool. Don't risk damaging that irreplaceable IC! Once you get that IC removed, I suggest taking a sewing needle and "VERY GENTLY" inserting it between the outer plastic and the pin contact (Figure D). This forces the pin contact inward and creates better contact with the IC. It's time consuming but do this for all 68 pin contacts and don't force them inward very far. Just do it slightly. After all 68 pin contacts are done, observe the orientation notch for pin #1 and carefully press the 68‑pin IC back into the socket. This is the method I used for years and it worked 100% of the time. As always, before removing the cover on any synth or sampler, ensure that it is unplugged from the power source. Also, double‑check you are properly grounded using an anti‑static wristband and are working on a static‑free workbench
Note: Manufacturers noticed that these 68‑pin IC's were popping loose from their sockets so they started installing metal covers to keep the IC in place. These work some of the time... but not always. Also, note that some of the early S‑330 production models do not have this metal cover installed
S-330 Owner's Manual, Service Notes & Supplemental Notes
Official Roland documents with details about Sampling, Schematics, SCSI, O/S differences and more
File Format: *.PDF File
S‑330 Owner's Manual + Guide Book v12‑88
S‑330 Service Notes v05‑88
W‑30 Sound Library
W‑30 Sound Library
The W‑30 is able to read all S‑50, S‑550 and S‑330 Sound Disks
Plenty are available for downloading at the SAMPLES Page
W‑30 System Utility Disk v1.10 (non-SCSI Systems Only)
This 3.5" floppy disk image file allows you to create a System Utility Disk used to boot a W‑30
File Format: *.OUT disk image files for use with the OMNIFLOP, SDISK, SDISKW or "dd" utility. To use with a factory firmware FDD/USB, rename the file to 000.IMG
W‑30 System Utility Disk v1.10
W‑30 Hard Drive And CD-ROM SCSI Utility Disk v1.07
This 3.5" floppy disk image enables use of the optional KW30 SCSI IC chip and Hard Drives, ZIP Drives, CD‑ROM's, SCSI2SD and ZuluSCSI
VERY IMPORTANT: If you want the W‑30 to boot from a SCSI device, read the setup suggestions found at this link
File Format: *.OUT disk image files for use with the OMNIFLOP, SDISK, SDISKW or "dd" utility. To use with a factory firmware FDD/USB, rename the file to 000.IMG
W‑30 Hard Drive And CD-ROM Utility Disk v1.07HD
OMNIFLOP Utility
Point-and-click WINDOWS program for creating Roland sampler 3.5" floppy disks from *.OUT disk image files
You will need to make sure that the floppy disk drive you are using is internal and is able to read/write 720KB disks
I have used OMNIFLOP with excellent results using Windows 7 Ultimate 32-bit and Windows XP
I created some useful installation notes here
File Format: *.EXE File For WINDOWS
OMNIFLOP
W‑30 Internal 720KB DS/DD 3.5" Floppy Disk Drive
Chinon P/N: FZ‑357 (After‑Market FDD Works By Simply Moving Jumpers)
Teac P/N: FD‑235HF‑C529 (After‑Market FDD Works By Simply Moving Jumpers)
Teac P/N: FD‑235HF‑C929 (After‑Market FDD Works By Simply Moving Jumpers)
NEC P/N: FD1231T (After‑Market / DIY Requiring Some Soldering)
Sony P/N: MPF920‑Z/121 (After‑Market / DIY Requiring Some Soldering)
Panasonic P/N: JU256A‑488PC (After‑Market / DIY Requiring Some Soldering)
Mitsubishi P/N: MF355F‑3490UC (After‑Market / DIY Requiring Some Soldering)
Note: Mitsubishi P/N: MF355F‑3490UC has a White Bezel
* More info about installing these inexpensive After‑Market FDD's can be found here
The W‑30 reads and writes sampler data using the 720KB DS/DD format. Some users say they use 1.44MB HD 3.5" blank disks by covering up the hole on the opposite side of the write‑protect tab with opaque tape. I have had mixed results in the past so I only use the hard to find and (usually) more expensive 720KB DS/DD disks. Different magnetic coatings are used on 1.44MB HD vs. 720KB DS/DD disks. There are also some differences in how the drives work reading HD vs. DS/DD disks. Data written in the DS/DD format onto HD discs will probably not be readable for very long. If you fake the drive out by taping over the HD disk identifying hole to use HD disks as DS/DD, it uses a lower than normal magnetic force normally required for writing data onto DS/DD discs. This can lead to higher error rates and sometimes the data will just disappear without warning. There is some more detailed info at retrotechnology.com about the different magnetic coatings used on 1.44MB HD vs. 720KB DS/DD disks
An excellent source for inexpensive recycled 720KB DS/DD 3.5" floppy disks is floppydisk.com
Note: All floppy disks are reformatted, tested and relabeled. I highly recommend this vendor!
If the sampler refuses to boot, the first step to take is carefully clean the read/write head on the 3.5" floppy disk drive (FDD) using a Q-Tip and 91% isopropyl alcohol (IPA). If that does not solve the booting isssue, the most common failure reported by W‑30 owners is a broken 3.5" FDD. After 35+ years of use, these mechanical dinosaurs simply crap out and die. In most cases, the only repairable parts are the three sensor switches which are activated whenever a disk is inserted:
❖ Density Mode (DD/HD)
❖ Disk Inserted (YES/NO)
❖ Write Protection (ON/OFF)
If any of these switches are broken or dirty, it could prevent the sampler O/S from working properly. Some users have reported success at solving some boot failure issues by performing maintenance on these switches. Depending on the model and manufacturer, these switches can be either mechanical or optical. Optical switches use an infrared emitter/sensor combo which look like a pair of clear and/or opaque LED's. Over time, optical sensor switches have a tendency to gather dust and debris. Spraying compressed air will sometime clean out the area. More intense accumulation requires disassembly and a thorough cleaning with a Q-Tip and 91% IPA. Mechanical switches are somewhat harder to clean and usually require some DeoxIT lube cleaner or a Q-Tip with 91% IPA
If you are considering updating your W‑30 to work with a USB Floppy Drive Emulator, see the information at this link
W‑30 3.5" Floppy Disk Load Errors
If you see an error message on the LCD window which reads "DISK LOAD ERROR xx", the following have been my experiences:
DISK LOAD ERROR 08 ‑ Usually a non‑O/S 3.5" floppy diskette, a damaged floppy diskette or incorrect density (should be 720KB DS/DD)
DISK LOAD ERROR 10 ‑ Almost always traced to a 3.5" disk drive hardware failure -or- the ribbon cable is plugged in upside‑down
DISK LOAD ERROR 18 ‑ Miscellaneous hardware failure (3.5" disk drive or external Hard Drive)
Starting Up & Powering Off The W‑30
Before turning the power ON or OFF
- Make sure there is no disk in the 3.5" floppy disk drive!
- When power is initially applied to the disk drive or when it is powered off, in some instances, a momentary power surge is created which can damage data on the disk
W‑30 Tips And Tricks
Menu Navigation
When I first got my W‑30, there were a couple of simple things I couldn't figure out and finding how to do it in the manual was a lost cause (as is the case with most Roland Owner's Manuals from this era). Take note of these tidbits;
- To modify the 60 character Disk Label / Disk Memo, press these buttons in order
USER 5 1 ENTER F5
Use the alphanumeric keypad or the dials to enter text and then save the Patch
- To modify a Patch name, press these buttons in order
USER 3 6 ENTER
Turn the CURSOR DIAL clockwise one click
Turn the VALUE DIAL counter‑clockwise one click
Use the alphanumeric keypad or the dials to enter text and then save the Patch
- To answer W‑30 menu selections requesting a YES/NO response, there aren't any YES or NO buttons to press!
The solution to Roland's convoluted menu architecture can be explained best with this image below and you can
use this same logic to answer similar YES/NO messages on the LCD screen

Over time, the high voltage inverter circuit which drives the bright blue electroluminescent panel for the LCD backlight will fail. It causes a high pitched and incredibly annoying shrill. Replacing the electroluminescent panel will not solve this issue. The only solution is to replace the entire LCD assembly. It's a lot of DIY work but luckily, you can find an inexpensive modern day replacement LCD for only $26 (USD). This replacement completely removes the high voltage inverter circuit and does not rely on a backlight panel. As a bonus, there are four colors to choose from with the new LCD - White (over Black), Black (over White), White (over Blue) or Black (over Monkey Vomit Green)
W-30 LCD Replacement DIY - Ver. 20190321
Update May 2025:
Recent Tariffs And Shipping Charges To The USA Have Made
This DIY Impractical Because Of The High Cost
Real‑Time Filter Control For Your W‑30
A very cool, easy and inexpensive DIY using a minimal amount of parts
 |
W‑30 Encoder Woes
I'll try to be polite as possible when I talk about the W‑30 encoders. They are total shit! OK... I failed miserably. For unknown reasons, Roland in their infinite wisdom decided to make the rotary encoders AND the jog wheels out of cheapo plastic. Usually the first thing to break or fall off of the W‑30 are the jog wheels and soon after the encoders will fail. All is not lost. I created a webpage dedicated to replacement options for new encoders made out of metal and jog wheels also made of durable aluminum. These new jog wheels use set screws so they won't fall off and they wont wobble like the old ones. Three different styles to choose from at this link
Hidden W‑30 Patches
There are 16 extra Patches hidden on W‑30 boot disks. You can access these Patches by using the W‑30 Utility Disk v1.10 boot disk or Hard Drive And CD‑ROM Utility Disk v1.07 boot disk. Because a maximum of only 16 Patches can reside in sampler RAM memory, these extra Patches are not loaded automatically at boot time. To use them, you will need to temporarily delete a few Patches residing in sampler RAM memory. This method will work regardless if you boot the sampler from a floppy drive, Hard Drive, GOTEK, SCSI2SD or ZuluSCSI. As long as you don't Save FD or Save System, the Patches you temporarily delete will remain intact the next time you boot‑up the sampler. You can listen to the Alternate Factory B Samples here
- Boot the W‑30 from either boot disk shown above
- After the sampler boots up
Press the SOUND Button
Press the F5 Button (5: Disk)
Press the F3 Button (3: Load Patch)
Press the F5 Button (Page)
- Use the CURSOR DIAL to highlight the Destination field
Use the VALUE DIAL to select any Patch 1 through 16
Press the F3 Button (Del P) - You may need to delete more than one Patch if the sampler RAM memory is full
Menu responds with "Are you sure?" (Note: There isn't a YES or NO button to press!)
Press the F1 Button (Delete)
- Use the CURSOR DIAL to highlight the Disk [FD] Patch# field
Use the VALUE DIAL to select any Patch 16 through 32
Press the F1 Button (Load)
Near the top of the LCD screen a message appears which reads, "Now Loading" and when done, "Complete" - To hear the new Patch
Press the PERFORMANCE Button
Select the same Destination Patch# you chose earlier
W‑30 Techno Stuff
In lieu of reposting a lot of W‑30 technical info which is already online, I'll suggest that you visit two of the best W‑30 webpages I've seen. "The Unofficial W‑30 Homepage" is an archived site from the 1990's but there are a LOT of goodies to be found there, especially in the TIPS/INSTRUCTIONS, EXPANSION, and FAQ sections. Another excellent resource, especially for electronic freaks like myself, are the twelve detailed webpages at "Neil's Webbly World"
Unofficial W‑30 Homepage
Neil's Webbly World (W-30 Page)
Booting The W‑30 From A Hard Drive, SCSI2SD Or ZuluSCSI Device
W‑30 External Boot Configuration
W‑30 YouTube Overview (Riva Lima)
Riva Lima has put together a very informative overview of the W-30 on his YouTube channel. You can click on the CC button to display text in English
Roland W‑30 Overview
W‑30 Owner's Manual and Service Notes
File Format: *.PDF File
W‑30 For FD, HD, CD Owner's Manual v89‑04A3 (Updated + Expanded)
W‑30 Service Notes v05‑89 (Note: Also known as the KW‑30 SCSI Upgrade Kit Manual)
"The Roland S-760 Digital Sampler is probably one of the most complex musical instruments Roland has ever designed. Because of this, sampler novices and in some cases hardcore sampler users find the S‑760 difficult to grasp." -- Sweetwater Music Support Website
S‑750 / S‑760 / S‑770 Sound Library (Actually the S‑770 library... but these also work with S‑750 and S‑760)
S‑750 / S‑760 / S‑770 Sound Library
S‑750 System Boot Disk v2.25
This 3.5" floppy disk image file allows you to create a System Utility Disk used to boot an S‑750
File Format: *.OUT disk image files for use with the OMNIFLOP, SDISK, SDISKW or "dd" utility
S‑750 System Utility Disk v2.25
S‑750 Legacy System Boot Disks v2.21 / v2.23 / v2.24
These 3.5" floppy disk image files are for those who like to experiment with older S‑750 boot disks
Note: The current System Boot Disk for the S‑750 is v2.25 (above)
File Format: *.OUT disk image files for use with the OMNIFLOP, SDISK, SDISKW or "dd" utility
S‑750 Legacy System Utility Disks v2.21 / v2.23 / v2.24
S‑760 System Boot Disk v2.24
This 3.5" floppy disk image file allows you to create a System Utility Disk used to boot an S‑760
File Format: *.OUT disk image files for use with the OMNIFLOP, SDISK, SDISKW or "dd" utility
S‑760 System Utility Disk v2.24
S‑770 System Boot Disk v2.25
This 3.5" floppy disk image file allows you to create a System Utility Disk used to boot an S‑770
File Format: *.OUT disk image files for use with the OMNIFLOP, SDISK, SDISKW or "dd" utility
S‑770 System Utility Disk v2.25
S‑770 Legacy System Boot Disks v2.21 / v2.23 / v2.24
These 3.5" floppy disk image files are for those who like to experiment with older S‑770 boot disks
Note: The current System Boot Disk for the S‑770 is v2.25 (above)
File Format: *.OUT disk image files for use with the OMNIFLOP, SDISK, SDISKW or "dd" utility
S‑770 Legacy System Utility Disks v2.21 / v2.23 / v2.24
S‑760 Internal 1.44MB DD/HD 3.5" Floppy Disk Drive

Chinon P/N: FZ-357 (The Original Factory Installed Model)
The S‑760 reads and writes sampler data to the 3.5" floppy disk drive using the 1.44MB DD/HD format. Note the unusual Jumper configuration on the back of the FZ‑357 disk drive. Detailed info about some possible drive replacements here
An excellent source for inexpensive recycled 1.44MB DD/HD 3.5" floppy disks is floppydisk.com
Note: All floppy disks are reformatted, tested and relabeled. I highly recommend this vendor!
If the sampler refuses to boot, the first step to take is carefully clean the read/write head on the 3.5" floppy disk drive (FDD) using a Q-Tip and 91% isopropyl alcohol (IPA). If that does not solve the booting isssue, the most common failure reported by S‑760 owners is a broken 3.5" FDD. After 35+ years of use, these mechanical dinosaurs simply crap out and die. In most cases, the only repairable parts are the three sensor switches which are activated whenever a disk is inserted:
❖ Density Mode (DD/HD)
❖ Disk Inserted (YES/NO)
❖ Write Protection (ON/OFF)
If any of these switches are broken or dirty, it could prevent the sampler O/S from working properly. Some users have reported success at solving some boot failure issues by performing maintenance on these switches. Depending on the model and manufacturer, these switches can be either mechanical or optical. Optical switches use an infrared emitter/sensor combo which look like a pair of clear and/or opaque LED's. Over time, optical sensor switches have a tendency to gather dust and debris. Spraying compressed air will sometime clean out the area. More intense accumulation requires disassembly and a thorough cleaning with a Q-Tip and 91% IPA. Mechanical switches are somewhat harder to clean and usually require some DeoxIT lube cleaner or a Q-Tip with 91% IPA
If you are considering updating your S‑760 to work with a USB Floppy Drive Emulator, see the information at this link
S‑760 Encoder Replacement DIY
Although it's not exactly a "Drop-In" solution, this rotary encoder replacement works extremely well. It requires an inexpensive custom PCB, a low‑cost commonly found rotary encoder and little bit of soldering
S-760 Encoder Replacement DIY

The most common failure on the S‑760 is the custom made LCD display. Almost every S‑760 owner has had a LCD screen failure of some kind in the sampler's life. The problems are usually broken lines, missing/illegible text, a black screen or a bright green screen with no text at all. It's impossible to fix this problem even if you disassemble and clean contact surfaces inside the display. The only solution is to use an external Mouse+CRT -or- find a New Old Stock (NOS) LCD replacement on eBay. The problem with using an external Mouse+CRT is you need to read the LCD in order to set the sampler into the correct display mode. It's a Catch‑22! Something else to note about the original LCD (DMF‑50374NYU‑LY)... the S‑760 Service Notes list the screen resolution as 320x80 pixels. This is most likely a misprint because the actual resolution of this LCD is 160x64 pixels
- Broken Lines or Garbled Text on the LCD (Setting the Mouse+CRT Mode)
If you are in a situation where you are unable to see any text on the LCD because it's garbled or illegible, you can still enable the Mouse+CRT mode blindly by following these steps;- Power On while holding the MODE button and keep holding it down for 15 seconds. This will put the S‑760 into Setup Mode
- The MODE button should now be flashing its red LED
- The MODE button should now be flashing its red LED
- Press the UP ARROW three times △ △ △
- Press the DOWN ARROW button two times ▽ ▽
- Turn the ENCODER knob two clicks to the LEFT ⚆ ⚆
- Turn the ENCODER knob one click to the RIGHT ⚆
- Press the EXIT button
- Although you may be unable to see it, the LCD will briefly display the message 'EEPROM Renewing.......' and the new settings you made are saved onto the EEPROM. At this point, the sampler will reboot and try to load the O/S from the Floppy Disk Drive, USB/FDD or SCSI Device. Note: Since you are doing everything blindly and depending on the age of your encoder and how accurate it tracks, you may need to attempt the encoder turns multiple times until you find the sweet spot
- Power On while holding the MODE button and keep holding it down for 15 seconds. This will put the S‑760 into Setup Mode
- Broken Lines or Garbled Text on the LCD (Setting the RC100+CRT Mode)
If you are in a situation where you are unable to see any text on the LCD because it's garbled or illegible, you can still enable the RC‑100+CRT mode blindly by following these steps;- Power On while holding the MODE button and keep holding it down for 15 seconds. This will put the S‑760 into Setup Mode
- The MODE button should now be flashing its red LED
- The MODE button should now be flashing its red LED
- Press the UP ARROW three times △ △ △
- Press the DOWN ARROW button two times ▽ ▽
- Turn the ENCODER knob two clicks to the RIGHT ⚆ ⚆
- Press the EXIT button
- Although you may be unable to see it, the LCD will briefly display the message 'EEPROM Renewing.......' and the new settings you made are saved onto the EEPROM. At this point, the sampler will reboot and try to load the O/S from the Floppy Disk Drive, USB/FDD, or SCSI Device. Note: Since you are doing everything blindly and depending on the age of your encoder and how accurate it tracks, you may need to attempt the encoder turns multiple times until you find the sweet spot
- Power On while holding the MODE button and keep holding it down for 15 seconds. This will put the S‑760 into Setup Mode

- Black or Solid Green LCD (Setting the LCD Contrast Adjust Mode)
If you are in a situation where you are unable to see any text on the LCD because it's solid black or solid green, the sampler settings may have gone haywire due to inactivity in storage, invalid EEPROM settings or other reasons. You can still still enable LCD CONTRAST ADJUST Mode blindly to brighten or darken the display by following these steps;- Power On while holding the MODE button and keep holding it down for 15 seconds. This will put the S‑760 into Setup Mode
- The MODE button should now be flashing its red LED
- The MODE button should now be flashing its red LED
- Press the UP ARROW three times △ △ △
- Press the DOWN ARROW button three times ▽ ▽ ▽
- Turn the ENCODER knob to the LEFT to make the text lighter ⚆ ⚆ ⚆
- Turn the ENCODER knob to the RIGHT to make the text darker ⚈ ⚈ ⚈
- Press the EXIT button
- The LCD will briefly display the message 'EEPROM Renewing.......' and the new settings you made are saved onto the EEPROM. At this point, the sampler will reboot and try to load the O/S from the Floppy Disk Drive USB/FDD, or SCSI Device. Note: Since you are doing everything blindly and depending on the age of your encoder and how accurate it tracks, you may need to attempt the encoder turns multiple times until you find the sweet spot
- Power On while holding the MODE button and keep holding it down for 15 seconds. This will put the S‑760 into Setup Mode
- New Old Stock (NOS) LCD Replacement
Until recently (March 2019) there was an eBay vendor who still had NOS LCD's available for the S‑760. To date, I've not found any more of these for sale online. Although it's not the original part number, it works perfectly. Keep in mind that it's made by the same company who made the original model with a high failure rate. This newer model uses a low voltage LED for it's backlight. The original used an Electroluminescent (EL) backlight panel which required an additional high voltage circuit. This newer model bypasses the old high voltage circuit and has a yellowish color. The original LCD had a greenish hue. The newer model was quite pricey at $49 (USD) but, if you don't have the optional OP‑760‑1 Video Expansion Board with the CRT output... this is your only choice. The installation is somewhat challenging but anyone with soldering experience will be able to complete it in about 30 minutes or less. I was unable to "cleanly" unsolder the white wiring harness connector from the old LCD so I ended up cutting the wires and reattached them to the new LCD. The brand is Optrex and the part number is DMF‑50374NYU‑LY‑1. I've put together some notes about installing the DMF‑50374NYU‑LY‑1 here
Increasing S‑760 Sample Wave Memory (SIMM's)
72‑Pin / Non‑Parity / 80ns Or Faster
There are four ways to expand the Wave Memory:
(2 x 16MB SIMM) = 32MB1
(1 x 8MB SIMM) + (1 x 16MB SIMM) + (2MB On‑Board) = 26MB
(1 x 16MB SIMM) + (2MB On‑Board) = 18MB
(1 x 8MB SIMM) + (2MB On‑Board) = 10MB
1 If (2 x 16MB SIMM's) are installed, the 2MB On‑Board memory is ignored. The S‑760 maximum memory is 32MB
2 You cannot install (2 x 8MB SIMM's) - Sweetwater Tech Document
There are two SIMM slots inside. When increasing Sample Wave Memory, one SIMM or a combination of 8MB and 16MB SIMM's can be used (See Bullet #2 above). The SIMM's must be 72‑pin, non‑parity and the speed must be 80ns or faster. Be aware that they are NOT the same style SIMM's used on S‑750 or S‑770 samplers. I've been able to find brand‑new 72‑pin SIMM's very cheap on eBay, reverb.com and elsewhere. When searching, look for high quality Macintosh compatible 72‑pin, non‑parity SIMM's. Two brand names I've used with success are IBM and Kingston
SPECIAL NOTE: For a SIMM upgrade on any Roland Sampler, use the highest quality memory possible. Otherwise you will experience data corruption ("crackling"). Detailed info about SIMM's specific to the S‑760 +plus+ installation tips can be found in the S-760 Supplemental Manual (PDF)
If you experience these symptoms during sample playback and have ruled out all issues related to defective or incorrect RAM SIMM's, there are two things to verify
-
1) Sound level issues might be caused by the Digital Booster setting (S-760 Owner's Manual - Page Advanced 3-92). The default setting is -6dB but this can be set as high as +12dB and create distorted sound output
- 2) Another problem could be defective capacitors on the Power Supply Unit (PSU). A visitor to my website was able to solve crackling and distorted sound issues by replacing all electrolytic capacitors on the TDK PSU (Note: There are two different PSU options for an S‑760 (110V/117V and 240V). The capacitor values are different so ensure you are using the correct list. One list is for TDK PSU P/N#: MSA817 and the other is for P/N#: MSA818. This part number is clearly indicated on a silver sticker affixed to the large aluminum heat sink)
- "I'm happy to report that I fixed the S‑760. It was a PSU problem. I re‑capped the entire PSU and everything is back to normal. It also cleaned up the video signal significantly, made the transformer stop screaming, and there's much less heat generated now. I attached a BOM for the PSU caps in case your readers could find it useful – all highest quality Nichicon brand."

S‑760 PSU Nichicon Recap BOM (*.PDF File)
To identify your version of the S‑760 boot EPROM (IC15), hold down the PREVIEW(PUSH) knob and the F1 button at the same time while turning on the power. The current firmware version will appear on either the LCD screen or the CRT screen. The final firmware version is v1.11 which can be downloaded for free at the Synth & Sampler Firmware webpage in the event you want to burn your own EPROM IC. A list of differences between the older firmware version v1.01 and the current v1.11 can be downloaded at this link
S‑760 Test Disk + Test Modes
Is your S‑760 acting strange? An extensive array of tests including FDD, SCSI Drive, LCD, SIMMS, LED's, Dials, MIDI, Sampling, Digital I/O, Voice, Sample Memory and more are explained in detail starting on Page 6 of the S‑760 Service Notes v12‑93
There are two ways to use this Test Disk
1) If a 3.5" FDD is installed, the Windows *.EXE file automatically creates a 3.5" floppy Test Disk
2) If a GOTEK USB/FDE installed, the *.OUT Test Disk file can boot the sampler directly
Booting The S‑760 From A Hard Drive, ZIP Drive, SCSI2SD Or ZuluSCSI Device
When booting the S‑760 from a FDD or GOTEK, loading the O/S portion takes 36 seconds. After configuring it to boot from a Hard Drive, ZIP Drive, SCSI2SD or ZuluSCSI, it takes less than 1 second. You will need to change the boot configuration using the LCD panel. Setup is quite easy and detailed instructions are here
Loading AKAI CD‑ROM's From An External CD‑ROM, SCSI2SD Or ZuluSCSI Device
The S‑760 and SP‑700 are the only S‑Series samplers which have the ability to load AKAI S1000 and S1100 library format CD‑ROM's. This greatly expands the capabilities of these two samplers because the AKAI library of CD‑ROM's is gigantic. Instructions for loading AKAI CD‑ROM's can be found here
External SCSI CD‑ROM Benchmarks (S-760)
Powering Up & Powering Down The S‑760
- BEFORE TURNING THE POWER ON OR OFF, MAKE SURE THERE IS NO DISK IN THE 3.5" FLOPPY DISK DRIVE!
- When power is initially applied to the disk drive -or- when it is powered off, in some instances, a momentary power
surge is created which can damage data on the disk
- When power is initially applied to the disk drive -or- when it is powered off, in some instances, a momentary power
- If there is a CRT Monitor & Mouse Connected and you see this on the screen and can't continue
- Controller [Panel + LCD] SCSI ID [7]
>> Please see my LCD <<
You will need to turn off the sampler and follow these steps: in order:- Power On while holding the MODE button and keep holding it down for 15 seconds. This will put the S‑760 into Setup Mode
- The MODE button should now be flashing its red LED
- Press the UP ARROW three times △ △ △
- Press the DOWN ARROW button two times ▽ ▽
- Turn the ENCODER knob two clicks to the LEFT ⚆ ⚆
- Turn the ENCODER knob one click to the RIGHT ⚆
- Press the EXIT button
- The LCD will briefly display the message 'EEPROM Renewing.......' and the new settings you made are saved onto the EEPROM. At this point, the sampler will reboot and try to load the O/S from the Floppy Disk Drive, USB/FDD or SCSI Device. After the sampler boots up, you will be in "Mouse+CRT Mode"and will be able to navigate menus using the mouse and CRT monitor
- Controller [Panel + LCD] SCSI ID [7]
- If there is No CRT Monitor And Mouse Connected and you see this on the LCD and can't continue
- Controller = Mouse +CRT
>> Please see your CRT <<
You will need to turn off the sampler then:- Power On while holding the MODE button and keep holding it down for 15 seconds. This will put the S‑760 into Setup Mode
- Follow the same steps shown above for choosing a CRT Monitor & Mouse except this time in the Setup section, choose "LCD Mode"
- Controller = Mouse +CRT
S‑760 "UNFORMATTED" Errors
These are two of the most common "UNFORMATTED" errors on the S‑760 when trying to load samples from CDROM, SCSI2SD, ZuluSCSI, Floppy Disk or GOTEK
(Figure E)
- 1) To load S‑330, S‑550, W‑30 Sound Disks, AKAI S1000/S1100 CD‑ROM's or AKAI S1000/S1100 CD‑ROM *.ISO files, you must use the menu selection CONVERT LOAD. The standard LOAD command will not work with S‑330, S‑550, W‑30 or AKAI samples because the LOAD command is reserved only for use with S‑760 formatted samples. See Page 3‑88 of the S‑760 Owner's Manual (Advanced Operation) for more detailed info about using the CONVERT LOAD command. Keep in mind that Convert Loading AKAI samples can take up to 8‑times longer than loading native Roland S‑760 sample files. It is also important to note that whenever an AKAI CD‑ROM or AKAI *.ISO file is detected, it will always show as "UNFORMATTED" in the SELECT DRIVE menu (See Figure E). All S‑760 and other Roland proprietary format CD‑ROM's contain a special string at the beginning of each disc which contains the Volume Name and other identifying info. AKAI CD‑ROM's are formatted differently so when an S‑760 or SP‑700 tries to view this special ID string, the S‑760 O/S will only see a bunch of garbage characters. Even though there is valid sampler data elsewhere on the CD‑ROM, the S‑760 O/S will flag it as a non‑Roland CD‑ROM and report it as "UNFORMATTED". This is normal behavior and is not an error when using AKAI S1000/S1100 CD‑ROM's with an S‑760 or SP‑700. Detailed info about loading AKAI S1000/S1100 CD‑ROM's and AKAI S1000/S1100 CD‑ROM *.ISO files can be found at this link
- Special Note re: "CONVERT LOAD" - The S‑760 Owner's Manual states, "IT IS NOT POSSIBLE TO CONVERT LOAD FLOPPY DISK DATA". However, this is not true because the manual was written prior to the v2.24 O/S release. Changes were made to the O/S code which enables the CONVERT LOAD command to also work with Floppy Disks (and GOTEK files)
- 2) If the "UNFORMATTED" error appears on all eight SCSI DEVICE ID#'s when trying to use the LOAD or CONVERT LOAD commands, this usually indicates there are two SCSI devices set to the same SCSI DEVICE ID#. Check and change the SCSI DEVICE ID# so that each SCSI device has a unique ID#. Also ensure that no other SCSI DEVICE ID# collides with the main S‑760 SCSI DEVICE ID#. The default device number of the S‑760 is set at the factory to SCSI DEVICE ID#7 but this may have changed depending on settings made by a previous owner. You can change the SELF SCSI DEVICE ID# easily when you are in Mouse+CRT mode using the following menu commands (Ensure there are no external devices set to the S‑760 Self SCSI ID#)
     System  >  SCSI  >  S-760 Self SCSI ID  (ID#7 is the Factory Default)

     System  >  LD/SV SysPRM  >  SavePRM  (Responds briefly with "!!Complete")
S‑760 Timing Errors???
It's not exactly a timing error, but more an issue with the triggering of envelopes which is more pronounced on short percussive sounds
User LAWRON over at gearspace.com has posted his solution
- "I wanted to bring some infos regarding the Roland S‑series, and the problem that has been related earlier in the thread regarding the use of the S‑ish (for my part, the S‑760) on drums with timing problems and envelope problems. I bought this sampler 1 year ago, and, apart the fact that the workflow is amazingly complicated, I had this insane problem that all my kick drums, snares and shot samples was not played properly by the S‑760 during playback, no mater the tempo, the sequencer, the velocity, no matter everything. I was like, c'mon, that make no sense, it's impossible they released a machine like this with such bad accuracy in playback. I found the solution. Depending on the sample, those with a super short and tight attack can be altered with the default settings. You just need to offset the attack a little bit backward in the patch common settings on page 4. Period. From this, you got everything absolutely perfect and sounding amazing. I hope it will help some of the users who had the same problem because, I was digging all over the web, I never found anything."
DA-400 4-Channel D/A Converter (External Expansion For The S‑760)
SAMPLING FREQUENCY: 48, 44.1, 32 kHz (Auto Select)
D/A CONVERSION: 18‑Bit Linear, 8‑Times Over Sampling
D/A CONVERSION: 18‑Bit Linear, 8‑Times Over Sampling
S-760 Support Documents
File Format: *.PDF File
S-760 Supplemental Manual (Quick Tour, Owner's Manual Corrections, SCSI and more - Roland Document SN29)
S-760 MIDI Implementation (Roland Document 111893 v1.0)
SCSI Transfers With The S-760 (Roland Document SN44 v2.0)
S-760 Demystified (Roland Version) (Roland Document SN42 v1.0 - Same as Keyboard Magazine article. Reprinted in B&W w/o images)
Digital Sampler Compatibility Guide (Roland Document SN33 v1/01 - Contains a very complete list of compatible external SCSI devices)
CD-ROM Audio Drivers For The S-760 (Roland Document SN43 v2.0)
Digital Sampler Compatibility Guide (v2010) (Another list of compatible external SCSI devices)
S-760 Demystified (Keyboard Magazine Version) (Original December 1996 Keyboard Magazine version with detailed info and images)
DA-400 Owner's Manual (Roland Document 00458990 / 041494)
S-760 Owner's Manual and Service Notes
File Format: *.PDF File
S‑760 Owner's Manual v11-93 (Advanced) + v0196 (Basic) (English)
OP-760-1 Expansion + S-760 Software V2.xx Owner's Manual v09-96 (English)
S-760 Service Notes v12‑93 (English)
S‑760 Owner's Manual v2 (Dutch)
S‑760 Owner's Manual v2 (Italian)
S‑760 Owner's Manual v2 (Hungarian)
S‑760 Owner's Manual v2 (Japanese)
30‑Pin / Non‑Parity / 100ns Or Faster
Increasing S‑750 Sample Wave Memory (SIMM's)
To increase Sample Wave Memory in the S‑750, the optional RAS-750E Expansion Board is required. Long out of production, you might be able to find a used one on eBay or at reverb.com. This expansion board uses 4MB SIMM's installed in pairs. The maximum memory allowed on the S‑750 is 18MB (16MB + 2MB already on‑board) so to reach this level you will need a total of 4 x 4MB SIMM's. The 4MB SIMM's must be 30‑pin, non‑parity and the speed must be 100ns or faster. See page 265 of the S‑750 Owner's Manual for detailed info
Increasing S‑770 Sample Wave Memory (SIMM's)
To increase Sample Wave Memory in the S‑770, the optional RAS-770 Expansion Board is required. Long out of production, you might be able to find a used one on eBay or at reverb.com. This expansion board uses 1MB SIMM's installed in pairs. The maximum memory allowed on the S‑770 is 16MB (14MB + 2MB already on‑board) so to reach this level you will need a total of 14 x 1MB SIMM's. The 1MB SIMM's must be 30‑pin, non‑parity and the speed must be 100ns or faster. See page 272 of the S‑770 Owner's Manual for detailed info
System Overview
The SP‑700 does not have a floppy disk drive like most other samplers in the S‑Series. The operating system is loaded automatically from two on‑board EPROM's. The module does not have an Audio Input Jack like other S‑Series samplers so it is unable to create new samples directly by using a microphone or an instrument via external input. It is strictly a playback sampler. However, you are still able to edit a million, zillion sample parameters like TVF & TVA Filters, Resonance, Waveforms, Velocity, Envelopes, etc... and then save any changes to an external SCSI device (Hard Drive, ZIP Drive, SCSI2SD or ZuluSCSI). Just like the S‑760, the SP‑700 has an advantage over the S‑750 and S‑770 samplers because it is able to load AKAI S1000 and S1100 CD‑ROM's. It is also able to load all samples from the S‑330, S‑550, S‑750, S‑760, S‑770 and W‑30 RSB libraries. The snag is that since there is no floppy disk drive on this model, all samples must be loaded using a Hard Drive, ZIP Drive, SCSI2SD, ZuluSCSI, or other external SCSI device. This sampler is compatible with any S‑550 or W‑30 ZIP Drive, SCSI2SD, ZuluSCSI or Hard Drive already formatted and loaded with samples. Simply connect an S‑550 or W‑30 ZIP Drive, SCSI2SD, ZuluSCSI or Hard Drive and use the "Convert Load" menu selection to load S‑550 or W‑30 samples. There are some SP‑700 compatible 80MB hard drive and 100 MB ZIP disk image files to download at this link
Unique Features
Some of the more interesting features about this sampler include Quick Load and Load While Playing. The SP‑700 also sports a 1M‑bit Non‑Volatile Flash Memory EPROM which was cutting edge technology way back in 1992
- Quick Load - This keeps a record stored in non‑volatile Flash Memory of up to 32 Volumes, Performances and Patches that you use on a regular basis. The SP‑700 remembers on which SCSI device every file was stored, where it can be found on that device, and how many seconds of RAM the file will use up... the idea being that whenever you want to load one of these items, it is faster to use Quick Load. This makes it unnecessary to spend time searching through a huge bank of sound data on a SCSI disk while in Disk Mode to load one particular sound
- Load While Playing - This feature will enable you to play the currently selected sample while loading another sample into memory which is useful during live performances
|
LCD Issues
- Setting The LCD Contrast Level
- If you find yourself in a situation where you are unable to see any text on the LCD screen, all may not be lost. If the LCD backlight is a bright solid color or a dark solid color, it’s possible that the previous contrast level setting was set to a higher or lower than normal level
- After powering on, wait 45 seconds for the O/S to boot up completely. Press & hold SHIFT then press HOME
- Turn the Alpha Dial all the way counter-clockwise and then all the way clockwise to see if any text appears on the screen
- Press EXIT
- Press SYSTEM then press F5
- Choose SAVE (This will write the current Contrast setting into Flash Memory)
- If the steps above do not solve the issue, you may need to replace the LCD
- If you find yourself in a situation where you are unable to see any text on the LCD screen, all may not be lost. If the LCD backlight is a bright solid color or a dark solid color, it’s possible that the previous contrast level setting was set to a higher or lower than normal level
- The Screaming Banshees From Hell
- Two of the most common failures on the Roland SP‑700 are
- 1) Dim or dark LCD backlight
- 2) High pitched shrill emitting from a defective high voltage inverter
- A defective high voltage inverter supplying current to the LCD’s Electroluminescent (EL) backlight causes a high pitched & incredibly annoying shrill. Replacing the electroluminescent panel will not solve this issue. The only solution is to replace the entire LCD assembly. It's a lot of DIY work but luckily, you can find a modern day LCD replacement. This replacement completely removes the high voltage inverter circuit and does not rely on an EL backlight panel because it uses a normal LED for illumination. As a bonus, there are four colors to choose from for a new LCD - White (over Black), Black (over White), White (over Blue) or Black (over Monkey Vomit Green)
- Two of the most common failures on the Roland SP‑700 are
SP-700 LCD Replacement DIY - Ver. 20220928
Update May 2025:
Recent Tariffs And Shipping Charges To The USA Have
Made This DIY Impractical Because Of The High Cost
Increasing Sample Wave Memory (SIMM's)
SPECIAL NOTE: Use the highest quality memory possible
30‑Pin / 4x8MB / Non‑Parity / 100ns Or Faster
Otherwise you will experience data corruption ("crackling")
To increase the SP‑700 Sample Wave Memory, use 4MB SIMM's installed in pairs. The maximum memory allowed is 32MB so to reach this level you will need a total of eight 4MB SIMM's. The SIMM's must be 30‑pin, non‑parity and the speed must be 100ns or faster. These are the same style SIMM's used on the S‑750 sampler. Be aware that they are NOT the same style SIMM's used on the S‑760 or S‑770 samplers. The S‑760 SIMM's have 72‑pins and the S‑770 SIMM's are only 1MB. I've been able to find brand‑new 30‑pin SIMM's very cheap on eBay, reverb.com and elsewhere. When searching, look for high quality Macintosh compatible non‑parity SIMM's. Increasing the memory is a breeze because of the easy‑access lid on top of the case. Remove two screws and you're ready to go. See Appendix Pages 2 through 5 of the SP‑700 Owner's Manual for detailed info
SCSI
If you plan to use a SCSI2SD or ZuluSCSI device with this sampler, be aware that you can power either of these without the need for an external +5VDC power supply. You will need to ensure that the switch labeled TERM POWER (located on the Main Board inside the SP‑700) is set to the ON position. This supplies a line on the SCSI bus (Pin #25) with +5VDC which in turn will provide the required power for these devices. This switch is easily accessible without having to remove the entire case and is located directly beneath the SIMM memory access lid. Remove two screws and you're ready to go
SP‑700 "UNFORMATTED" Errors
Two of the most common "UNFORMATTED" errors on the SP‑700 when trying to load samples from CDROM, SCSI2SD, or ZuluSCSI are the same as those on the S‑760. See the section above titled "S‑760 "UNFORMATTED" Errors"
SP‑700 "WAVE MEMORY FULL" Error
When it was shipped from the factory, powering on the sampler will default by allocating all available sample memory to Bank A. If all memory SIMM's are installed with 32MB total RAM, this automatically sets Bank A to 363.8 seconds of free sample memory and zero seconds to Bank B. If you try to load or copy any samples into Bank B, you will see an error message that reads "WAVE MEMORY FULL". The way to get around this is to change some system parameters and allocate more sample memory to Bank B. From the front panel press the following button sequence:
SYSTEM > PRM(F1) > PAGE/NEXT > PAGE/NEXT > S1/DEC to decrease ‑or‑ S2/INC to increase the wave memory
After you have allocated the desired memory for Bank A and Bank B, press EXEC(F5) to save the new setting to the FLASH IC. The next time you power on the sampler, these new sample wave memory settings will be the default
SP‑700 "WAVE MEMORY CHECK ERROR" During TEST Mode
If you see a "WAVE MEMORY CHECK ERROR" during TEST mode this might be due to the fact that the switch labeled TERM POWER (located on the Main Board inside the SP‑700) is set to the OFF position and/or a SCSI device is missing a terminator. Power off the sampler, set the TERM POWER switch to the ON position and/or check for an un‑terminated SCSI device then run TEST mode again
SP‑700 "FREEZE/LOCK-UP" Error
During the power up phase and system check, if the sampler freezes and locks‑up when checking SCSI devices, the problem might lie with the two termination SIP bussed resistor arrays at PCB locations RA1 and RA2. If either of these components are defective, plugged in backwards or have a broken pin, the sampler will not boot. If RA1 and RA2 are missing or defective, the modern day replacement is Bourns P/N: 4610X‑101‑111LF. It's available here at mouser.com
2‑Prong Power Cable Replacement DIY
Back in the 1980's and 1990's there were no rules in the USA which required synth and sampler manufacturers to use 3‑prong grounded power cables. Naturally, Roland took advantage of this and cut their production costs by only installing 2‑prong power cables. As the business credo says, "Who gives a shit about safety when there's a profit to be made?"
SP‑700 AC Power Receptacle Replacement DIY
Loading AKAI CD‑ROM's From An External CD‑ROM, SCSI2SD Or ZuluSCSI Device
The S‑760 and SP‑700 are the only S‑Series samplers which have the ability to load AKAI S1000 and S1100 library format CD‑ROM's. This greatly expands the capabilities of these two samplers because the AKAI library of CD‑ROM's is gigantic. Instructions for loading AKAI CD‑ROM's can be found here
SP‑700 Owner's Manual and Service Notes
File Format: *.PDF File
SP‑700 Owner's Manual v12‑92
SP‑700 Service Notes v04‑93
SP-700 Sales Brochure
After‑Market Floppy Disk Drives
DIY info for replacing an unreliable or broken FDD using inexpensive Chinon, Teac, Panasonic, Mitsubishi, NEC & other brands. Some of the instructions are easy as moving/adding jumpers while others require a steady hand w/advanced soldering skills
FDD Tech
GOTEK USB Floppy Drive Emulator (USB/FDE)
There are many methods of making a GOTEK USB Floppy Drive Emulator (USB/FDE) work with a Roland S‑50, S‑550, S‑330 or W‑30 sampler. The easiest way is to buy GOTEK Model: SFRM72‑FU‑DL for about $25 (USD) and simply plug it into the sampler where the floppy disk drive used to sit. The disadvantage of using this model is that there are very few bells and whistles available. The GOTEK factory firmware on this model uses a very boring 7‑segment LED display and the two buttons on the front make a clumsy user interface
Luckily, there are alternatives for updating the GOTEK firmware and the best version I've seen is available for free. You can purchase a low‑priced GOTEK for about $26 (USD), a nice, crisp OLED screen for $2, a rotary encoder for $3 and update the firmware yourself using free installation software. In the past, other firmware updates required a special serial interface and a $10 software license for each GOTEK you updated
The only extra hardware you need for this free FlashFloppy firmware update is a standard USB cable. When I updated my GOTEK with the FlashFloppy firmware, installed the OLED and rotary encoder, It worked perfectly the very first time I tried it. Very unusual for mods like this when trying to make 1980's technology work with modern gadgets. In fact, after all the updates went so smoothly, I thought perhaps that something had gone wrong
Keep in mind that the OLED screen and Rotary encoder are optional add‑ons but... for these low cost parts, I highly recommended adding them. It's like the difference between driving a Ford Pinto and a Corvette Stingray

A link to installing a GOTEK USB/FDE on your Roland sampler using the free FlashFloppy firmware is here
(This firmware update requires free software installation and additional parts [optional] which requires soldering)
A link to installing a GOTEK USB/FDE the easy way on your Roland sampler is here
(No soldering or extra modification is required for this method)
There are many methods of making a GOTEK USB Floppy Drive Emulator (USB/FDE) work with a Roland S‑50, S‑550, S‑330 or W‑30 sampler. The easiest way is to buy GOTEK Model: SFRM72‑FU‑DL for about $25 (USD) and simply plug it into the sampler where the floppy disk drive used to sit. The disadvantage of using this model is that there are very few bells and whistles available. The GOTEK factory firmware on this model uses a very boring 7‑segment LED display and the two buttons on the front make a clumsy user interface
Luckily, there are alternatives for updating the GOTEK firmware and the best version I've seen is available for free. You can purchase a low‑priced GOTEK for about $26 (USD), a nice, crisp OLED screen for $2, a rotary encoder for $3 and update the firmware yourself using free installation software. In the past, other firmware updates required a special serial interface and a $10 software license for each GOTEK you updated
The only extra hardware you need for this free FlashFloppy firmware update is a standard USB cable. When I updated my GOTEK with the FlashFloppy firmware, installed the OLED and rotary encoder, It worked perfectly the very first time I tried it. Very unusual for mods like this when trying to make 1980's technology work with modern gadgets. In fact, after all the updates went so smoothly, I thought perhaps that something had gone wrong
Keep in mind that the OLED screen and Rotary encoder are optional add‑ons but... for these low cost parts, I highly recommended adding them. It's like the difference between driving a Ford Pinto and a Corvette Stingray
A link to installing a GOTEK USB/FDE on your Roland sampler using the free FlashFloppy firmware is here
(This firmware update requires free software installation and additional parts [optional] which requires soldering)
A link to installing a GOTEK USB/FDE the easy way on your Roland sampler is here
(No soldering or extra modification is required for this method)
ACCESSORIES: COLOR MONITOR / COMPOSITE VIDEO / MOUSE / RC‑100 / DT‑100
GBS 8200 Video Converter Board
Q: Can I plug an LCD Flat Screen VGA Color Monitor into the S‑50, S‑330, S‑550, S‑750, S‑760 or S‑770 DIGITAL RGB Port for use as the display device?
A: LOL! You should know by now that almost EVERYTHING Roland makes uses proprietary external devices and it's never easy getting things to work correctly. Making a 15‑pin LCD Flat Screen VGA Color Monitor work is much trickier than just using a simple adapter cable. Several solutions are available and they all require additional external electronics. One of the more interesting and cost effective solutions is the use of a GBS 8200 CGA To VGA Video Converter Board. The current cost on eBay is about $29 USD and you will also need to buy an 8‑pin DIN male connector, an inexpensive wall‑wart power supply and an enclosure for the board. This video board is a compact device measuring 4.0" x 4.5" x 0.75". I have put together a DIY guide with detailed instructions about how to connect this board to an S‑50, S‑550 or S‑330 (See the DIY PAGE)
Q: Can I plug an old‑style CGA, EGA, or RGB color monitor into the S‑50, S‑330, S‑550, S‑750, S‑760 or S‑770 DIGITAL RGB Port for use as the display device?
A: Again... LOL! Roland Proprietary. There are several old‑style CGA, EGA and RGB monitors which are known to work well with the S‑50, S‑330, S‑550, S‑750, S‑760 and S‑770. However, you can't just plug the monitor in directly. Each one requires a special adapter cable before it can work. Each monitor will require a different style cable because Roland monitors use 8‑pin plugs, Commodore monitors use 9‑pin plugs, Atari monitors use 13‑pin plugs, etc...
Roland CC-141 RGB Monitor
  Atari SC1224 / SC1435         Commodore 1080 / 1084         Mitsubishi DiamondScan         Darius TSM-1431
  Roland CC-121                 Taxan 610 / 420               Sony Trinitron KV-1311CR       Sharp CU-14GB
  Roland CC-141                 Magnavox 8762                 Zenith ZVM133                  NEC 3D
- DIY instructions for connecting several types of VGA / CGA / EGA / RGB monitors here
- DIY instructions for making your own Roland RGB-25N cable here
- DIY instructions for making your own Atari SC1224 / SC1435 RGB adapter cable here
Q: What are my options if I don't have an CGA, EGA or VGA color monitor?
A: The S‑50, S‑550 and S‑330 all have a Composite Video OUT jack which is used to connect an RCA cable to a TV or a monochrome CRT. The output video signal is monochrome but it is still very usable when making on‑screen menu selections
One option for using the Composite Video signal is an inexpensive device called the EasyCap‑DC60 which enables a Composite Video IN signal using the USB port on your PC or laptop via the supplied software. EasyCap‑DC60 knock‑offs sell for $10 (USD) on eBay and Amazon
If your TV, monitor or computer has a Composite Video IN jack, you can simply use an RCA cable to get a Composite Video OUT signal from the S‑50, S‑550 or S‑330. If your TV, monitor or computer has a video input with an S‑Video IN jack, you can make an easy DIY cable using a 4‑pin mini DIN plug, a 470pF capacitor, and an RCA plug. Because this is a video signal, be sure to use shielded cable. Non‑standard 7‑pin mini‑DIN connectors (termed "7P") are used on some computer video cards [PC and Mac]. A 7‑pin socket accepts, and is pin compatible, with a standard 4‑pin S‑Video plug which is the type used for this DIY cable [Click to enlarge image]
Used ATI Radeon X1300 PCI-E Video Cards sell for less than $9 on eBay. I used a similar card like this one for years to view the composite video output from my S‑50. It was not in color but it did the job. The big advantage was that this card plugged into my Windows PC which eliminated the need for an additional monitor or TV
Another low‑cost option is an unused VHS deck gathering dust somewhere. Some models have S‑Video and/or Composite Video IN jacks. Connect the sampler's Composite OUT signal to the VHS deck, then connect the VHS deck Video OUT to a TV or a computer video card and for little or no investment... you're good to go. If you are trying to connect your S‑50, S‑550 or S‑330 to equipment using PAL and not NTSC video standards, all bets are off. I can't provide any help. When PAL is involved, my eyes glaze over and everything starts to get foggy... just like the snow on a TV that can't receive a good signal. I know absolutely nothing about PAL
Q: Can I use a regular PC mouse with the EXT CONTROL Port on the S‑550, S‑330 or S‑7xx?
A: And Again... LOL! Roland Proprietary. Plugging a regular PC mouse into an S‑Series sampler will fry the PICO® fuse so don't try it. The only type of mouse which works when plugged in directly is the Roland MU‑1 or other MSX‑type mouse. These are nearly impossible to find and are insanely expensive compared to a normal PC mouse. However, there is a way to use an inexpensive PS/2 mouse. See the DIY PAGE for more info
NOTE: The S‑50 will not work with any type of mouse. The EXT CONTROLLER port on the back of the S‑50 will only work with the optional DT‑100 Digitizer Tablet. If you plug a mouse into the EXT CONTROLLER port, you run the risk of causing a short circuit in the sampler. Likewise, if you plug a non‑Roland mouse into the EXT CTRL port on the S‑550, S‑330, S‑750, S‑760 or S‑770, you run the risk of causing a short circuit. If this happens, see the Roland Fuse Reference Webpage
Q: What is an RC‑100 Remote Controller? A: The RC‑100 has a very long hard‑wired cable which plugs into the EXT CONTROL Port of the S‑330, S‑550 or S‑750/760/770. It adds the same alpha dial found on the S‑50 and duplicates all of the front panel buttons as a convenience device so that you won't need to hover over the sampler while editing. It also has a 9‑pin connector on the back so either a mouse or a DT‑100 (but not both) can be used. The RC‑100 is nearly impossible to find on eBay or from other sources
Q: What is a DT‑100 Digitizer Tablet?
A: The DT‑100 plugs into the EXT CONTROL Port of the S‑50. It has a stylus and a flat surface which is used to draw waveforms. The DT‑100 also performs menu navigations just like an MU‑1 mouse. There is a clip at the top which is used to hold paper in place over the tablet to protect the drawing surface. The DT‑100 CANNOT be plugged into the EXT CONTROL Port of the S‑550, S‑330 or W‑30. There are no menu choices to support it. However, the DT‑100 CAN be used with the S‑550 and S‑330 if it is plugged into the EXT CONTROL Port on the optional RC‑100 device. A high‑res scan of the most boring manual Roland ever printed is here
*.OUT AND *.IMG FILES - SHARE YOUR SAMPLER LIBRARY
Q: Is it easy to share samples with other S‑50 / S‑550 / S‑330 / S‑760 / W‑30 owners?
A: Absolutely! The OMNIFLOP (Windows) and "dd" (Mac) utilities make it super simple to create your own 3.5" disk image files which can be uploaded or eMailed
Q: Where can I find more info about the S‑50, S‑550, S‑330 W‑30 and S‑7xx samplers?
A: Since the early 1990's, John Sellens has maintained an excellent resource for the S‑Series and W‑Series samplers. Plenty of downloads, sample libraries, utilities, info and newsgroup discussions from the 1980's & 1990's is there. Luckily for us, it is still operational to this day. I was using it when it was just an FTP site and web browsers weren't even developed yet. You can find everything under the sun about the S‑Series samplers at sgroup.ca. There is also a special interest group geared towards the S‑Series and W‑Series samplers at Facebook called the Roland Sampler Information Exchange. Joining is FREE and easy.
S-Series Resource: SGroup.ca Facebook: Roland Sampler Information Exchange
File Format: Freebie *.OUT Disk Image Files here
SYSTEM AND UTILITY VERSIONS (CURRENT AND LEGACY)
Q: What are the current System and Utility versions for some of the Roland samplers?
A: This list is unverified and by no means complete but it's pretty close. I was able to compile these by reading the headers on various 3.5" floppy disks

      CURRENT    SYSTEM/UTILITY       VERSION       DATE          DISK TYPE            DISK HEADER
      S-50       System/Utility       2.02          08 JUN/87     Boot/Sound           S-50 MT25A
                 SYS-505 Converter    1.00          31 May/88     Boot/Utility         S-50 MT25A
                 Director-S           1.00          18 AUG/87     Boot/Sequencer       S-50 MT25A

      S-550      System/Utility       1.15*         01 APR/90     Boot/Utility         S550 MT25B
                 CD-5 System          1.02**        05 Feb/91     Boot/Utility/SCSI    S550 MT25B
                 HD5-IF System        1.03          23 JAN/89     Boot/Utility/SCSI    S550 MT25B
                 Director-S           1.00          12 MAY/88     Boot/Sequencer       S550 MT25B

      S-330      System/Utility       1.03          18 NOV/88     Boot/Utility         S330 MT25C
                 System/Utility       1.03          09 NOV/88     Boot/Utility         S330 MT25C
                 Director-S           1.00          26 JAN/88     Boot/Sequencer       S330 MT25C

      W-30       System/Utility       1.10          01 APR/92     Boot/Utility         W-30
                 Sys For FD/HD/CD     1.07          01 APR/92     Boot/Utility/SCSI    W-30

      S-760***   System/Utility       2.24          (No Date)     Boot/Utility         S770 MR25AP
                 Test Disk/Utility    1.02          13 MAY/94     Boot/Test Disk       S770 MR25AP

      S-750/770  System/Utility       2.25          (No Date)     Boot/Utility         S770 MR25A1

        *v1.13 Appears to be more stable than v1.15 for non-SCSI systems so I always use v1.13
       **v1.02 Has compatibility issues with ZIP & Hard Drives. Use CD-5 System v1.00 instead!
      ***S-760 Boot Disks are 1.44MB DS/HD and S-50/550/330/750/770/W-30 Boot Disks are 720KB DS/DD


      LEGACY     SYSTEM/UTILITY       VERSION       DATE          DISK TYPE            DISK HEADER
      S-50       System/Utility       2.00          20 APR/87     Boot/Sound           S-50 MT25A
                 System/Utility       1.06          02 DEC/86     Boot/Utility         S-50 MT25A
                 System/Utility       1.02          09 OCT/86     Boot/Utility         S-50 MT25A
                 Converted S-50       No System     (No Date)     Sound                S-51 MT25A

      S-550      System/Utility       1.01          17 NOV/87     Boot/Utility         S550 MT25B
                 System/Utility       1.11          10 FEB/88     Boot/Utility         S550 MT25B
                 System/Utility       1.12          12 MAY/88     Boot/Utility         S550 MT25B
                 System/Utility       1.13*         26 OCT/88     Boot/Utility         S550 MT25B
                 CD-5 System          1.01          23 Jan/89     Boot/Utility/SCSI    S550 MT25B
                 CD-5 System          1.00**        22 Nov/88     Boot/Utility/SCSI    S550 MT25B
                 HD5-IF System        1.00          11 Sep/87     Boot/Utility/SCSI    S550 MT25B
                 Ver 1.xx Sound       No System     (No Date)     Sound                S500 MT25B

      S-330      System/Utility       1.00          07 MAR/88     Boot/Utility         S330 MT25C
                 System/Utility       1.01          11 MAY/88     Boot/Utility         S330 MT25C

      W-30       System/Utility       1.02          (No Date)     Boot/Utility         W-30
                 System/Utility       1.04          07 JUL/89     Boot/Utility         W-30
                 Sys For FD/HD/CD     1.04          01 DEC/89     Boot/Utility/SCSI    W-30
                 System/Utility       1.05          01 AUG/89     Boot/Utility         W-30
                 System/Utility       1.06          01 DEC/89     Boot/Utility         W-30
                 Sys For FD/HD/CD     1.06          27 JUN/91     Boot/Utility/SCSI    W-30
                 System/Utility       1.09          12 DEC/91     Boot/Utility         W-30

      S-760***   S-760 System         2.14          (No Date)     Boot/Utility         S770 MR25AP
                 S-760 System         2.16          (No Date)     Boot/Utility         S770 MR25AP
                 S-760 System         2.19          (No Date)     Boot/Utility         S770 MR25AP
                 S-760 System         2.20          (No Date)     Boot/Utility         S770 MR25AP
                 S-760 System         2.21          (No Date)     Boot/Utility         S770 MR25AP
                 S-760 System         2.23          (No Date)     Boot/Utility         S770 MR25AP

      S-750/770  SYS-772 System       2.21          (No Date)     Boot/Utility         S770 MR25A1
                 SYS-772 System       2.23          (No Date)     Boot/Utility         S770 MR25A1
                 SYS-772 System       2.24          (No Date)     Boot/Utility         S770 MR25A1
DISK FORMATS SHARED BETWEEN DIFFERENT SAMPLER MODELS
Q: Can I load floppy disks, Hard Drives and CD‑ROM's formatted for other sampler models onto my Roland sampler?
A: Yes and No. There are several options available. Some will load directly & others need to use a "Convert Load" command or a separate utility disk
| DJ‑70: | Loads S‑750, S‑760 & S‑770 floppy disks directly Can "Convert Load" S‑330, S‑550 & W‑30 floppy disks using DJ‑70 menu selections |
| DJ‑70MKII: | Loads S‑750, S‑760 & S‑770 floppy disks directly
Can "Convert Load" S‑330, S‑550 & W‑30 floppy disks using DJ‑70MKII menu selections Can "Convert Load" AKAI S1000 and S1100 library format CD‑ROM's directly from a SCSI CD‑ROM drive & save it as Roland format |
| S‑330: | Loads S‑550 floppy disks directly & can also "Convert Load" S‑50 floppy disks using S‑330 UTILITY menu selections |
| S‑50: | Loads S‑330 & S‑550 floppy disks using the "SYS‑505 Convert Load Utility Disk" |
| S‑550: | Loads S‑330 floppy disks directly & can also "Convert Load" S‑50 floppy disks using S‑550 UTILITY menu selections |
| S‑760: | Can "Convert Load" S‑330, S‑550 & W‑30 floppy disks using S‑760 menu selections
Can "Convert Load" S‑550 & W‑30 hard disks & CD‑ROM's using S‑760 menu selections Can "Convert Load" AKAI S‑1000 & S‑1100 library CD‑ROM's directly from a SCSI CD‑ROM drive & save it as Roland format to a hard disk
|
| SP‑700: | Can "Convert Load" S‑330, S‑550 & W‑30 hard disks using SP‑700 menu selections
Can "Convert Load" S‑750, S‑760, S‑770 & DJ‑70MKII hard disks & CD‑ROM's using SP‑700 menu selections Can "Convert Load" AKAI S‑1000 & S‑1100 library CD‑ROM's directly from a SCSI CD‑ROM drive & save it as Roland format to a hard disk
|
| W‑30: | Loads S‑330 & S‑550 floppy disks directly & can also "Convert Load" S‑50 floppy disks using W‑30 menu selections
Reads S‑550 Hard Drives & S‑550 CD‑ROM's directly Reads S‑50, S‑330 & S‑550 Director‑S Song Data & MRC‑300 & MRC‑500 sequencer floppy disks directly Converts & Saves W‑30 Sound Disks into S‑50, S‑330 or S‑550 formats directly onto a floppy disk or USB/FDE (These floppy disks or USB/FDE disk image files will then load into an S‑50, S‑330 or S‑550) |
|
||||||||||||||||||||||||||||||||||||||||||||||||||||||||||||
MAGAZINES - KEYBOARD CLINICS - MISCELLANEOUS DOCUMENTS

Keyboard Clinic: S‑50 / S‑550 / S‑330 1991 Keyboard Magazine A great article from Keyboard Magazine January 1991 - Issue #177. "Keyboard Clinic: Roland S‑50 / S‑550 / S‑330 - Get The Most Out Of Your Roland". Eleven pages scanned at 300DPI, advertisements removed, placed into one large 6MB PDF file File Format: PDF Document (6MB) "Keyboard Clinic: S-50/S-550/S-330" |

The Roland S-760 Demystified 1996 Keyboard Magazine A fantastic 7‑page article from Keyboard Magazine, January 1996. Quicker, more effective ways to make new samples, edit them, and store them to disk, plus advice from a pro on how to optimize memory and time‑stretch your beat loops. All pages have been scanned at 300DPI, advertisements removed, placed into one large 4MB PDF file File Format: PDF Document (4MB) "The Roland S-760 Demystified" |

W-30 Keyboard Report October 1989 Keyboard Magazine An in‑depth review of the W‑30 with useful tips and detailed sequencer operation. Four pages scanned at 300DPI, advertisements removed and placed into one large 9MB PDF file File Format: PDF Document "W-30 Keyboard Report" - 1989 Review
|

Samplers - Special Issue March 1989 Keyboard Magazine Thirty‑seven pages of sampler comparisons. Bar charts, Frequency Response Curves, Comparison Charts and plenty of feature reviews to keep you busy. The S‑550 stacks‑up extremely well next to the competition including AKAI, Yamaha, Kurzweil, E‑Mu and other new samplers of the era File Format: PDF Document "Sampler Special Issue" - 1989 Report(Note: Be Patient... very large download file with hi‑rez scans) |

S-50 Keyboard Report December 1986 Keyboard Magazine An in‑depth review of the "new" S‑50 using the recently released v2.0 O/S File Format: PDF Document "S-50 Keyboard Report" - 1986 Report |

S‑50 / S‑10 Sales Brochure Gatefold From 1986 Eight pages of Super High-res scans @600 dpi from the original Roland sales brochure File Format: PDF Document (10MB) S-50 Gatefold - 1986 Sales Brochure |

W-30 Full Page Ad June 1989 Keyboard Magazine Full spread ad from the June 1989 Keyboard Magazine for the brand new Roland W‑30 Workstation File Format: JPEG Image (5MB) "W-30 Keyboard Magazine Full Spread Ad" |

W-30 Sound Structures June 1989 Sound On Sound Magazine Sound Structures, MIDI And Sequencing Article For The W-30 File Format: Weblink "W-30 Sound Structures - 1989" (External Link)
|

W-30 Review July 1989 Music Technology Magazine Detailed overview of the newly released W-30 File Format: Weblink "W-30 Review - 1989" (External Link) |

Roland S-330 Review August 1988 Music Technology Magazine In-depth review of the S-330 with user notes and operation tips File Format: Weblink "S-330 Review - 1988" (External Link)
|

S-50 Review December 1986 Music Technology Magazine In-depth review of the S-50 with user notes and operation tips File Format: Weblink "S-50 Review - 1986" (External Link)
|

Roland S-550 Review June 1988 Music Technology Magazine A brief overview of the newly released S-550 File Format: Weblink "S-550 Review - 1988" (External Link)
|

S-550 And S-330 Comparison June 1988 Sound On Sound Magazine A comparison of the S-550 and S-330 from 1988 File Format: Weblink "W-550 & S-330 Comparison" (External Link)
|

Roland S-50 Review December 1986 Sound On Sound Magazine A brief overview of the "newly released" S-50 File Format: Weblink "S-50 Review - 1986" (External Link)
|

Roland S-760 Review February 1994 Sound On Sound Website A glowing review of the "newly" released S-760 File Format: Weblink "S-760 Review - February 1994" (External Link)
|

Roland S-760 Review January 1994 Music Technology Magazine Another positive review of the S-760 File Format: Weblink "S-760 Review - January 1994" (External Link)
|

SP-700 Sales Brochure Gate-fold from 1992 Roland's 8-Page gatefold sales brochure for the SP-700 File Format: Weblink "SP-700 Sales Brochure" (External Link)
|

S-760 Review July 1994 Electronic Musician Magazine A glowing 4.9 Star Review for the S-760 sampler. The reviewer subtracted a micro‑point because, "...the documentation is a nightmare". Unorganized documentation for a piece of Roland gear??? Go figure!!! File Format: PDF Document "Electronic Musician Magazine S-760 Review - 1994"
|

S-760 Full Page Ad October 1994 Electronic Musician Magazine File Format: 300 DPI JPG "S-760 Full Page Ad"
|

SP-700 Review August 1993 Electronic Musician Magazine File Format: 300 DPI PDF "Electronic Musician Magazine SP-700 Review - 1993"
|

W-30 Review September 1989 Electronic Musician Magazine File Format: 300 DPI PDF "Electronic Musician Magazine W-30 Review - 1989"
|

SP-700 Review May 1993 Sound On Sound File Format:(External Link) "Sound On Sound SP-700 Review - 1993"
|
S-770 Review July 1990 Sound On Sound Magazine File Format: (External Link) "Sound On Sound Magazine S-770 Review - 1990"
|
S-770 Review (Part I, II & III) July 1990 Music Technology Magazine File Format: (External Links) "MT Magazine S-770 Review - 1990 - Part 1"
"MT Magazine S-770 Review - 1990 - Part 2"
"MT Magazine S-770 Review - 1990 - Part 3"
|

S-750 Review October 1991 Sound On Sound Magazine File Format: (External Link) "Sound On Sound Magazine S-750 Review - 1991"
|
S-760 vs. AKAI S3000 vs. EMU 3X December 1994 Mix Magazine File Format: (External Link) "Mix Magazine S-760 Test - 1994"
|

(Click For Larger Image)
| Note: The S‑50 has a DB25 SCSI port (shown at this link) but Roland never developed the required hardware or software to make it functional. In the early 1990's, a company called ToneGenics Corporation developed hardware and custom boot disk software for adding external SCSI Hard Drives but... it was quite expensive at $500 and never gained popularity |

(Click For Larger Image)

(Click For Larger Image)
Other Synthesizer And Sampler Homepages I Maintain
|
| If you find some of this DIY info useful, please consider donating a small amount. All donations are used for future DIY sampler development and free info. Thanks!
|
|

Safety Precautions
Modifications made to any factory stock equipment will always pose an element of risk. Sometimes mistakes are made which are irreversible. Improper soldering and handling of electricity can cause serious injury and damage the synthesizer. Use caution when handling static sensitive devices and the PCB. Make sure you are properly grounded, working on a static‑free workbench or table and wearing eye protection during any soldering tasks. The author is not responsible for any damage or injury resulting from this DIY info. Use this DIY information at your own risk. And, I can't stress enough, the importance of wearing eye protection while soldering. That stuff flies everywhere sometimes!
Modifications made to any factory stock equipment will always pose an element of risk. Sometimes mistakes are made which are irreversible. Improper soldering and handling of electricity can cause serious injury and damage the synthesizer. Use caution when handling static sensitive devices and the PCB. Make sure you are properly grounded, working on a static‑free workbench or table and wearing eye protection during any soldering tasks. The author is not responsible for any damage or injury resulting from this DIY info. Use this DIY information at your own risk. And, I can't stress enough, the importance of wearing eye protection while soldering. That stuff flies everywhere sometimes!
All images, text, JavaScript and HTML Code ©1995- by llamamusic.com
The Information On This Page Is Current As Of
WEBSITE DISCLAIMER
Last updated October 31, 2014
1) You may not copy, reproduce, republish, disassemble, decompile, reverse engineer, post, make available to the public, or otherwise use the content of this website (including all software applications, scripts, webpages, design elements, and graphics) for commercial gain in any way
2) By using the llamamusic.com website and its services you agree to be bound by these terms, which shall take effect immediately on your first use of this website. You may not use llamamusic.com services if you do not accept the terms. If you do not agree to be bound by all of the following terms please do not access and use llamamusic.com. llamamusic.com reserves rights to block violators of these terms from using its services or restrict their access in any form at any time
3) You agree that lawful owners of llamamusic.com own all legal right, title, copyrights, design rights, and other intellectual property rights (registered and unregistered) in this website and all content (including all software applications) located on the site
4) llamamusic.com website content and services are provided "AS IS" and on an "AS AVAILABLE" basis. To the extent permitted by law, llamamusic.com excludes all representations and warranties (whether express or implied by law), including the implied warranties of satisfactory quality, fitness for a particular purpose, non‑infringement, compatibility, security, and accuracy. llamamusic.com does not guarantee the accuracy, completeness, or performance of the website or any of the content and services. While we try to ensure that all functionality provided is correct, no responsibility is accepted by or on behalf of llamamusic.com for any errors or inaccurate content on the website
5) llamamusic.com shall not be liable for any of the following losses or damage (whether such damage or losses were foreseen, foreseeable, known, or otherwise): (a) loss of data; (b) loss of revenue or anticipated profits; (c) loss of business; (d) loss of opportunity; (e) loss of goodwill or injury to reputation; (f) losses suffered by third parties; or (g) any indirect, consequential, special or exemplary damages arising from the use of llamamusic.com and its services regardless of the form of action
6) You agree to use this website only for lawful purposes, and in a way that does not infringe the rights of, restrict or inhibit anyone else’s use of llamamusic.com
7) The information provided by llamamusic.com ("we," "us," or "our") on llamamusic.com (the "Site") is for general informational purposes only. All information on the Site is provided in good faith, however we make no representation or warranty of any kind, express or implied, regarding the accuracy, adequacy, validity, reliability, availability, or completeness of any information on the Site. UNDER NO CIRCUMSTANCE SHALL WE HAVE ANY LIABILITY TO YOU FOR ANY LOSS OR DAMAGE OF ANY KIND INCURRED AS A RESULT OF THE USE OF THE SITE OR RELIANCE ON ANY INFORMATION PROVIDED ON THE SITE. YOUR USE OF THE SITE AND YOUR RELIANCE ON ANY INFORMATION ON THE SITE IS SOLELY AT YOUR OWN RISK
EXTERNAL LINKS DISCLAIMER
The Site may contain (or you may be sent through the Site) links to other websites or content belonging to or originating from third parties or links to websites and features in banners or other advertising. Such external links are not investigated, monitored, or checked for accuracy, adequacy, validity, reliability, availability, or completeness by us. WE DO NOT WARRANT, ENDORSE, GUARANTEE, OR ASSUME RESPONSIBILITY FOR THE ACCURACY OR RELIABILITY OF ANY INFORMATION OFFERED BY THIRD‑PARTY WEBSITES LINKED THROUGH THE SITE OR ANY WEBSITE OR FEATURE LINKED IN ANY BANNER OR OTHER ADVERTISING. WE WILL NOT BE A PARTY TO OR IN ANY WAY BE RESPONSIBLE FOR MONITORING ANY TRANSACTION BETWEEN YOU AND THIRD‑PARTY PROVIDERS OF PRODUCTS OR SERVICES
AFFILIATES DISCLAIMER
The Site may contain links to affiliate websites. Our affiliates include the following:
• supersynthprojects.com • vecoven.com • super-jx.com
