


| If you find some of this DIY info useful, please consider donating a small amount. All donations are used for future DIY synth development and free info. Thanks! |  |

This page contains D-5, D-10, D-20 and D-110 information about;
 FAQ - Manuals - Service - Troubleshooting - Factory Presets - MIDI
SPECS - Dimensions - Power - ROM - RAM
PCM CARDS - Additional Patches And Tones
RAM CARDS - M-128 / M-256 / M-512
ACCESSORIES - Programmer - PCM Cards - Switches - Etc...
SPECIFICATIONS - Dimensions / Power / Audio / Memory
ROM IC VERSIONS - ROM Revisions - Bug Fixes
POWER SWITCHES - High Quality Replacements
ERROR MESSAGES - Common Error Messages And Troubleshooting
LCD REPLACEMENT - A Fancy Winstar/Raystar OLED Screen Replacement!
PG-10 PROGRAMMER - The Holy Grail Of Hardware Programmers
BATTERY REPLACEMENT - Internal Battery DIY
VOLUME POT REPLACEMENT - Scratchy Or Intermittent Volume? Here's The Fix
TACT SWITCH REPLACEMENT - Unresponsive Front Panel Buttons? Part #'s / Pointers
D-10 "ALL NOTES OFF" SETTING - How To Temprarily Disable This Annoying Feature
RESTORE D-10 FACTORY SOUNDS - How To Load The Original Tones Into The D-10
CUSTOM MULTI-BANK RAM CARDS - An Innovative RAM Card Design From Deutschland
RESTORE D-110 FACTORY SOUNDS - How To Load The Original Tones Into The D-110
ACCESSING D-110 INTERNAL TONES - How To Find Tones Loaded From A D-10 SysEx File
FAVORITE DIY TOOLS AND DIY VENDORS - Tips For DIY Freaks Who Like To Save $$$
IS YOUR D-10 FREEZING OR LOCKING UP? - Some Easy Maintenance Is Needed For The 68-Pin IC
ROLAND D-10 DIY AC POWER CONVERSION - Converting A Japanese 100V D-10 To A USA 117V D-10
ROLAND D-10 117V 2-PRONG TO 3-PRONG CABLE DIY - An Easy DIY To Avoid Short Circuit Mishaps
ROLAND D-110 117V 2-PRONG TO 3-PRONG CABLE DIY - An Easy DIY To Avoid Short Circuit Mishaps FAQ - Manuals - Service - Troubleshooting - Factory Presets - MIDI
SPECS - Dimensions - Power - ROM - RAM
PCM CARDS - Additional Patches And Tones
RAM CARDS - M-128 / M-256 / M-512
ACCESSORIES - Programmer - PCM Cards - Switches - Etc...
SPECIFICATIONS - Dimensions / Power / Audio / Memory
ROM IC VERSIONS - ROM Revisions - Bug Fixes
POWER SWITCHES - High Quality Replacements
ERROR MESSAGES - Common Error Messages And Troubleshooting
LCD REPLACEMENT - A Fancy Winstar/Raystar OLED Screen Replacement!
PG-10 PROGRAMMER - The Holy Grail Of Hardware Programmers
BATTERY REPLACEMENT - Internal Battery DIY
VOLUME POT REPLACEMENT - Scratchy Or Intermittent Volume? Here's The Fix
TACT SWITCH REPLACEMENT - Unresponsive Front Panel Buttons? Part #'s / Pointers
D-10 "ALL NOTES OFF" SETTING - How To Temprarily Disable This Annoying Feature
RESTORE D-10 FACTORY SOUNDS - How To Load The Original Tones Into The D-10
CUSTOM MULTI-BANK RAM CARDS - An Innovative RAM Card Design From Deutschland
RESTORE D-110 FACTORY SOUNDS - How To Load The Original Tones Into The D-110
ACCESSING D-110 INTERNAL TONES - How To Find Tones Loaded From A D-10 SysEx File
FAVORITE DIY TOOLS AND DIY VENDORS - Tips For DIY Freaks Who Like To Save $$$
IS YOUR D-10 FREEZING OR LOCKING UP? - Some Easy Maintenance Is Needed For The 68-Pin IC
ROLAND D-10 DIY AC POWER CONVERSION - Converting A Japanese 100V D-10 To A USA 117V D-10
ROLAND D-10 117V 2-PRONG TO 3-PRONG CABLE DIY - An Easy DIY To Avoid Short Circuit Mishaps
ROLAND D-110 117V 2-PRONG TO 3-PRONG CABLE DIY - An Easy DIY To Avoid Short Circuit Mishaps
|
 I think these two topics are important enough to place at the top of all my synth INFO webpages
1) I buy a lot of broken synths on eBay and I'm able to fix about 90% of everything I find. It's usually a simple fix. If you have a synth with no power or intermittent problems after it warms up, it's probably due to the fact that back in the 1980's Roland and other synth makers used sub‑par solder and/or not enough solder to hold components in place. After 30+ years, the solder begins to break down and hairline fractures appear. This occurs at a higher rate for components which generate a lot of heat like Bridge Rectifiers, Power Transistors, large Electrolytic Capacitors, power input jacks and audio jacks which get a lot of use. The best approach is to use a magnifying glass and carefully inspect the backside of the circuit board. If you spot any suspect areas, re‑flow a hefty amount of NEW solder
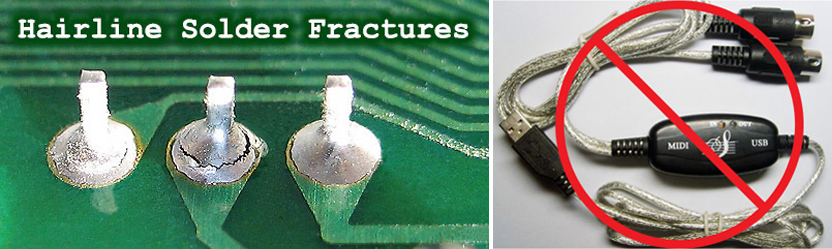
2) I receive a lot of eMails and field many questions at synth related forums and also on Facebook. The most common question I get about problems with a synth has to do with errors when trying to load Patches and Tones. About 99.9% of the time, the problem always turns out to be a crappy MIDI interface. If you have a cheapo MIDI interface which looks similar to the one shown on the right... throw this piece of shit in the trash! Do It Now. Seriously! This thing is total junk and you get what you pay for. Inexpensive MIDI interfaces like this are unable to properly regulate the buffering of MIDI data. They will work fine with simple messages such as CC, Note On, Note Off, etc... however, when you try to send SysEx messages which are much longer, the SysEx data cuts off after only sending a few bytes. Investing in a higher quality MIDI interface will solve Load/Save errors and other communication problems. Also, if you experience errors when transferring Patch and Tone data from a computer to a synthesizer, DON'T use a USB hub. Plug your MIDI interface directly from the computer to the synthesizer. Why? Some external USB hubs fail when multiple USB devices are attached because there is not enough power to share. Small power sags will suddenly cause one or ALL of the attached USB devices connected to the hub to fail, often accompanied with a "disconnect" signal
These MIDI interfaces have been tested and will work with large SysEx Dumps:
       ✓ Focusrite Scarlett 2i4 2nd Gen   ✓ M-Audio Profire 2626        ✓ ESI Midimate eX         ✓ ESI Midimate II
       ✓ Focusrite Scarlett 4i4 2nd Gen   ✓ Miditech MIDIface II Thru   ✓ Yamaha UX 16 USB/MIDI   ✓ MOTU 823 mk3
       ✓ Focusrite Scarlett 6i6 3rd Gen   ✓ Tie Studio MIDI 1i1o        ✓ Miditech MIDIface 4x4   ✓ RME FireFace UC 2X2
       ✓ iConnectivity mio 1x1            ✓ iConnectivity mioXC 1x1
These MIDI interfaces are shit and do not work with large SysEx Dumps (some might w/special driver):
      ✗ M-Audio MIDISport UNO            ✗ M-Audio MIDISport 1X1       ✗ M-Audio MIDISport 2x2   ✗ M-Audio Uno
      ✗ AVID/M-Audio Fast Track Pro      ✗ Lekato MIDI USB             ✗ Hosa USM-422 MIDI       ✗ Fore MIDI Interface
      ✗ DigitalLife MIDI-C01             ✗ Hosongnic, HiFangeow, etc...
(Here's How To Remove It)
Press [ SYSTEM ] and the the LCD shows:
SYSTEM
Master Tune=442
Press [ PARAMETER GROUP △ ] four times. The LCD shows:
SYSTEM
Overflow = ON
Press [ PARAMETER BANK ▽ ] once and and he LCD shows:
SYSTEM
Overflow = OFF
Press [ EXIT ] then dump all the Patches via SysEx
Press [ WRITE/COPY ] and the LCD should read:
Save To Card
Sound
Press [ PARAMETER GROUP △ ] twice. The LCD shows:
Dump One Way
Sound
Press [ PARAMETER BANK △ ] twice. The LCD shows:
Dump One Way
All
Press [ ENTER ] and the LCD shows:
Dump One Way
All Sure?
(Prepare Your SysEx Program To Receive Data)
Press [ WRITE/COPY ] and the LCD should read:
Complete

 D-5 Owner's Manual (v.94-08)
D-10 Owner's Manual (v.89-05)
D-20 Owner's Manual (v.88-10)
D-110 Owner's Manual (v.90-10)
D-5 Owner's Manual (v.94-08)
D-10 Owner's Manual (v.89-05)
D-20 Owner's Manual (v.88-10)
D-110 Owner's Manual (v.90-10)
FREE Owner's Manuals for almost every synth/sampler/effects available at
midimanuals.com D-5 Service Notes (v.89-04)
D-10 Service Notes (v.88-04)
D-20 Service Notes (v.88-06)
D-110 Service Notes (v.88-06)
Gigantic collection of Service Manuals w/schematics at this link. The highest quality PDF's on the Internet
synfo.nl AudioPilz D-110 Demo A funny and informative video about the D‑110
D-110 Demo Songs The eight demo songs inside the D-110
SynthMania A preview of some factory presets
D-110 / D-50 Sound Comparison
1) FIRMWARE - As you may have noticed, there have been several firmware revisions and bug fixes made to the D‑110 over the years. Much more than other Roland synths!!! If your D‑110 has an EPROM version 1.09 or lower, you will experience a loooooooong list of problems with SysEx. Notably, trying to load Patches and Tones will sometimes fail. The only solution is to update your EPROM with version 1.10 or higher. Info on upgrading to a higher version is here and here
2) MIDI INTERFACE - Another thing to check is the MIDI interface connected to your computer. Some inexpensive MIDI interfaces which look similar to this piece of shit are unable to properly regulate the buffering of MIDI data. Some of these inexpensive MIDI interfaces will work fine with simple messages such as CC, Note On, Note Off, etc... However, when you try to send SysEx messages which are much longer, the SysEx data cuts off after only sending a few bytes. Investing in a higher quality MIDI interface may solve Load/Save errors and other communication problems
Additional Troubleshooting Info
- Is the D‑110 set to SysEx Device ID = 17?
Press [ SYSTEM ]
Press [ PARAMETER GROUP △ ] three times
The LCD should read: SYSTEM - Exclu Unit#= 17
If not, press [ PARAMETER BANK △ or ▽ ] and set Exclu Unit#= 17
Press [ EXIT ] to resume normal play mode
- Is the computer Sound Card, MIDI Controller, SysEx Librarian, etc... set to MIDI Channel 1?
- Is the computer Sound Card, MIDI Controller, SysEx Librarian, sending MIDI data to the D‑110?
- Make sure your Patch Librarian or SysEx program can send and receive SysEx data to and from the D‑110
- Do you have two MIDI cables connected? Two are required because SysEx uses both MIDI IN and MIDI OUT
- Is the MIDI interface connected to a USB hub? USB hubs are notorious for transfer glitches. Plug straight into the computer
- The MIDI Send and Receive settings on your computer might be too fast for the D‑110 MIDI buffer to handle. The D‑110 synth was manufactured back in Medieval times when the processor speed of a home computer was only 20MHz... much slower than the models of today at 4GHz. Try setting the MIDI transmit speed in your computer's SysEx program to a smaller value. A recommended value for Snoize, Bome and MIDI‑OX is 390ms
[ WARNING!!! Everything in the internal memory will be erased! ]
To perform a Bulk Load
1) Press [ SYSTEM ]
Press [ PARAMETER GROUP △ ] one time
Press [ PARAMETER BANK ▽ ] one time
The LCD should show Mem Protect= OFF
Press [ EXIT ]
2) Use your computer's SysEx program to SEND the factory preset file d‑110_Factory_Presets.SYX (The load process is automatic)
3) Nothing will be shown on the the LCD however, the green MIDI RECEIVE LED should blink during the load process
4) If the Patches won't load or if you receive a Dump to MIDI Rejected error message, change the SYSTEM OVERFLOW = OFF setting here
If the Bulk Dump procedure did not work, verify the following
✓ Connect MIDI OUT and MIDI IN cables between the D‑110 and the computer
✓ Is the D‑110 set to the correct SysEx Channel?
Press [ SYSTEM ]
Press [ PARAMETER GROUP △ ] three times
The LCD should read: SYSTEM - Exclu Unit#= 17
If not, press [ PARAMETER BANK △ or ▽ ] and set Exclu Unit#= 17
Press [ EXIT ] to resume normal play mode
* Info about restoring Factory Preset Patches from an optional RAM Data Card here
To Perform A Bulk Dump
Press [ WRITE/COPY ] and the LCD shows: Save To Card - Sound
Press [ PARAMETER GROUP △ ] twice. The LCD shows: Dump One Way ‑ Sound
Press [ PARAMETER BANK △ ] twice. The LCD shows: Dump One Way - All
Press [ ENTER ] twice and the LCD shows: Dump One Way - All - Sure?
(Prepare Your SysEx Program To Receive Data)
Press [ WRITE/COPY ] and the LCD shows: Start
After the transfer is complete, the D‑110 LCD will briefly show: Complete
Note: The MIDI MESSAGES green LED will NOT flash during the transfer
The D‑110 will only flash the MIDI MESSAGES green LED for MIDI IN messages
Use your computer's SysEx program to save the Bulk Dump as a *.SYX file
Press [ EXIT ] to resume normal play mode
If the Bulk Dump procedure did not work, verify the following
❖ Connect MIDI OUT and MIDI IN cables between the D‑110 and the computer
❖ Is the D‑110 set to the correct SysEx Channel?
Press [ SYSTEM ]
Press [ PARAMETER GROUP △ ] three times
The LCD should read: SYSTEM - Exclu Unit#= 17
If not, press [ PARAMETER BANK △ or ▽ ] and set Exclu Unit#= 17
Press [ EXIT ] to resume normal play mode
If you receive a Dump to MIDI Rejected error message, change the SYSTEM OVERFLOW = OFF setting here then press [ EXIT ] to resume normal play mode
** Info for saving all internal Patches and Tones to an optional RAM Data Card is here

[ WARNING!!! Everything in the internal memory will be erased! ]
To Perform A Bulk Load On A D-10
Use a generic SysEx program on your computer to SEND the D‑10 factory preset file D1020ORIG.MID which can be downloaded at this link:
Factory Patches (D‑series Synths)
That's all you need to do. The load process is automatic and you don't need to press any buttons on the D‑10. The LCD will not show any activity during the load process and will not show anything when complete. You will need to rely on the generic SysEx program status to determine when the load procedure has finished sending data ****
It's important to note that SysEx loading procedures shown in the D‑10 Owner's Manual will not work for several D‑10 *.SYX files found on the Internet. The instructions are intended for use only for Saving/Loading data from a RAM/PCM card or transferring SysEx data between two D‑10 synths. There is no mention of transferring SysEx data using a computer because back in 1988, Roland was slow to provide support to computer users. Why? Computers were quite expensive and considered a luxury item (in today's currency, the average price of an IBM PC was $5,000 and the Macintosh M5120 was $14,000). Not every music studio had a computer back then
If the Bulk Load procedure did not work, verify the following
✓ Connect MIDI OUT and MIDI IN cables between the D‑10 and the computer
✓ Is the D‑10 set to the correct SysEx Channel?
SYSTEM - Exclu Unit#= 17
*** Info about restoring Factory Preset Patches from an optional RAM Data Card here
**** If you receive a "DATA MISMATCH" error when trying to load a SysEx file, there are two things to check
1) Disable the SysEx program setting "Split Long Messages When Sending" (Bome Send SX v1.4)
2) Ensure you are not using a crappy MIDI interface (See the info here)
Press [ WRITE ] [ ENTER ] [ WRITE ] [ ENTER ] then "Complete" will appear on the LCD screen

Press [ MULTI TIMBRAL / PERFORMANCE ] until the red PERFORMANCE LED lights up
Press [ MIDI ]
Press [ DISPLAY ▽ ] three times
The LCD shows
MIDI TXAll N-Off
ON
Press [ VALUE ▽ ]
The LCD shows
MIDI TXAll N-Off
OFF
Press [ EXIT ]
* NOTE: Unfortunately, there's no way to save this setting. It's enabled by default when the D‑10 is powered on
 D-10 / D-110 Battery Replacement Guide
Everything In The Internal Memory Will Be Erased. Everything... As In EVERYTHING!
Back-up Your Patches Before Initializing Your Synth.

D-5 Factory Reset (see WARNING!!!)
Press [ MODE ] until the ROM PLAY LED lights up
Hold down [ EXIT ] and [ EDIT ] then press [ ENTER ]
Hold down [ A/B ] then press [ BANK 7 ]
To exit, hold down [ A/B ] then press [ EXIT ]
D-10 and D-20 Factory Reset (see WARNING!!!)
While holding [ TUNE/FUNCTION ] and [ WRITE ], turn on the power
D-110 Factory Reset (see WARNING!!!)
While holding [ WRITE/COPY ], turn on the power
Press [ ENTER ] to confirm
The 3D printing service I used was all3dp.com and they had the lowest price I could find anywhere. The website is based in Germany but they use search algorithms to sort through several 3D printing facilities around the world and use the one which is the closest to your address. This keeps the shipping costs at a minimum


Update / February 2024: Four years after this post, these two OLED's are nearly impossible to source anywhere.
However, this info remains online in the event someone is able to cross reference P/N's for a similar OLED display

There are three types of tact switches to choose from.
The original factory switch Operating Force was 1 Newton but I prefer a harder press Operating Force of 2.6 Newton*
1) Brand Name: ALPS
Manufacturer P/N: SKHHAKA010
Mouser P/N: 688-SKHHAK
Operating Force: 1 Newton
Operating Life: 1,00,000 cycles
Size: 5mm (H) x 6mm (W) x 6mm (D)
2) Brand Name: ALPS
Manufacturer P/N: SKHHAMA010
Mouser P/N: 688-SKHHAM
Operating Force: 1.6 Newton
Operating Life: 500,000 cycles
Size: 5mm (H) x 6mm (W) x 6mm (D)
3) Brand Name: ALPS
Manufacturer P/N: SKHHARA010
Mouser P/N: 688-SKHHAR
Operating Force: 2.6 Newton*
Operating Life: 200,000 cycles
Size: 5mm (H) x 6mm (W) x 6mm (D)
16 switches are needed for the D-110
39 switches are needed for the D-10 and D-20
(Do yourself a favor and buy a couple of spares because... shit happens)

There are two types of tact switches to choose from.
The original factory switch Operating Force was 1 Newton*
1) Brand Name: OMRON
Manufacturer P/N: B3F-6020
Mouser P/N: 653-B3F-60203
Operating Force: 1 Newton*
Operating Life: 1,00,000 cycles
Size: 5mm (H) x 6mm (W) x 6mm (D)
2) Brand Name: OMRON
Manufacturer P/N: B3F-6022
Mouser P/N: 653-B3F-60223
Operating Force: 1.5 Newton
Operating Life: 300,000 cycles
Size: 5mm (H) x 6mm (W) x 6mm (D)
38 switches are needed for the D-5
(Do yourself a favor and buy a couple of spares because... shit happens)
 Tact Switch Reference Page For Other Roland Synths/Samplers

Mouser P/N: 652-PTD902-2015KA503
Bournes P/N: PTD902-2015K-A503
Notes about replacing this part are at the D‑110 Battery Replacement Guide webpage
D-110 Volume Pot Replacement

Note: Manufacturers noticed that these 68‑pin IC's were popping loose from their sockets so they started installing metal covers to keep the IC in place. These work some of the time... but not always. Also, note that some of the early D‑10 production models do not have this metal cover installed
The maximum character length for a Timbre name = 10
The only legal characters in Patch or Timbre names are the following:
A through Z a through z 0 through 9
# ! ? . , : ; ' " * + - / < = > & space
# ! ? . , : ; ' " * + - / < = > & space
"Roland D-10, D-110 & Related" Facebook Group
https://www.facebook.com/groups/999335273568994
gearspace.com
http://gearspace.com- The D‑110 has 6 individual 1/4" audio output jacks and 2 Mix Out Jacks. The D‑10 only has 2 Mix Out Jacks
- The D‑110 does not support and will not load D‑10 Performance Patches, Rhythm Patterns or Rhythm Tracks
- The D‑10 has two 1/4" input jacks for connecting a Start/Stop Pedal and a Hold Pedal (DP-10 / DP-6 / DP-2)
- The D‑10 is able to store 128 Patches. The D‑110 is only able to store 64 Patches
- The D‑10 has a built‑in Rhythm Machine and Metronome
- The most significant difference between the D‑5 and the D‑10/D‑20? No onboard digital Reverb and Delay
- The D‑5 has only one MIDI transmit channel as opposed to Upper/Lower channels on the D‑10/D‑20
- A welcome sight to see is the "MIDI All Notes Off" transmission has been removed. Yay!
- The keyboard has NO AFTERTOUCH... not even via MIDI control!
- Local On/Off has been added to the Multi Timbral mode
- There is no data slider
- A 9V DC external power supply is used (Wall-wart)
- There are no on‑board Rhythm Patterns and there is no Rhythm Track (Metronome)
- Expression Pedal On/Off has been added to Performance and Multi Timbral modes
- Four new Patch Effects have been added: Chord Play, Harmony, Chase Play and Arpeggio
- These are accessed via four new front panel buttons
- Unfortunately, none of these effects are active for notes received over MIDI
- Breath Controller via MIDI has been added
- Breath Control can be set to control Volume and Modulation separately or together
- Partial Reserve has been made programmable from the front panel
- This is the function which reserves set numbers of Partials for each Part in Multi Timbral mode
- On the D‑10/D‑20, it is inaccessible from the front panel


Converting a D‑10 or D-110 117V synth from a 2‑prong to a 3‑prong grounded AC power cable is much easier than it sounds. So why is this an important modification? Just ask any synth or sampler owner who has plugged their gear into an ungrounded mixing board. It's a quick way to fry transistors in a synth or sampler audio circuit. Grounding also provides an extra level of safety in the event of a major short circuit
D-10 117V 2-Prong To 3-Prong Cable DIY
D-110 117V 2-Prong To 3-Prong Cable DIY

There are some amazing finds in the Japanese synth and sampler market. I bought a D‑10 in mint condition at an unbelievable low price on eBay and it was shipped to the USA for free... in a deluxe D‑10 logo embossed leather‑bound hardshell case. Converting a Japanese D-10 synth from 100V over to USA 117V is much easier than it sounds
DIY - Converting Japanese 100V D-10 Model To USA 117V D-10 Model

Roland released three Factory PCM ROM Cards for the D‑10, D‑20 and D‑110. These three cards each contain 128 Performance Patches, 128 Timbres, 64 Tones, 32 Rhythm Patterns and 1 Rhythm Track

PATCH & TONE LISTINGS


        PN‑D10‑01 / Unique D‑Sounds (Roland)
                  ❖ Scanned Insert (PDF)

        PN‑D10‑02 / Rhythm & Bass (Roland)
                  ❖ Scanned Insert (PDF)

        PN‑D10‑03 / Natural Variation (Roland)
                  ❖ Scanned Insert (PDF)


                  ❖ Patch And Tone Listing Of All Three Roland PCM Cards (PDF)
* Using Roland PN‑D10‑nn PCM ROM Cards With The D‑110 and D‑5: Hard‑coded data on Roland brand PCM cards includes 128 Performance Patches, 128 Timbres, 64 Tones, 32 Rhythm Patterns and 1 Rhythm Track. However, the Performance Patches, Rhythm Patterns and Rhythm Tracks are not compatible with the D‑110. You can load all 128 Timbres and 64 Tones into the D‑110 and edit all sound parameters but if you try to load any of the Performance Patch data from a PCM card, a "No Data" error message will appear on the LCD. Performance Patches, Rhythm Patterns and Rhythm Tracks from most PCM cards will only load into D‑10 and D‑20 synths
These PCM ROM Cards for the D‑10 and D‑20 are compatible with the D‑5. However, data programmed on the D‑10 and D‑20 does not completely match tup with he D‑5 (Patch Effects are not included in the D‑10 or D‑20 data). If you use D‑10 or D‑20 data on the D‑5 in Performance Mode, the Patch Effects will automatically be set the same in all of the Patches. In the Multi Timbral mode, however, you are free from this problem
Other PCM ROM cards were released by third‑party vendors such as Sound Source Unlimited, Eye and I Productions, Best Choice and Valhala Music. Unlike Memory Cards, the data contained on a PCM ROM card is hard‑coded so nothing can be saved back onto the cards... these cards can only be read. However, it is possible to load the data contained on these third‑party cards (and also Roland PN‑D10‑0x cards) into the synth and save all of the Patches and Tones as a SysEx file via MIDI onto a hard drive, sequencer or other storage device. This SysEx data can be loaded back into the synth and used even if the original PCM card is not plugged into the synth. It is also possible to save this data onto an M‑256 or M‑512 Memory Card for instant access. Nice!!! See the "LOAD ALL Patches & Tones / SAVE ALL Patches & Tones" section in the ROLAND BRAND RAM CARDS heading below
Some info re: third‑party PCM cards found floating around the Internet
                            New Age  -  Sound Source Unlimited
                     Digital Synths  -  Sound Source Unlimited
                      Voice Crystal  -  Eye and I Productions
                                           ➤ VOL. 1 - 6
                         Music Pack  -  Best Choice
                     L.A. Synthesis  -  Best Choice
         Source - Live Sound Vol. 1  -  IGS Co. Ltd.
                D-110 Studio Series  -  Valhala Music
                                           ➤ PCM
                                           ➤ ANALOG
        D-10/D-20/D-5 Studio Series  -  Valhala Music
                                           ➤ TOP 40
                                           ➤ DIGITAL
                                           ➤ NEW AGE
                                           ➤ EFFECTS
                                           ➤ ORCHESTRAL
   D-10/D-20/D-5 International Gold  -  Valhala Music
                                           ➤ D-122

   ❖ Patch And Tone Listing Of Roland & Third‑Party Valhala PCM Cards (PDF)


The slot labeled "MEMORY CARD" on the front of a D‑110 and on the back of a D‑5, D‑10 and D‑20 is for use with Roland Memory Cards M‑256(D/E/G) and M‑512(D/E/G). This slot also accepts Roland Factory and Third Party PCM ROM Cards. The M‑256 and M‑512 Memory Cards will also work with other Roland gear including the D‑50, D‑550, D‑70, GC‑8, JD‑800, JD‑990, JV‑80, JV‑880, JV‑1080, JV‑2080, Pad 80, PM‑16, R‑8, R‑8M, R‑70, R‑880, TD‑5, TD‑10, TR‑626, U‑20, VG‑8, and more
Memory Cards allow storage for additional Patches, Timbres and Tones. The M‑256 and M‑512 Memory Cards will work exactly the same. However, using an M‑512 Memory Card is overkill because the extra memory on the card is not accessed. The D‑5, D‑10, D‑20 and D‑110 were originally designed to work with the smaller M‑256 Memory Card... before the larger M‑512 Memory Card was manufactured. The D‑110 Owner's Manual also states, "...using an M‑128D Memory Card will not enable the use of Patches 51 to 88 or Tones 33 to 64." There's not enough room. Using an M‑128D Memory Card with a D‑110 looks like a giant hassle. Pay the extra $$$ for a larger card. Also, an M‑128D Memory Card will not work at all with the D‑5, D‑10 or D‑20 (See Page 109 of the D‑110 Owner's Manual)
When inserting a Memory Card for the first time ‑or‑ if the card contains data from a different model synthesizer, a message similar to this will appear on the LCD;
Illegal Card
   Card Formatting
   OK?
To continue, press [ ENTER ] twice and the card will be formatted
Press [ EXIT ] to continue
TROUBLESHOOTING
A visitor to the GR‑1 Homepage passed along some very useful info about troubleshooting a once working M‑256 Memory Card. Thanks for the info, Al! The problem was the error message "NOT GR1" would display but the system would not allow the card to be formatted. The solution was to perform a Full Copy (Dump) of the patches to the card. When the message "FORMAT?" is displayed, press "YES". The "COPY COMPLETED" message will appear. You can now read and write to the card. The standard "FORMAT" option only works for brand new un‑formated and un‑corrupted cards. If you are experiencing M‑256 or M‑512 Memory Card problems on other Roland gear, a similar work‑around might be the solution
When inserting or removing cards from the "MEMORY CARD" slot, always make sure the switch on top of the card is set to the PROTECT position to prevent accidental erasure of any data. These cards use an internal lithium coin cell battery which the owner's manual says to replace every 2 years. However, I have found my battery lasting anywhere from 5 to 7 years. The replacement battery is P/N: CR2016 (Note that this is different from the more common CR2032 battery). I highly recommend buying a quality name‑brand battery like Panasonic. Saving fifty cents to purchase an off‑brand is, in my opinion, a bad idea. This battery is going to last a very long time so get a good one without the need to worry about a cheap‑o brand leaking and ruining your RAM Card
M-256E Owner's Manual (English / French / German / Japanese)
M-512E Owner's Manual (English / French / German / Japanese)

[ Backup All Of Your Patches And Tones Before Continuing! ]
From A Data RAM Card To Internal RAM on a D‑110
Make sure the PROTECT switch on the RAM Card is ON
Press [ EXIT ] then press [ WRITE/COPY ]
The LCD shows
Save to Card
Sound
Press [ PARAMETER GROUP △ ] once
The LCD shows
Load from Card
Sound
Press [ PARAMETER BANK △ ] twice
The LCD shows
Load from Card
All
Press [ ENTER ] The LCD asks Sure?
Press [ WRITE/COPY ] to confirm
The LCD briefly shows
Complete
Note: If after pressing [ WRITE/COPY ]
The LCD shows:
MemProtected
Turn off once ?
Simply press [ ENTER ] to continue
The LCD briefly shows:
No Data
Complete
 Instead of choosing ALL, you can load individual Sounds
Sound (Loads only the Tones, Timbres and Patches)
All (Loads all Tones, Timbres and Patches)
From Internal RAM To A Data RAM Card on a D‑110
Make sure the PROTECT switch on the RAM Card is OFF
Press [ EXIT ] then press [ WRITE/COPY ]
The LCD shows
Save to Card
Sound
Press [ PARAMETER BANK △ ] twice
The LCD shows
Save to Card
All
Press [ ENTER ] The LCD asks Sure?
Press [ WRITE/COPY ] to confirm
The LCD briefly shows
No Data
Complete
[ Backup All Of Your Patches And Tones Before Continuing! ]
From A Data RAM Card To Internal RAM on a D‑10
Make sure the PROTECT switch on the RAM Card is ON
Press [ DATA TRANSFER ]
The LCD shows
Card Select
Save Load
Press [ UPPER ] button to choose "Load"
The LCD shows
Card Load Select
All
Press the [ LOWER ] button to select “All”
The LCD shows
Card Load All
Sure? Enter
Press [ ENTER ] to confirm
The LCD shows
Turn Protect off
once? Write/Exit
Press [ WRITE ]
The LCD shows:
Card Load All
Sure? Enter
Press [ ENTER ]
The LCD shows
Complete
Instead of choosing ALL, you can load individual Rhythm/Sounds
Sound (Loads only the Tones, Timbres and Patches)
Rhythm Setup (Loads only the Rhythm Setup)
All (Loads all the Tones, Timbres, Patches and Rhythm Setup)
From Internal RAM To A Data RAM Card on a D‑10
Make sure the PROTECT switch on the RAM Card is OFF
Press [ DATA TRANSFER ]
The LCD shows
Card Select
Save Load
Press [ LOWER ] button to choose "Save"
The LCD shows
Card Save Select
All
Press the [ LOWER ] button to select “All”
The LCD shows
Card Load All
Sure? Enter
Press [ ENTER ] to confirm
The LCD shows
Turn Protect off
once? Write/Exit
Press [ WRITE ]
The LCD shows:
Card Save All
Sure? Enter
Press [ ENTER ]
The LCD shows
Complete
Instead of choosing ALL, you can save individual Rhythm/Sounds
Sound (Saves only the Tones, Timbres and Patches)
Rhythm Setup (Saves only the Rhythm Setup)
All (Saves all the Tones, Timbres, Patches and Rhythm Setup)
Custom Multi‑Bank RAM Cards
This amazing custom multi‑bank RAM card is a high quality item made in Germany. It's the equivalent of having 16 Roland M‑256 RAM cards on one device. It has switches on top so you can easily choose between the 16 individual banks. There's no battery and everything is stored on an MRAM chip. The cool thing is that this card works on my D‑110 and also works on other synths I own like the JV‑880, U‑20 and GR‑1. It has a lengthy compatibility list including the Roland A‑90, D‑5, D‑50, D‑550, D‑10, D‑70, JD‑800, JD‑990, JV‑1000, JV‑1080, JV‑2080, GR‑50, PM‑16, TR‑626, R‑880 (GC‑8), R‑8M, Akai MX‑1000, VX600 and others. It's possible to mix banks on one card so the ability to move this card between different model synths is convenient and a real money saver. For the DIY crowd, there are some interesting modifications discussed in the User Manual to emulate PCM ROM cards or increase the bank sizes anywhere from 16 x 256Kbit, 8 x 512Kbit, 4 x 1Mbit, 2 x 2Mbit or 1 x 4Mbit simply by adding some solder bridges
Update - January 2022: Sadly, Saga Musix no longer sells this RAM card but there is some Fantastic News! The designer of this multi‑bank RAM card has released the BOM and schematics into the DIY community for free. KiCAD PCB and Gerber files are available at github ‑or‑ you can order PCB's from OSH Park and build your own now for half the price of a brand new card . I have built six of these and they are all working great
DIY Your Own Multi-Bank RAM Card (External Web Link)
Multi-Bank RAM Card Info At Saga Musix (External Web Link)


Manufacturer
ALPS
Sony / JVC / Panasonic
Roland
Part Number
SDGA3P
554-880-12
13129124
Click Here For A Selection Of D‑10 and D‑20 Power Switches


Bypass chaotic front panel editing of the D-5, D-10, D-20 or D-110 with this ultra-rare accessory


Check Internal Battery
Battery Replacement GuideCheck Card's Battery
  Memory Protected
Turn off once?Card Protected
Card Write Error
Write Number Err
No Space
No Data
Card Not Ready
Read Only Card ‑ Couldn't Write
Illegal Card
PCM Memory Cards)Exclusive Buffer Full
Exclusive Data Checksum Error
Handshake Mode Timeout Occurred
Dump to MIDI Rejected


IC19 on the PCB
Date Code =========================== VER. 1.01 [ 88/xx/xx ] VER. 1.02 [ 88/xx/xx ] VER. 1.03 [ 88/xx/xx ]* Final ROM IC VersionVER. 1.04[ Not Released ]VER. 1.05[ Not Released ] VER. 1.06 [ 88/04/05 ] VER. 1.07 [ 88/06/14 ] VER. 1.08 [ 88/xx/xx ] VER. 1.09 [ 88/xx/xx ] VER. 1.10 [ 88/08/30 ] VER. 1.11 [ 89/04/14 ] VER. 1.12 [ 89/12/22 ] VER. 1.13* [ 90/05/23 ] ===========================
 D-110 ROM IC Bug Fixes

IC14 (A) & IC13 (B) on the Main Board
              Date Code
======================
VER. 1.01  [ unknown ]
VER. 1.02  [  05D8   ]
VER. 1.03  [  12D8   ]
VER. 1.04  [ unknown ]
VER. 1.05  [ unknown ]
VER. 1.06  [  16C9   ]
VER. 1.10  [  27E8   ]
VER. 1.11  [  14G8   ]
VER. 1.12* [ unknown ]
======================
* Final ROM IC Version D-10 ROM IC Bug Fixes
5 Octaves
64 Programmable Tones / 63 Preset Rhythm Tones
32 Maximum Voices
5 Octaves
64 Programmable Tones / 63 Preset Rhythm Tones
32 Maximum Voices
5 Octaves
64 Programmable Tones / 63 Preset Rhythm Tones
32 Maximum Voices
64 Programmable Tones / 63 Preset Rhythm Tones
32 Maximum Voices
Battery Replacement DIY 
Tips For DIY Freaks Who Like To Save $$$. I picked this selection of gadgets and vendors because of the extremely LOW cost. I use everything shown here almost every day and highly recommend each one
Favorite DIY Tools And DIY VendorsOther Synthesizer And Sampler Homepages I Maintain
Safety Precautions and Disclaimer
Modifications made to any factory stock equipment will always pose an element of risk. Sometimes mistakes are made which are irreversible. Improper soldering and handling of electricity can cause serious injury and damage the synthesizer. Use caution when handling static sensitive devices and the PCB. Make sure you are properly grounded, working on a static‑free workbench or table and wearing eye protection during any soldering tasks. The author is not responsible for any damage or injury resulting from this DIY info. Use this DIY information at your own risk. And, I can't stress enough, the importance of wearing eye protection while soldering. That stuff flies everywhere sometimes!
Modifications made to any factory stock equipment will always pose an element of risk. Sometimes mistakes are made which are irreversible. Improper soldering and handling of electricity can cause serious injury and damage the synthesizer. Use caution when handling static sensitive devices and the PCB. Make sure you are properly grounded, working on a static‑free workbench or table and wearing eye protection during any soldering tasks. The author is not responsible for any damage or injury resulting from this DIY info. Use this DIY information at your own risk. And, I can't stress enough, the importance of wearing eye protection while soldering. That stuff flies everywhere sometimes!
| If you find some of this DIY info useful, please consider donating a small amount. All donations are used for future DIY synth development and free info. Thanks! | |
All images, text, JavaScript and HTML Code ©1995-
by llamamusic.com
The Information On This Page Is Current As Of
The Information On This Page Is Current As Of
WEBSITE DISCLAIMER
Last updated October 31, 2014
1) You may not copy, reproduce, republish, disassemble, decompile, reverse engineer, post, make available to the public, or otherwise use the content of this website (including all software applications, scripts, web‑pages, design elements, and graphics) for commercial gain in any way
2) By using the llamamusic.com website and its services you agree to be bound by these terms, which shall take effect immediately on your first use of this website. You may not use llamamusic.com services if you do not accept the terms. If you do not agree to be bound by all of the following terms please do not access and use llamamusic.com. llamamusic.com reserves rights to block violators of these terms from using its services or restrict their access in any form at any time
3) You agree that lawful owners of llamamusic.com own all legal right, title, copyrights, design rights, and other intellectual property rights (registered and unregistered) in this website and all content (including all software applications) located on the site
4) llamamusic.com website content and services are provided "AS IS" and on an "AS AVAILABLE" basis. To the extent permitted by law, llamamusic.com excludes all representations and warranties (whether express or implied by law), including the implied warranties of satisfactory quality, fitness for a particular purpose, non‑infringement, compatibility, security, and accuracy. llamamusic.com does not guarantee the accuracy, completeness, or performance of the website or any of the content and services. While we try to ensure that all functionality provided is correct, no responsibility is accepted by or on behalf of llamamusic.com for any errors or inaccurate content on the website
5) llamamusic.com shall not be liable for any of the following losses or damage (whether such damage or losses were foreseen, foreseeable, known, or otherwise): (a) loss of data; (b) loss of revenue or anticipated profits; (c) loss of business; (d) loss of opportunity; (e) loss of goodwill or injury to reputation; (f) losses suffered by third parties; or (g) any indirect, consequential, special or exemplary damages arising from the use of llamamusic.com and its services regardless of the form of action
6) You agree to use this website only for lawful purposes, and in a way that does not infringe the rights of, restrict or inhibit anyone else’s use of llamamusic.com
7) The information provided by llamamusic.com ("we," "us," or "our") on llamamusic.com (the "Site") is for general informational purposes only. All information on the Site is provided in good faith, however we make no representation or warranty of any kind, express or implied, regarding the accuracy, adequacy, validity, reliability, availability, or completeness of any information on the Site. UNDER NO CIRCUMSTANCE SHALL WE HAVE ANY LIABILITY TO YOU FOR ANY LOSS OR DAMAGE OF ANY KIND INCURRED AS A RESULT OF THE USE OF THE SITE OR RELIANCE ON ANY INFORMATION PROVIDED ON THE SITE. YOUR USE OF THE SITE AND YOUR RELIANCE ON ANY INFORMATION ON THE SITE IS SOLELY AT YOUR OWN RISK
EXTERNAL LINKS DISCLAIMER
The Site may contain (or you may be sent through the Site) links to other websites or content belonging to or originating from third parties or links to websites and features in banners or other advertising. Such external links are not investigated, monitored, or checked for accuracy, adequacy, validity, reliability, availability, or completeness by us. WE DO NOT WARRANT, ENDORSE, GUARANTEE, OR ASSUME RESPONSIBILITY FOR THE ACCURACY OR RELIABILITY OF ANY INFORMATION OFFERED BY THIRD‑PARTY WEBSITES LINKED THROUGH THE SITE OR ANY WEBSITE OR FEATURE LINKED IN ANY BANNER OR OTHER ADVERTISING. WE WILL NOT BE A PARTY TO OR IN ANY WAY BE RESPONSIBLE FOR MONITORING ANY TRANSACTION BETWEEN YOU AND THIRD‑PARTY PROVIDERS OF PRODUCTS OR SERVICES
AFFILIATES DISCLAIMER
The Site may contain links to affiliate websites. Our affiliates include the following:
• supersynthprojects.com • vecoven.com • super-jx.com
